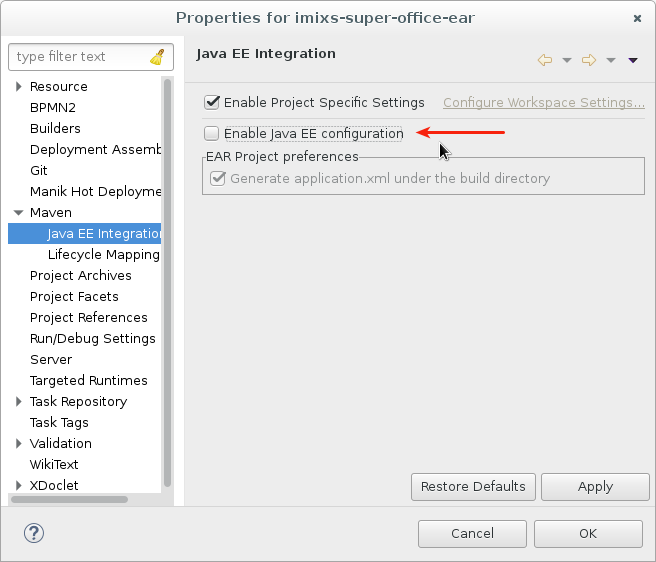
Eclipse Mars hangs on XML Validation

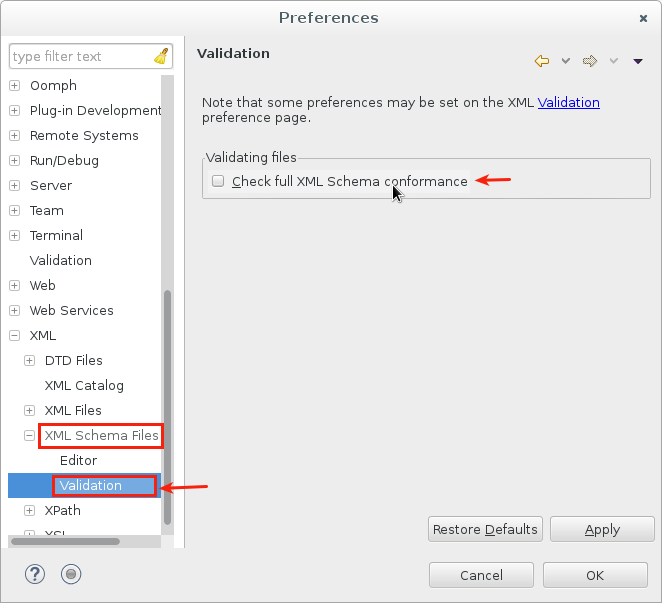
Eclipse Mars is a great IDE which a lot of performance improvements against older versions of Eclipse. But I still have in some workspaces the problem that my Eclipse IDE hangs during validation of XML files of my Web Projects (e.g. web.xml or faces-config.xml). This problem is well known for the Eclipse IDE. To solve this problem in Eclipse Mars it is sufficient to disable the Validation of  “XML Schema Files”.

eclipse-xml-validation

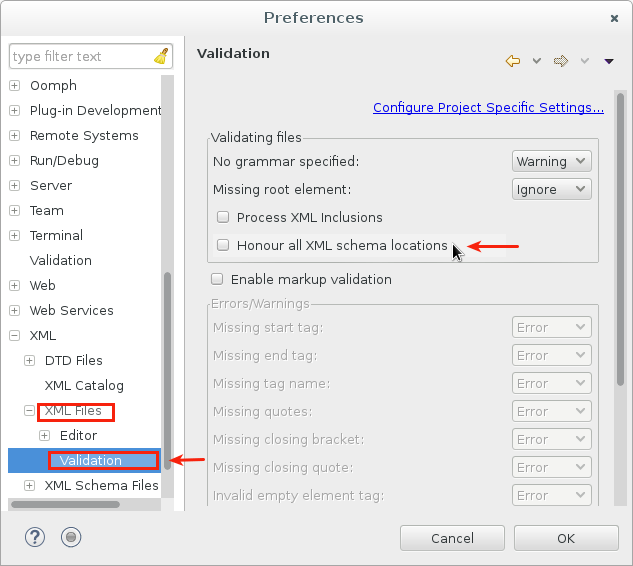
and also disable the Option “Honour all XML schema location” for the XML Files validation.

eclipse-xml-validation2

If you disable this options, Eclipse will be faster after updating xml files.

Jenkins – How to Deploy an Artifact Into a Custom Directory

It takes me some time to figure out the right way to deploy an artifact with Jenkins. After a successful build, I wanted to deploy the generated EAR file into a custom directory of my server. After trying several plugins the Artifact Deployer Plugin  seems to me the best solution.

jenkins-01

With this plugin installed you can add a ‘Post-Build-Action’ to your project. The Artefact location can be specified using the wildcards “**/*.war” or “**/*.ear”.  In case of a Maven Project it’s not necessary to add a Base Dir location like it was in earlier releases. The ‘Remote File Location’ is just your target directory. You have also an option to disable the deployment in case the build failed.

So that’s it. If you know other solutions (especially for Wilfly) let me know.

Wildfly – Debugging JPA / Eclipselink

It take me some time to figure out how to debug the JPA / EclipseLink implementation running on Wildfly. My goal was to log the SQL statements generated by EclipseLink.

It’s not necessary to modify the persistance.xml file. Just add into the standalone.xml file the following additional logger categories:

 <logger category="org.eclipse.persistence.sql">
 <level name="DEBUG"/>
 </logger>
 <logger category="org.jboss.as.jpa">
 <level name="DEBUG"/>
 </logger>

And change the log level from the console-handler from ‘INFO’ to ‘DEBUG’

<console-handler name="CONSOLE">
 <level name="INFO"/>
 <formatter>
 <named-formatter name="COLOR-PATTERN"/>
 </formatter>
 </console-handler>

Restart wildfly which is now logging all JPA information.

Microservices, Verticals and Business Process Management?

If you think about modern architecture, you will possibly find that one of the best solution (for the moment) seems to be a microservice architecture. Microservices are a quite different approach as we followed in the past, where we often designed monolithic enterprise applications. In a monolithic application context a single software system is encapsulating the business-logic, the database-layer and the UI components. The Java EE architecture provides a perfect framework to build such kind of applications to be deployed and executed in a scalable and transactional application server environment.

microservices_verticals_bpm-00

But monolithic enterprise applications are sometimes difficult to maintain, even if only little changes need to be made to one of its components. This is one reason why the idea came up to split a monolithic application block into several microservices.

One of the question is, how to change the architecture from a monolith approach to a modern service based architecture? A good overview what this means can be read in Christians Posta’s Blog.

Vertical Services

At the first look it seems to be easy to separate business logic into isolated services. But often this approach ends with a closely spaced set of microservices, which are not really loose coupled. One of the reasons can be the database layer which survives as a monolithic block behind all the new microservices. This happens when we think that database objects are related to each other. And this is only a very realistic picture of our real business world. But this creates complex synchronization points between all of our services and teams and you have to coordinate all of the changes in the database layer. Often a database change caused by one service affects also other services.

microservices_verticals_bpm-01

One solution to solve this problem can be, dividing the functionality into cohesive “verticals”, which are not driven by technical or organizational aspects. Each vertical will have its own “business logic”, “database” and an optional “UI component”. With  this approach, we don’t need to re-deploy the entire monolithic business-service tier, if we made changes to a single database object or a functionality of one of these verticals. Ideally, a single team can own and operate on each vertical as well.

microservices_verticals_bpm-02


Usually, it is recommended to control the synchronization between the services by sending events. The approach behind this idea is the “Reactive Programming” style. The communication between the services is realized in an asynchronous way . So the business logic of one service layer did not depend on the result of another service layer. A service may or may not react on a specific event. And this is the idea of loose coupling.

But does this fit your business requirements?

The “Business Process Service Architecture”

One problem with decoupling the business logic into separate services is the fact, that there still exists an “Over-All-Business-Logic” behind all these services. This is known as the “Business Process.” If, in our example above, the Order-Service, Invoice-Service and Logistic-Service are implemented as separate building blocks, there is still the general bussiness process of the “Ordering-Management” in the background defining states and business rules. For example if a product is ordered by a customer (Order-Service) the product may not be shipped (Logistic-Service) before an invoice was sent to the customer (Invoice-Service). So it is not sufficient, if the Invoice-Service and the Logistic-Service react asynchronously on a new event, triggered by the Order-Service, without reflecting the business process.

What we can do now, is defining separate events indicating each phase in the Order-Management-Process. For example the Order-Service can send an “Order-Ready-For-Invoice-Event” to signal that the invoice need to be send. And a new “Order-Ready-For-Shipment-Event” can be triggered by the Invoice-Service to indicate that the invoice for the order was sent to the customer and the product can be shipped. But now we have again created the same problem as we had before with the common database. We couple our services via specific event types which are reflecting our business process. The business process is now spread across various services.

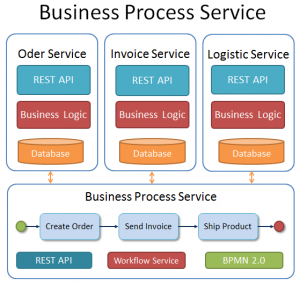
To avoid this effect of tightly coupled services we can separate the business process itself as a service. This means that we move the Over-All-Business-Logic out of our services and provide a separate new service layer reflecting only the business process.

Business-Process-Service-Architecture

I will call this a “Business-Process-Service-Architecture”. In this architecture style each service layer depends on the business-process-service.  Events are sent only between a vertical and the Business-Process-Service layer. Our Order-Service, Invoice-Service and Logistic-Service may or may not react on those process events. The advantage of this architecture is, that we now have one service which controls the ordering management process and is reflecting the state for each process instance. Each vertical can call the business-service layer to query the status of the Over-All-Business-Process and also use these workflow information for further processing. Also we can change our business process independent from our vertical service layers.

BPMN 2.0 and Workflow Engines

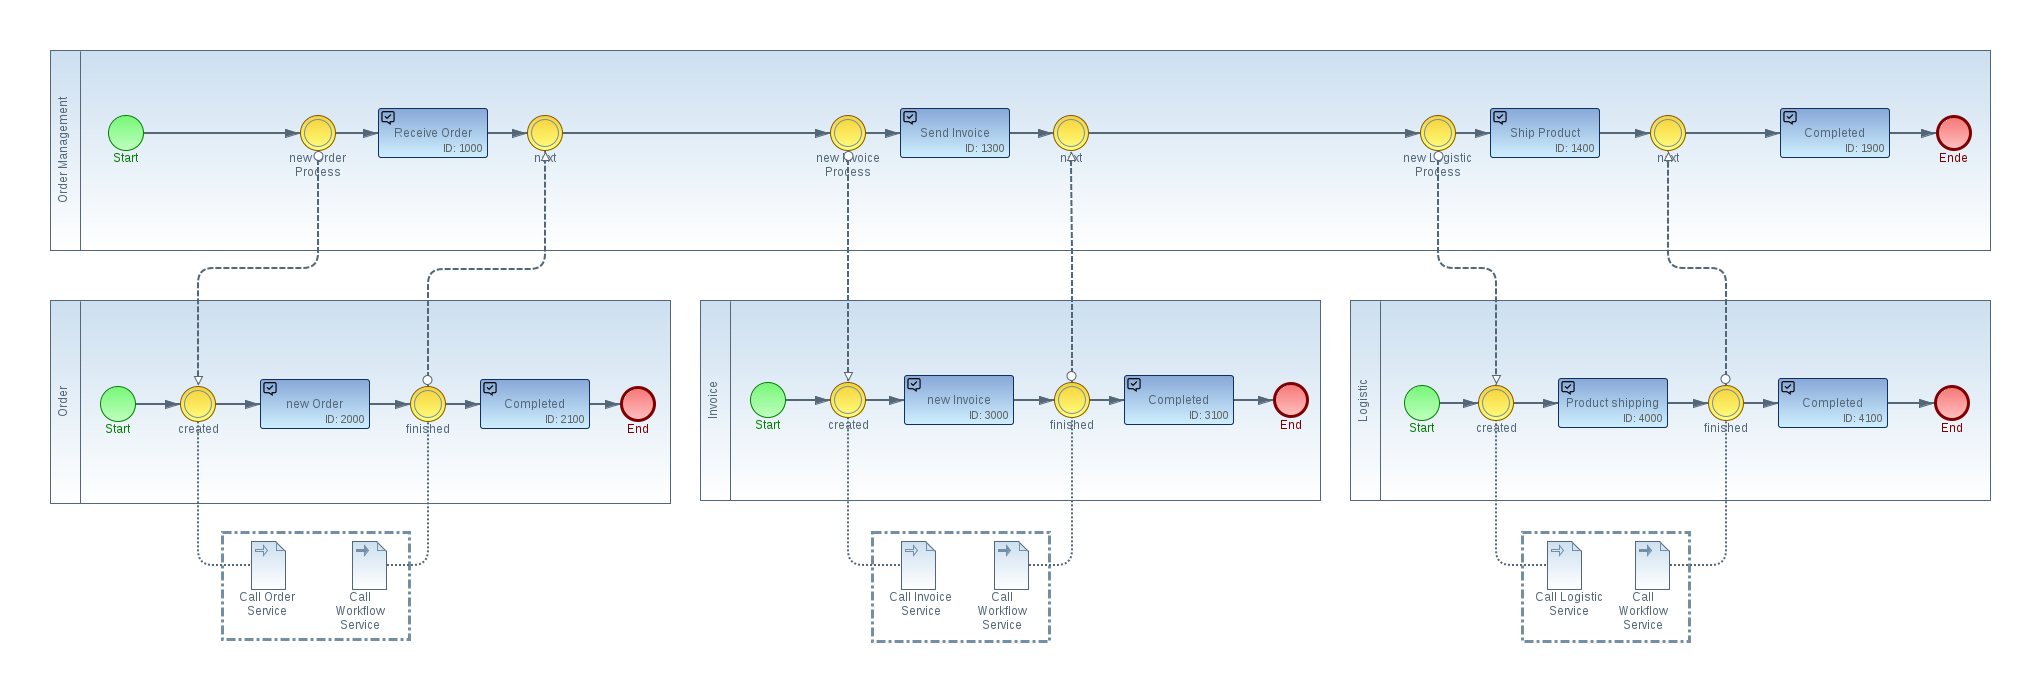
One of the most common technologies to describe a business process is the ‘Business Process Model and Notation’ – BPMN 2.0 standard. BPMN was initially designed to describe a business process without all the technical details of a software system. A BPMN diagram is easy to understand and a good starting point to talk about a business process with technician as also with management people. Beside the general description of a business process, a BPMN model can also be executed by a process or workflow engine. The Workflow Management System controls each task from the starting point until it is finished. So based on the model description the workflow engine controls the life-cycle of a business process. An example of a workflow engine which can be integrated into a Business Process Service Architecture is the Open Source project Imixs-Workflow.

Beside the general control of the business process, our new service can also collect any kind of meta information from our verticals. The service becomes the central information point in our microservice architecture. We can now change our business process model and integrate new verticals without affecting existing implementations. We have finally decoupled our services. This is one of the most important effects you can achieve with this architecture style.  In a future article I will show an example how to integrate a Business Process Service based on a RESTfull service interface.

Continue Reading: How to Design a Business Process Service Architecture

Warum Dreicksgeschäfte in der IT nicht funktionieren

Dreiecksgeschäfte beschreiben in der Wirtschaft eine Situation, in der eine Ware nicht direkt zwischen zwei Vertragsprartnern gehandelt wird, sonder über einen dritten Partner in einer Dreieckbeziehung. Ein Beispiel hierfür ist eine Möbelfabrik, die zur Herstellung ihrer Möbel Holz von einem Waldbesitzer bezieht. Zu einem Dreiecksgeschäft kommt es, wenn ein neuer Marktteilnehmer diesen Bedarf wahrnimmt und das Holz des Waldbesitzers kauft, um dieses an die Möbelfabrik weiter zu verkaufen. Die Möbelfabrik könnte zwar das selbe Holz in gleicher Menge und Qualität vom Waldbesitzer beziehen, wickelt den Handel jetzt aber über den neuen Markteilnehmer ab. Continue reading “Warum Dreicksgeschäfte in der IT nicht funktionieren”

Is Reactive Programming the Holy Grail?

Architecture and system design is involving rapidity in the last years. We are talking about Rest Services, Microservice Architecture and about reactive programming. The last one is sometimes a kind of mystery because it often sounds like it is the holy grail in modern software design. A good overview about this programming paradigm and its difference to other concepts can be read in David Bushmans article.

Reactive programming is an important architecture style but it can bring also a lot of new complexity in your application design. Lets explain me this in an example:

Imagine the following software design: Our company is selling products not only online but also via service agents. On the one side we have a business application which is managing all the orders. After a new order was processed by the service agent first an invoice need to be send to the customer. After that our company ships the product to the customer. For the invoice process we want to use a cloud service which is developed by another developer team. So let’s think about how the order and invoice process can be handled by our business application. No doubt, we want to use a restful service interface between our business application and the invoice cloud service. We can design our solution with the following rest service based interaction between the two services:

Reactive Programming - synchronized services

The invoice service provides a rest service interface where we can post a new order. All we have to do is to send the order data to the service. If we got a HTTP response 200 we know the invoice was successfully processed and we can ship our product. After the customer has paid the invoice the cloud service will do the same in the other way. Our business application offers a rest service where the invoice service can post the payment data. We respond with HTTP 200 to signal the invoice service that we have received the payment information and updated the order status. So finally the service agent can verify and close the order.

This all works fine and after all this is no bad software design. But we did not make use the reactive programming paradigm here. This means we have all the bad stuff of synchronous and IO blocking architecture. Your service calls are implemented by a model called “one-request-per-thread” and those threads can spend a significant amount of time in “IO Waiting” states due to blocking I/O calls and not doing work. You can see this in the sequence diagram above. So our service agent can maybe have a bad performance when creating a new order.

Reactive Services

How can we change the design into a non blocking reactive style which is often called as faster, better, cheaper? Again we are convinced in our restful service interfaces. But now we decouple both systems better to get faster response times.

Reactive Programming - asynchronous services

What you can see here is a different solution of the same problem. Now the invoice service provides still a rest service interface but this time we are just sending the order data in a non blocking style. The invoice service handles the creation of the invoice asynchronous. This means our first request is now much faster and is not waiting until the invoice is processed by the invoice service. The invoice service can scale much better and our business application is not blocked. After the invoice was processed by the invoice service, the service calls our business application and sends the invoice number for the order request. This also did not block our invoice service because we just accept the invoice number to be stored in a queue. Our business application can check the data of the invoice asynchronous to see if the invoice was successfully created and sent to the customer. If so our application can update the order status. The service agent can check the status of the order to see if he can ship the product.
Finally, when the customer has paid the invoice, we will do implementing the same concept for the processing the payment. The invoice service just sends a payment event to the business application. The business application can process this event again asynchronously and can request the payment data from the invoice service without blocking other threads. So the service agent can check the payment status and can finally close the order in our business application.

Is it Better, Faster, Cheaper?

We have decoupled our systems much better and followed the reactive programming paradigm. But what does this mean for our business case as a whole? Remember – in our example the order was processed by a service agent ‘manually’. Our company don’t want to ship products without sending an invoice first. This means when our service agent is processing the orders he now will only receive a message from the invoice service that the invoice was sent to be processed in the other system. This means our service agent can not ship the products yet. He has to stop his work and check again the order status after some period of time. And this will change the whole organisation of the business process. Users still can’t wait! So what will happen is that our user will change the way he is processing the customer’s orders. One day he will enter only the order data into the system of all new orders. The next day he will check all the orders form the day before and verify if the invoice was sent so he can ship the products. You can see that now our IT system performs much better, but our customer has to wait one day longer to receive our product! The same use case can happen with the payment process. When the customer has paid and calls our company to ask if the payment was received, our service agent can again not answer immediately. He can only tell the customer that a payment information was received, but he can not check this in time, because our business application was maybe still not able to receive the payment data and update the order information. Our customer will at all not be very happy with our service.

Conclusion

I had to overstate slightly the scenario to point out that the response time is not the only criteria for good software design. It is important to verify whether a synchronized status of an business object is more important to the business case than the response time of an IT system.  Reactive software design is important for decoupled systems with massive automated business processes and can solve a lot of performance issues. But not always this is the scenario your application has to deal with.
So you should carefully think about when to use reactive programming style and when it is a better choice to accept a “one-request-per-thread” blocking system. In any case it is important to understand the concepts of a shiny new architecture before starting with your new application design.

WildFly – Reverse Proxy via SSL

In many web architectures it is common to access a Java EE Application through a reverse proxy server. A reverse proxy can be used for example as a dispatcher to redirect users to different servers or switch to a standby server in a failover scenario. Another typical use case is to run a dispatcher as the SSL Endpoint for a Java EE application. traefik.io or Squid are common tools to provide such a functionality. If you are running Wildfly behind such a reverse proxy server for SSL Endpoints you need to take care about some configuration issues.

Run Wildfly in HTTP only

In case you run Wildfly behind a modern reverse proxy like traefik.io things should work out of the box. It is fine for these scenarios that Wildfly is accessed by HTTP only. The reverse proxy in this scenario the SSL termination endpoint.

proxy-address-forwarding=”true”

A problem within this scenario ocures in JSF applications when a redirect is used. Such a redirect scenario is typical for JSF applications where a navigation rule uses a <redirect/>.

In this case Wildfly is not aware of the proxy and so it sends a HTTP redirect (302) which will lead to a situation where an already established SSL connection will be lost. To avoid the loss of SSL connections inside your WildFly application you need to add the HTTP header parameter into the HTTP listener of your dispatcher:

proxy-address-forwarding="true"

This will hold the existing SSL connection also for HTTP redirect 302. The complete configuration will look like this:

<subsystem xmlns="urn:jboss:domain:undertow:11.0" default-server="default-server" default-virtual-host="default-host" default-servlet-container="default" default-security-domain="other" statistics-enabled="${wildfly.undertow.statistics-enabled:${wildfly.statistics-enabled:false}}">
            <buffer-cache name="default"/>
            <server name="default-server">
                <http-listener name="default" socket-binding="http" redirect-socket="https" proxy-address-forwarding="true" enable-http2="true"/>
                <https-listener name="https" socket-binding="https" security-realm="ApplicationRealm" enable-http2="true"/>
                <host name="default-host" alias="localhost">
                    <location name="/" handler="welcome-content"/>
                    <http-invoker security-realm="ApplicationRealm"/>
                </host>
            </server>
            <servlet-container name="default">
                <jsp-config/>
                <websockets/>
            </servlet-container>
            <handlers>
                <file name="welcome-content" path="${jboss.home.dir}/welcome-content"/>
            </handlers>
        </subsystem>

The important part is the http-listener configuration wich now enables proxy-address-forwarding.

So this is the most easy configuration for wildfly running behind a reverse proxy. Only if you need to run Wildfly a an SSL Endpoint than continue reading the next section.

Run WildFly as an SSL Endpoint

To access an application running on Wildfly through a reverse proxy per SSL it may be necessary to enable also HTTPS connections in Wildfly. This means Wildfly is the SSL termination endpoint. Per default the WildFly server is only allowing HTTP connections. To enable HTTPS you need first to create a certificate and add this into the standalone.xml. Here are the steps to go:

(1) Create a Certificate 

(1.1) Self-signed Certificate:

Using the linux keytool you can easily create your own private certificate and store it into the  / configuration/ directory in Wildfly:

cd /opt/wildfly/standalone/configuration/
keytool -genkey -alias local-wildfly-cert -keyalg RSA -sigalg MD5withRSA -keystore local-wildfly-cert.jks -storepass adminadmin  -keypass adminadmin -validity 9999 -dname "CN=Server Administrator,O=MyOrg,OU=com,C=DE"

Replace the password and organisation name with appropriate values.

(1.2) CA-Certificate

Only in case that you already have an existing CA-Certificate and you want to use it for wildfly directly you can create the keystore file for wildfly with the openssl command line tool:

openssl pkcs12 -export -in yourdomain.com.crt -inkey yourdomain.com.key -out yourdomain.com.p12 -name local-wildfly-cert -CAfile your_provider_bundle.crt -caname root -chain

You need to define a password for the generated cert file. The pk12 file can now be imported into the keystore with the following command

keytool -importkeystore -deststorepass <secret password> -destkeypass <secret password> -destkeystore yourdomain.com.jks -srckeystore yourdomain.com.p12 -srcstoretype PKCS12 -srcstorepass <secret password used in csr> -alias local-wildfly-cert

The password again is needed for the configuration in wildfly.

(2) Configure a security realm

After you have generated the .jks file you can now add a new SecurityRealm with the name “UndertowRealm” in the standalone.xml file. This security realm is used to established https connections for wildfly/undertow later.  Add the following entry into the section “security-realms” of the standalone.xml file:

..... 
  <security-realm name="UndertowRealm">
      <server-identities>
         <ssl>
           <keystore path="local-wildfly-cert.jks" relative-to="jboss.server.config.dir" keystore-password="adminadmin" alias="local-wildfly-cert" key-password="adminadmin"/>
         </ssl>
      </server-identities>
  </security-realm>
</security-realms>

The new realm is using the local SSL certificate created before.
Note: Take care about the location of your key files.

(3) Setup the HTTPS Listener

Finally you need to update the http and https-listeners for undertow in the standalone.xml. Edit the server section ‘default-server’ in the following way:

.......
<server name="default-server">
 <http-listener name="default" socket-binding="http" proxy-address-forwarding="true"/>
 <https-listener name="https" socket-binding="https" security-realm="UndertowRealm"/>
   ....
.....

Note: Be careful about changing both listener settings – http and https! The default setting redirect-socket=https from the http-listener must be changed in proxy-address-forwarding=true.

The default port for https in wildfly/undertow is 8443. So you can test your https setup now with a direct https request:

https://myserver:8443/myapplication

See also more discussion here.

Wildfly – Logging

To activate logging for a specific category (path/class) from a deployed application follow these steps:

  1. Open the Wildfly Admin Console
  2. Switch to “Configuration -> Subsystem :Logging”
  3. Change the Console Loglevel to ‘FINE’ (or higher in case you need finer log levels) – default is ‘INFO’
  4. Add a new Log Category (Tab: Log Categories) with the following settings:
    • Category = package or class
    • Level = FINE (or higher in case you need finer log levels)
    • Use parent handler=true

How to use JSF 2.0 as an Action-Based-Framework

JSF is a common used and widely spread Web-Framework with a lot of powerful features and a great community. But JSF also follows a concept which is not comparable to Action-Based or Request-Based Frameworks like MVC 1.0 or Spring MVC. The concept behind JSF is a so called Event- or Component-Based Framework (alternative therm is MVC-Pull). This approach gives you a lot of flexibility in developing web applications, but it also includes some problems. What you often see in JSF  applications is, that URLs are not bookmarkable and you can not use the browsers History-Back button. This makes the behavior of JSF a little bit clumsy to the end-users.  I will explain  in this post how to solve this ‘problem’ in an elegant way without abusing JSF.

The Problem

The problem with the non bookmarkable URLs and the ugly situation that we can not use the Browser History-Back Button in a JSF application is founded in the so called Postback mechanism.  Each time you use a JSF Command-Action like a <h:commandButton> or a <h:commandLink>, JSF generates a Form Post, computes the resulting web site internally and posts back the markup to the browser. This is the natural behavior of the HTTP POST method and very efficient because the browser is not forced to load a new page. But if you want to change the page content/url the user is faced with a usability problem. The following two pages illustrating the problem:

page1.xhtml:

...
<h:body>
 <h:form>
 <h1>Page1</h1>
 <h:commandLink action="/page2">Go to Page2</h:commandLink>
 </h:form>
</h:body>

page2.xhtml:

...
<h:body>
 <h:form>
 <h1>Page2</h1>
 <h:commandLink action="/page1">Go to Page1</h:commandLink>
 </h:form>
</h:body>

If you test this page example you will see that the browser URL did not correspond with the page you see. Command-Actions are very powerful and we need them in situations where we want to submit the user input. But for simple navigation there is another tag introduced in JSF 2.0 which should be used instead of a command action. The <h:link> and <h:button>. In the next example you can see how the two pages work when we use this new JSF component:

page1.xhtml:

...
<h:body>
 <h1>Page1</h1>
 <h:link outcome="/page2">Link to Page2</h:link>
</h:body>

page2.xhtml:

...
<h:body>
 <h1>Page2</h1>
 <h:link outcome="/page1">Link to Page1</h:link>
</h:body>

Now when the user clicks on one of the page links the browser url is updated correctly because a HTTP GET request is initiated. This is the correct way to implement a page navigation in JSF.

Rule No. 1: Never use a command-action to navigate between pages


The Action Controller

In most situations it is not sufficient to simply navigate between to pages. What we need is business logic to be called when the user clicks on the navigation link to open a new page. Command Actions providing a lot of functionality to solve this problem. And this is also the reason why command actions are often used in JSF.  To control the outcome of a page after the user clicks on a action link is called an Action Controller. A Action Controller is in most cases a request-scoped CDI bean. So what we can do here is to bind the outcome attribute of the <h:link> component to a CDI Bean method like seen in the following example:

page1.xhtml:

...
<h:body>
 <h1>Page1</h1>
 <h:link outcome="#{myActionController.action1()">Link to Page2</h:link>
</h:body>

MyActionController.java:

@Named
@RequestScoped
public class MyActionController implements Serializable {
 private static final long serialVersionUID = 1L;
 public String action1() {
 // your code goes here.....
 return "/page2";
 }
}

The ugly part of this solution is that the action controller have to know the page name. So the action controller is tightly coupled to our JSF pages. (By the way, we see exactly the same coupling in MVC 1.0 examples.) In addition in this solution we need to make sure hat every link navigating to page2 is calling our action method. But a more complicating problem is that the action controller is not called if the user opens the page2 form a bookmarked URL!

So lets look on a better solution: We can place the ActionController directly into the page view. This  can be done by the new JSF 2.0 component <f:event> inside a the JSF component <h:view>. With the f:event type we can specify the jsf life-cycle phase where the action controller should be called.  See the next example:

page1.xhtml:

...
<h:body>
 <f:view>
  <f:event type="preRenderView" listener="#{myActionController.init()}" />
   <h1>Page1</h1>
   <h:link outcome="/page2">Link to Page2</h:link>
 </f:view>
</h:body>

MyActionController.java:

@Named
@RequestScoped
public class MyActionController implements Serializable {
 private static final long serialVersionUID = 1L;
 public void init() {
 System.out.println("...initializing action controller....");
 }
}

This solution ensures that your ActionController is always called before the page is rendered.

Rule No. 2: Avoid binding controller methods to a navigation link

If you do some tests with the ActionController example you will notice that the init() method of the ActionController is not called if the user clicks the Browser History-Back Button to enter the page. This again is not a problem of JSF but of the caching behavior of Web Browsers. See a good blog post about this topic here.

The JSF Command-Action and Postbacks

Now lets take a look on the JSF command action. As I mentioned earlier the JSF command actions are useful if you want to submit the users input from a input form.

<h:form>
 <h1>Form1</h1>
 <h:inputText value="#{myActionController.orderDate}" >
    <f:convertDateTime pattern="dd.MM.yyyy" timeZone="CET"/>
 </h:inputText>
 <h:commandButton action="#{myActionController.submitOrder}" value="submit"/>
 </h:form>

In this example the submit action button triggers our action controller method ‘submitOrder()’. Thus a method typically implements our business logic to persist or update data. JSF exepcts a public method returning a String which points to the resulting page outcome. See the following example:

 public String submitOrder() {
   // your code goes here....
   return "/page2";
 }

If you do some tests, you will see that a click on the submit button will produce a HTTP POST method call and the page content will result in the markup of page2. As this was a postback the browser URL has not updated. Another problem seen here is that we now have again the situation where our Action Controller have to now the page name.

To avoid this problems simple make use of another JSF command action attribute called ‘actionListener’. With EL 2.2 we can call any method of a CDI bean with or without parameter. The action attribute itself can now be used for the navigation part. In case we want to navigate to another page we still have the Postback problem. But JSF 2.0 allows to force a redirect by adding the query parameter ‘?faces-redirect=true’ at the end of the navigation path.

<h:commandButton actionListener="#{myActionController.submitOrderByListener()}"
 action="page2?faces-redirect=true" value="submit"/>

ActionListener method:

 public void submitOrderByListener() {
   // your code goes here....
   System.out.println("ActionListener called...");
 }

The result of the faces-redirect=true is also known as the Postback/Redirect/Get (PRG) pattern. The browser will receive a HTTP result 302 with the new URL to be redirected to.

Rule No. 3: Use faces-redirect=true to force Posteback/Redirect/Get pattern

Conclusion

As you can see, JSF 2.0 is a powerful framework which can be used also to implement web application with a request-based behavior as it is typically for modern web applications. Take care of the following rules:

Rule No. 1: Never use a command-action to navigate between pages
Rule No. 2: Avoid binding controller methods to a navigation link
Rule No. 3: Use faces-redirect=true to force Posteback/Redirect/Get pattern

I hope this blog post will help someone to get out the most of JSF. If you have any ideas or questions post your comments.

Debian Jessie – problem with suspend mode after closing laptop lid

With my ultrabook “Wortmann Terra Mobile 1450 II” running on Debian Jessie I have had a problem with the suspend mode. When I close the laptop lid the laptop goes into suspend mode, and after reopening the lid the laptop awakes. But than after some seconds the laptop goes back into suspend mode. That was an annoying problem.

I solved this after reading this stackexchange question. After playing around with some settings is seems that suspend mode is not working correctly with my hardware wen closing/opening the lid. My solution is now to set the machine in hibernate mode instead of suspend mode. This can be done by setting the following flag in the ‘/etc/systemd/logind.conf’ file.

HandleLidSwitch=hibernate

It takes now some seconds until the ultrabook is in hibernate mode and it needs a complete boot when opening the lid, but thanks to the SSD hard-disk this is quite fast.