
During an Upgrade from Wildfly 27.0.1 to Wildfly 29.0.1 I run into a compatibility problem with the GraalVM Script engine which we are using in our Open Source Workflow engine Imixs-Workflow.
Continue reading “Using GraalVM Script Engine with Wildfly 29”Jakarta EE9 – Wildfly – Elytron – SecurityDomains
With version 11 Wildfly introduced a complete new security concept named ‘Elytron’. This security concept is a little bit confusing on the first look if you have worked with previous versions of Wildfly. To be honest I personally recognized the Elytron framework with version Wildfly 24. Even it it is well documented it took me a while until I get things working. Initially I came across the configuration concept during migrating the Imixs-Workflow project form Jakarta EE8 to Jakarta EE9. As we are using docker images to run our applications we are configuring the Wildfly server by the standalone.xml file and not via the CLI provided by Wildfly. In the following I will show what is important to get a Jakarta EE9 application work with Elytron.
The Elytron Subsystem
Wildfly is separated in its core into subsystems. Each subsystem has its own configuration section in the standalone.xml file. For the Elytron subsystem this is urn:wildfly:elytron:14.0.
If you look into the subsystem configuration you can see that a security domain is split now into the domain and the realm section. A simple FileBased security realm with the realm name ‘imixsrealm’ will look like this:
        <subsystem xmlns="urn:wildfly:elytron:14.0" final-providers="combined-providers" disallowed-providers="OracleUcrypto">
.....
            <security-domains>
.....
              	<!-- imixsrealm filerealm configuration   -->
		<security-domain name="imixsrealm" default-realm="imixsrealm" permission-mapper="default-permission-mapper">
			<realm name="imixsrealm"/>
		</security-domain>
            </security-domains>
            <security-realms>
....
                <!-- imixsrealm filerealm property files -->
                <properties-realm name="imixsrealm" groups-attribute="Roles">
			<users-properties path="sampleapp-users.properties" relative-to="jboss.server.config.dir" digest-realm-name="Application Security" plain-text="true"/>
			<groups-properties path="sampleapp-roles.properties" relative-to="jboss.server.config.dir"/>
		</properties-realm>
            </security-realms>
.....
        </subsystem>
I added a security-domain with the name ‘imixsrealm’ and also a properties-realm section with the same name where I define the users and roles property files. The attribute plain-text="true" indicates that you store the password in plaintext, which makes testing much easier. Place the sample-app-roles and users property files into the standalone/config/ directory. Do not modify the other sections of the Elytron subsystem!
The content of the sampleapp-users.properties looks like this (with plain text passwords)
admin=adminadmin
manfred=password
anna=password
In the file sampleapp-roles.properties you can assign users to application specific roles:
admin=MANAGERACCESS
manfred=MANAGERACCESS
anna=AUTHORACCESS
So far everything seems to look similar to the old security-domain configuration. But at this moment you new security domain wont work. There are additional steps needed.
The EJB and Web Subsystems
To get the security domain working with your application you need to add the security domain also to the undertow web subsystem. In this subsystem you will find a section ‘application-security-domains’. And in this section you need to add your new security domain as well:
       <subsystem xmlns="urn:jboss:domain:undertow:12.0" default-server="default-server" default-virtual-host="default-host" default-servlet-container="default" default-security-domain="other" statistics-enabled="${wildfly.undertow.statistics-enabled:${wildfly.statistics-enabled:false}}">
....
            <application-security-domains>
                <application-security-domain name="imixsrealm" security-domain="imixsrealm"/>
                <application-security-domain name="other" security-domain="ApplicationDomain"/>
            </application-security-domains>
        </subsystem>
There is also a subsystem for EJBs “ejb3:9.0” and it becomes important that you add your security domain also there if you have EJBs with the annotations @RolesAllowed or @RunAs
        <subsystem xmlns="urn:jboss:domain:ejb3:9.0">
...
            <default-security-domain value="other"/>
            <application-security-domains>
                 <application-security-domain name="imixsrealm" security-domain="imixsrealm"/>
                <application-security-domain name="other" security-domain="ApplicationDomain"/>
            </application-security-domains>
...
        </subsystem>
Now you have completed your configuration in the standalone.xml file
The jboss-web.xml and jboss-ejb3.xml
There are still 2 application specific files which need to be part of your web application.
In the jboss-web.xml you define you custom security domain:
<?xml version="1.0" encoding="UTF-8"?>
<jboss-web>
	<context-root>/</context-root>
	<security-domain>imixsrealm</security-domain>
</jboss-web>
and in the jboss-ejb3.xml file:
<?xml version="1.1" encoding="UTF-8"?>
<jboss:ejb-jar xmlns:jboss="http://www.jboss.com/xml/ns/javaee"
	xmlns="http://java.sun.com/xml/ns/javaee" xmlns:xsi="http://www.w3.org/2001/XMLSchema-instance"
	xmlns:s="urn:security:1.1"
	xsi:schemaLocation="http://www.jboss.com/xml/ns/javaee http://www.jboss.org/j2ee/schema/jboss-ejb3-2_0.xsd http://java.sun.com/xml/ns/javaee http://java.sun.com/xml/ns/javaee/ejb-jar_3_1.xsd"
	version="3.1" impl-version="2.0">

	<assembly-descriptor>
		<s:security>
			<ejb-name>*</ejb-name>
			<s:security-domain>imixsrealm</s:security-domain>
			<!-- This configuration is necessary to enable @runAs for the AdminPService  -->
			<s:missing-method-permissions-deny-access>false</s:missing-method-permissions-deny-access>
		</s:security>
	</assembly-descriptor>

</jboss:ejb-jar>
So finally your Jakarta EE9 application should now deploy and run within Wilfly 24 using the new Elytron Security Framework.
Database Realm / jdbc-realm
It is also easy to use jdbc-realm configuration. You can find general information about Database realms here. The following shows an example how to configure a jdbc-realm with two tables storing an encrypted password and user roles.
<jdbc-realm name="imixsrealm">
    <principal-query sql="select PASSWORD from USERID where ID=?" data-source="office">
        <simple-digest-mapper algorithm="simple-digest-sha-256" password-index="1" hash-encoding="hex"/>
    </principal-query>
          <principal-query sql="select GROUP_ID from USERID_USERGROUP where ID=?" data-source="office">
              <attribute-mapping>
                  <attribute to="Roles" index="1"/>
              </attribute-mapping>
    </principal-query>
</jdbc-realm>
Note: I am using two queries here as my role definitions are stored in a separate table (USERID_USERGROUP). The password is stored in hex format encrypted with a SHA-256 algorithm.
VisualVM & Wildfly running in Docker
In Imixs-Workflow project we use mostly use Wildfly Server to run the Imixs-Worklfow engine. If you want to profile your workflow instance in details you can use the VisualVM profiling tool. To use this tool when running Wildfly in a container will be the topic of this blog post. You can download VisualVM form Github.
When running Wildfly in a container you need to use the remote profile capabilities of VIsualVM to analyse your services. Make sure hat you publish port 9990 in addition to port 8080. Port 9990 is the management port for the Wildfly Web Interface and JMX capabilities.
Next you need the wildfly client command line tool to start later visualvom. This is java library provided by your Wildfly container. You can simply copy the jar file out from your running wildfly with the Docker command
$ docker cp 7cd7d73ec7a7:/opt/jboss/wildfly/bin/client/jboss-client.jar ./
Replace the Docker Container ID with your own one.
Now that you have the jboss-client.jar on your host, just copy it into your VisualVM install directory and start VisualVM with the following option:
$ ./bin/visualvm -cp:a jboss-client.jarNow you can connect to your wildfly server running in the container with a new JMX Connection which you can open from the ‘file’ menu in VisualVM
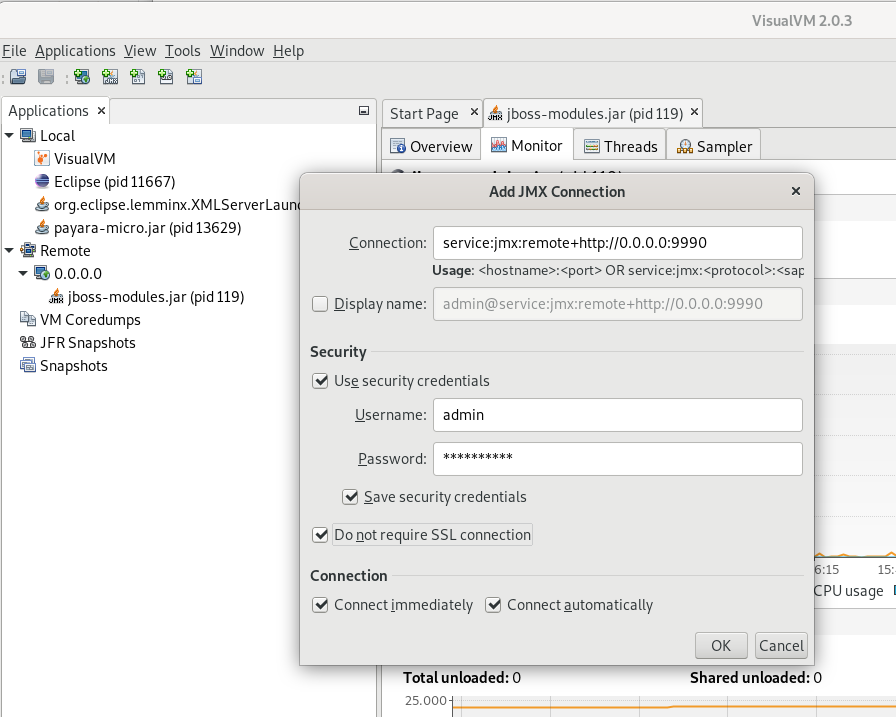
To connec to to use the following URL:
service:jmx:remote+http://0.0.0.0:9990Note that you may need a admin user account on your wildfly server. If you are unsure open your wildfly web console first form a web browser:
http://0.0.0.0:9990If you do not have yet a remote admin account you can create one within your Wildfly Docker container. Open a bash inside your running container and add the new admin user with the command:
$ ./wildfly/bin/add-user.shAfter you have created your new account you can test the connection from a browser window by opening the URL http://localhost:9990/
The user account you use to login into the Wildfly Admin console is now the same you use for the VisualVM Remote Connection to your server.
OpenLiberty – Performance
In the course of our open source project Imixs-Office-Workflow, I have now examined OpenLiberty in more detail. And I came up to the conclusion that OpenLiberty has a very impressive performance.
Docker
I run OpenLiberty in Docker in the version ‘20.0.0.3-full-java8-openj9-ubi’. Our application is a full featured Workflow Management Suite with a Web Interface and also a Rest API. So for OpenLiberty we use the following feature set:
...
	<featureManager>
		<feature>javaee-8.0</feature>
		<feature>microProfile-2.2</feature>>
		<feature>javaMail-1.6</feature>
	</featureManager>
...
As recommended by OpenLiberty I use the following Dockerfile layout:
FROM openliberty/open-liberty:20.0.0.3-full-java8-openj9-ubi
# Copy postgres JDBC driver
COPY ./postgresql-9.4.1212.jar /opt/ol/wlp/lib
# Add config
COPY --chown=1001:0 ./server.xml /config/server.xml

# Activate Debug Mode...
# COPY --chown=1001:0 ./jvm.options /config/

# Copy sample application
COPY ./imixs-office-workflow*.war /config/dropins/

RUN configure.sh
The important part here is the RUN command at the end of the Dockerfile. This script adds the requested XML snippets and grow image to be fit-for-purpose. This makes the docker build process a little bit slower, but the startup of the image is very fast.
I measured a startup time of round about 12 seconds. This is very fast for the size and complexity of this application. And it is a little bit faster than the startup of Wildfly with round about 15 seconds. Only in case of a hot-redeploy of the application Wildfly seems to be a little bit faster (6 seconds) in compare to OpenLiberty (8 seconds).
| Open Liberty | Wildfly | |
| Docker Startup Time | 12 sec | 15 sec |
| Application Hot Deploy | 8 sec | 6 sec |
Debug Mode
Note: activating the debug port makes OpenLiberty performance very poor. So do not forget to deactivate debugging in productive mode! The debug mode can be activated by providing a jvm.options file like this:
-agentlib:jdwp=transport=dt_socket,server=y,suspend=n,address=7777I have commented on this in the Dockerfile example above.
Wildfly 16.0.0 with Microprofile Metrics 2.0.0
Wildfly Server is supporting the Eclipse Microprofile Metric API since version 14.0.0 . Within the Imixs-Workflow Project we started since version 5.0.0 to support Microprofile 2.0.
Continue reading “Wildfly 16.0.0 with Microprofile Metrics 2.0.0”EJB Transaction Timeout in Wildfly
If you have long running transactions, in Wildfly it can happen that you run into a timeout durinng your processing EJB method. In this case you can change the default timeout from 5 minutes via the standalone.xml file:
 <subsystem xmlns="urn:jboss:domain:transactions:4.0">
  <core-environment>
  <process-id>
  <uuid/>
  </process-id>
  </core-environment>
  <recovery-environment socket-binding="txn-recovery-environment" status-socket-binding="txn-status-manager"/>
  <coordinator-environment default-timeout="1200"/>
  <object-store path="tx-object-store" relative-to="jboss.server.data.dir"/>
</subsystem>
In this example I changed the coordinator-environment default-timeout to 20 minutes
JCA and Wildfly 10
In the last few days, I struggled to implement my first JCA adapter. My goal was a solution for a transactional access to external Systems like Hadoop or Lucene from my Java EE application. As I finally succeed, I try here to answer some my own questions: Continue reading “JCA and Wildfly 10”
Using Keycloak for Wildfly Applications
Keycloak is a Open Source Identity and Access Management Server which can be used together with Wildfly to authenticate users with a modern authentication mechanism based on OpenID Connect and OAuth.
This is a short tutorial how to setup a Keycloak server and configure a wildfly web application to use keycloak to authenticate users. Continue reading “Using Keycloak for Wildfly Applications”
Wildfly – Install PostgreSQL JDBC Driver as a Module
Instead of deploying a JDBC driver with the wildfly auto-deploy feature, the driver can be alternatively installed as an module. This is also necessary to be used with XA-Datasources. So it is a recommended way to install the driver as a module. The following section shows how to a jdbc driver module is created. Continue reading “Wildfly – Install PostgreSQL JDBC Driver as a Module”
Jenkins – How to Deploy an Artifact Into a Custom Directory
It takes me some time to figure out the right way to deploy an artifact with Jenkins. After a successful build, I wanted to deploy the generated EAR file into a custom directory of my server. After trying several plugins the Artifact Deployer Plugin seems to me the best solution.
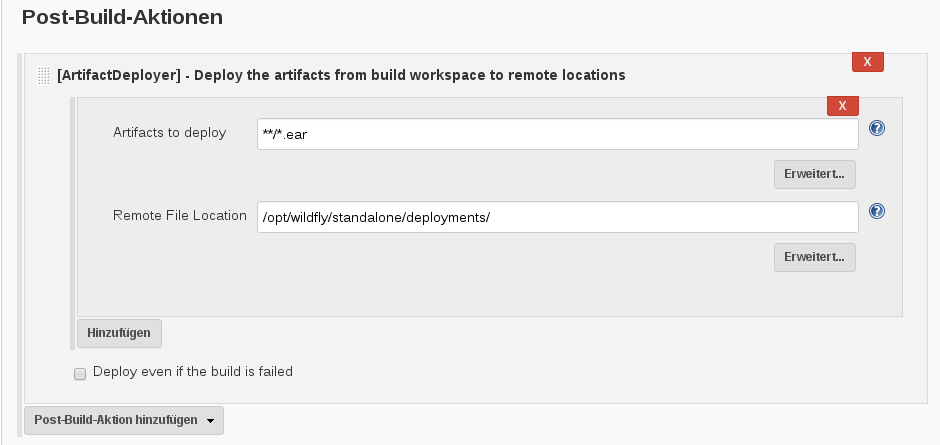
With this plugin installed you can add a ‘Post-Build-Action’ to your project. The Artefact location can be specified using the wildcards “**/*.war” or “**/*.ear”. In case of a Maven Project it’s not necessary to add a Base Dir location like it was in earlier releases. The ‘Remote File Location’ is just your target directory. You have also an option to disable the deployment in case the build failed.
So that’s it. If you know other solutions (especially for Wilfly) let me know.