Maven – Sonatype Central Repository

Since July 2025 the old oss repositories (e.g. https://oss.sonatype.org/content/repositories/snapshots) are deprecated and are no longer accessible. If you have not yet updated your Maven Open Source project you need to change some settings. But most things are now more easy as before.

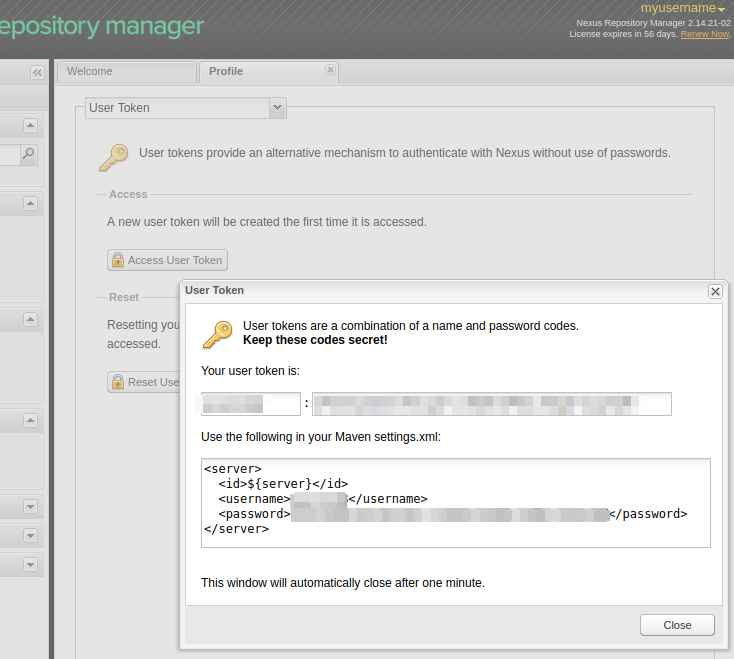
1. Create a new User Token

If you do not have yet generated a User Token, open your Sonatype Account:

https://central.sonatype.com/account

and generate a new User Token.

Next update your maven settings.xml file (e.g ~/.m2/settings.xml) with your generated username and password token:

<?xml version="1.0" encoding="UTF-8"?>
<settings xmlns="http://maven.apache.org/SETTINGS/1.0.0" 
          xmlns:xsi="http://www.w3.org/2001/XMLSchema-instance"
          xsi:schemaLocation="http://maven.apache.org/SETTINGS/1.0.0 
          https://maven.apache.org/xsd/settings-1.0.0.xsd">

    <servers>
      <server>
        <id>central</id>
        <username>....</username>
        <password>.............</password>
      </server>
    </servers>

</settings>

No additional settings regarding the server URLs are needed here.

Note: If you generate a new user token/password it can take a while until the new credentials are synchronized and active. So if you see the following error message this can also be an issue that the new credentials are not yet active and you need to wait a few minutes:

[ERROR] Failed to execute goal org.apache.maven.plugins:maven-deploy-plugin:2.7:deploy (default-deploy) on project imixs-marty: Failed to deploy artifacts: Could not transfer artifact org.imixs.workflow:imixs-marty:jar:5.1.1-20250707.205537-1 from/to central (https://central.sonatype.com/repository/maven-snapshots/): authorization failed for https://central.sonatype.com/repository/maven-snapshots/org/imixs/workflow/imixs-marty/5.1.1-SNAPSHOT/imixs-marty-5.1.1-20250707.205537-1.jar, status: 403 Forbidden -> [Help 1]
[ERROR] 
[ERROR] To see the full stack trace of the errors, re-run Maven with the -e switch.
[ERROR] Re-run Maven using the -X switch to enable full debug logging.
[ERROR] 
[ERROR] For more information about the errors and possible solutions, please read the following articles:
[ERROR] [Help 1] http://cwiki.apache.org/confluence/display/MAVEN/MojoExecutionException

2. Update your pom.xml File

Next update your pom.xml. The new setup is much simplified. The main issue is to replace the old nexus-staging-maven-plugin with the new central-publishing-maven-plugin.

Here is an example with the important parts:

<project xmlns="http://maven.apache.org/POM/4.0.0"
	xmlns:xsi="http://www.w3.org/2001/XMLSchema-instance"
	xsi:schemaLocation="http://maven.apache.org/POM/4.0.0 http://maven.apache.org/maven-v4_0_0.xsd">
	<modelVersion>4.0.0</modelVersion>
	<groupId>.....</groupId>
	.............
	
	<repositories>
		<repository>
			<id>central-portal-snapshots</id>
			<name>Central Portal Snapshots</name>
			<url>https://central.sonatype.com/repository/maven-snapshots/</url>
			<releases>
				<enabled>false</enabled>
			</releases>
			<snapshots>
				<enabled>true</enabled>
			</snapshots>
		</repository>
	</repositories>

	<build>
		<plugins>

			..........

			<!-- release management -->
			<plugin>
				<groupId>org.apache.maven.plugins</groupId>
				<artifactId>maven-release-plugin</artifactId>
				<version>3.0.1</version>
				<configuration>
					<autoVersionSubmodules>true</autoVersionSubmodules>
					<useReleaseProfile>false</useReleaseProfile>
					<releaseProfiles>release</releaseProfiles>
					<goals>deploy</goals>
				</configuration>
			</plugin>

			<plugin>
				<groupId>org.apache.maven.plugins</groupId>
				<artifactId>maven-site-plugin</artifactId>
				<version>3.12.1</version>
			</plugin>

			<plugin>
				<groupId>org.apache.maven.plugins</groupId>
				<artifactId>maven-project-info-reports-plugin</artifactId>
				<version>3.1.0</version>
			</plugin>

			<plugin>
				<groupId>org.apache.maven.plugins</groupId>
				<artifactId>maven-javadoc-plugin</artifactId>
				<version>3.2.0</version>
				<configuration>
					<additionalOptions>-Xdoclint:none</additionalOptions>
				</configuration>
			</plugin>

			<plugin>
				<groupId>org.apache.maven.plugins</groupId>
				<artifactId>maven-jxr-plugin</artifactId>
				<version>3.0.0</version>
			</plugin>

		</plugins>
	</build>

	<reporting>
		<plugins>
			<!-- java doc -->
			<plugin>
				<groupId>org.apache.maven.plugins</groupId>
				<artifactId>maven-javadoc-plugin</artifactId>
				<version>3.2.0</version>
				<configuration>
					<additionalOptions>-Xdoclint:none</additionalOptions>
				</configuration>
			</plugin>
			<plugin>
				<groupId>org.apache.maven.plugins</groupId>
				<artifactId>maven-jxr-plugin</artifactId>
				<version>3.0.0</version>
			</plugin>
		</plugins>
	</reporting>

	<profiles>

		<!-- Profile for Releases -->
		<profile>
			<id>release</id>
			<build>
				<plugins>
					<!-- for RELEASES: Central Publishing Plugin -->
					<plugin>
						<groupId>org.sonatype.central</groupId>
						<artifactId>central-publishing-maven-plugin</artifactId>
						<version>0.8.0</version>
						<extensions>true</extensions>
						<configuration>
							<publishingServerId>central</publishingServerId>
							<autoPublish>true</autoPublish>
							<waitUntil>published</waitUntil>
						</configuration>
					</plugin>


					<!-- Source Plugin -->
					<plugin>
						<groupId>org.apache.maven.plugins</groupId>
						<artifactId>maven-source-plugin</artifactId>
						<version>3.2.1</version>
						<executions>
							<execution>
								<id>attach-sources</id>
								<goals>
									<goal>jar-no-fork</goal>
								</goals>
							</execution>
						</executions>
					</plugin>

					<!-- Javadoc Plugin -->
					<plugin>
						<groupId>org.apache.maven.plugins</groupId>
						<artifactId>maven-javadoc-plugin</artifactId>
						<version>3.2.0</version>
						<configuration>
							<additionalOptions>-Xdoclint:none</additionalOptions>
						</configuration>
						<executions>
							<execution>
								<id>attach-javadocs</id>
								<goals>
									<goal>jar</goal>
								</goals>
							</execution>
						</executions>
					</plugin>

					<!-- GPG Signing Plugin -->
					<plugin>
						<groupId>org.apache.maven.plugins</groupId>
						<artifactId>maven-gpg-plugin</artifactId>
						<version>3.1.0</version>
						<executions>
							<execution>
								<id>sign-artifacts</id>
								<phase>verify</phase>
								<goals>
									<goal>sign</goal>
								</goals>
							</execution>
						</executions>
					</plugin>
				</plugins>
			</build>
		</profile>
	</profiles>


	<dependencies>
	      .............
	</dependencies>


	<!-- Distribution Management central.sonatype.org -->
	<distributionManagement>
		<snapshotRepository>
			<id>central</id>
			<url>https://central.sonatype.com/repository/maven-snapshots/</url>
		</snapshotRepository>
		<repository>
			<id>central</id>
			<url>https://central.sonatype.com</url>
		</repository>
	</distributionManagement>

</project>

I left the parts ‘url’, ‘scm’, ‘licenses’ , … here. You need to fulfill the requirements for a correct project documentation in your pom.xml

3. Deploy your Snapshot

To deploy your snapshot version just use the same command as before:

$ mvn clean deploy 

To check your snapshots you can’t any longer browse the sonatype snapshot repos with your browser. But you can request a specific snapshot URL to test if your upload was successful. E.g.:

https://central.sonatype.com/repository/maven-snapshots/org/imixs/workflow/imixs-marty/5.1.1-SNAPSHOT/maven-metadata.xml

4. Release

To release your project you can run:

$ mvn release:clean release:prepare -DautoVersionSubmodules=true
.....

$ mvn release:perform

That’s it.

How to Mock EJBs within Jakarta EE?

If you use Mockito as a Test Framework to test your Jakarta EE EJB classes this can be super easy or a horror. At least when you have some older code as the situation was when I run into an strange issue with NullPointerExceptions.

The point is that Mockito has changed massively between Version 4 and 5. And you’ll notice this when you just copy & paste a lot of test code from older projects. So first make sure that your Maven dependencies are up to date and you use at least Mocktio version 5.2.0

<dependency>
  <groupId>junit</groupId>
  <artifactId>junit</artifactId>
  <version>4.13.1</version>
  <scope>test</scope>
</dependency>
<dependency>
  <groupId>org.mockito</groupId>
  <artifactId>mockito-core</artifactId>
  <version>5.8.0</version>
  <scope>test</scope>
</dependency>
<dependency>
  <groupId>org.mockito</groupId>
  <artifactId>mockito-junit-jupiter</artifactId>
  <version>5.8.0</version> 
  <scope>test</scope>
</dependency>

As you can see I use not only mockito-core but also the new mocktio-junit-jupiter framework that we can use for testing more complex Java beans like EJBs.

If you test a simple pojo class you test code will still look like this:

package org.imixs.workflow.bpmn;

import java.util.List;
import org.junit.Assert;
import org.junit.Before;
import org.junit.Test;

public class TestBPMNModelBasic {

	OpenBPMNModelManager openBPMNModelManager = null;

  @Before
  public void setup()  {
    openBPMNModelManager = new OpenBPMNModelManager();
  }

  @Test
  public void testStartTasks() {
    List<Object> startTasks = openBPMNModelManager.findStartTasks(model, "Simple");
    Assert.assertNotNull(startTasks);	
  }
}

This is a fictive test example from our Imixs-Workflow project. What you can see here is that I use a simple pojo class (OpenBPMNModelManger) that I create with the constructor in the setup method. And this works all fine!

But if you try the same with EJB you may possible fail early by creating the EJB mocks. However Mocktio supports you in this with the new mockito-junit-jupiter framework in version 5.x.

Take a look at the following example testing a Jakarta EE EJB:

package org.imixs.workflow.engine;

import org.imixs.workflow.bpmn.OpenBPMNModelManager;
import org.imixs.workflow.exceptions.ModelException;
import org.junit.Assert;
import org.junit.jupiter.api.BeforeEach;
import org.junit.jupiter.api.Test;
import org.junit.jupiter.api.extension.ExtendWith;
import org.mockito.InjectMocks;
import org.mockito.Mock;
import org.mockito.junit.jupiter.MockitoExtension;

@ExtendWith(MockitoExtension.class)
public class TestModelServiceNew {

  @Mock
  private DocumentService documentService;

  @InjectMocks
  ModelService modelServiceMock;

  @BeforeEach
  public void setUp() {
    MockitoAnnotations.openMocks(this);
    when(documentService.load(Mockito.anyString())).thenReturn(new ItemCollection());
  }

  @Test
  public void testGetDataObject() throws ModelException {
   OpenBPMNModelManager openBPMNModelManager = modelServiceMock.getOpenBPMNModelManager();
   Assert.assertNotNull(openBPMNModelManager); 
  }
}

I am using here the Annotation @ExtendWith(MockitoExtension.class) to prepare my test class for testing more complex EJB code and I inject my EJB service as a mock with the annotation @InjectMocks. I also use the annotation @Mock here to inject additional dependency classes used by my service.

This all looks fine and it works perfect!

But there is one detail in my second example which can be easily overseen! The @Test annotation of my test method is now imported by the mockito jupiter framework and no longer form the core junit framework!

...
import org.junit.jupiter.api.Test; // Important!
...

And this is the important change. If you oversee this new import you will run into NullPointerExceptions.

The reason for this issue is that Mockito doesn’t automatically create the ModelServiceMock object when you still use import org.junit.Test. This is because the annotation @InjectMocks is used in conjunction with JUnit 5 and Mockito Jupiter. So if you still use any of the usual JUnit 5 annotations like @BeforeEach or the @Test annotation of JUnit 5 you will have a mix between JUnit 4 and JUnit 5, which can lead to problems.

Also note: In this example that also the annotation @Before has changed to @BeforeEach. Mockito depends on this new annotation too and will not call the when call if the setup method is not annotated with @BeforeEach !

Sonatype – 401 Content access is protected by token

Today I run into a maven problem during deployment of my snapshot releases to https://oss.sonatype.org. The upload was canceled with a message like this one:

[ERROR] Failed to execute goal org.sonatype.plugins:nexus-staging-maven-plugin:1.6.13:deploy (injected-nexus-deploy) on project imixs-workflow-index-solr: Failed to deploy artifacts: Could not transfer artifact org.imixs.workflow:imixs-workflow:pom:6.0.7-20240619.183701-1 from/to ossrh (https://oss.sonatype.org/content/repositories/snapshots): authentication failed for https://oss.sonatype.org/content/repositories/snapshots/org/imixs/workflow/imixs-workflow/6.0.7-SNAPSHOT/imixs-workflow-6.0.7-20240619.183701-1.pom, status: 401 Content access is protected by token -> [Help 1]
[ERROR] 
[ERROR] To see the full stack trace of the errors, re-run Maven with the -e switch.
[ERROR] Re-run Maven using the -X switch to enable full debug logging.
[ERROR] 
[ERROR] For more information about the errors and possible solutions, please read the following articles:
[ERROR] [Help 1] http://cwiki.apache.org/confluence/display/MAVEN/MojoExecutionException
[ERROR] 
[ERROR] After correcting the problems, you can resume the build with the command
[ERROR]   mvn <args> -rf :imixs-workflow-index-solr

This may happen if you have overlooked the fact that Sonatype has introduced a new token-based authentication method.

Update your maven settings.xml file

What you need first, is to remove your hard coded userid/password from your maven settings.xml file (located in your home directory .m2/)

Your server config for ossrh should look like this:

<settings>
   <servers>
    <server>
     <id>ossrh</id>
     <username>token-username</username>
     <password>token-password</password>
    </server>
   </servers>
</settings>

For this you need to generate a token first. If you still use your plaintext userid/password this will no longer work. Find details here.

  1. Login to https://oss.sonatype.org with your normal user account
  2. Select under your login name the menu option “Profile”
  3. Click on the ‘Profile’ tab
  4. Generate a new access token

This will show you the token to be replaced with your old userid/password in your settings.xml file

That’s it. Now your deployment should work again.

How to Handle JSF Exceptions in Jakarta EE 10

Exception handling is a tedious but necessary job during development of modern web applications. And it’s teh same for Jakarta EE 10. But if you migrate an existing application to the new Jakarta EE 10 things have change a little bit and so it can happen that you old errorHandler does no no longer work. At least this was the case when I migrated Imixs-Office-Workflow to Jakrata EE 10. So in this short tutorial I will briefly explain how to handle JSF Exceptions.

First of all you need an exeptionHandler extending the Jakarta EE10 ExceptionHandlerWrapper class. The implementation can look like this:


import java.util.Iterator;
import java.util.Objects;

import jakarta.faces.FacesException;
import jakarta.faces.application.NavigationHandler;
import jakarta.faces.context.ExceptionHandler;
import jakarta.faces.context.ExceptionHandlerWrapper;
import jakarta.faces.context.FacesContext;
import jakarta.faces.context.Flash;
import jakarta.faces.event.ExceptionQueuedEvent;
import jakarta.faces.event.ExceptionQueuedEventContext;

public class MyExceptionHandler extends ExceptionHandlerWrapper {

  public MyExceptionHandler(ExceptionHandler wrapped) {
    super(wrapped);
  }

  @Override
  public void handle() throws FacesException {
    Iterator iterator = getUnhandledExceptionQueuedEvents().iterator();

    while (iterator.hasNext()) {
      ExceptionQueuedEvent event = (ExceptionQueuedEvent) iterator.next();
      ExceptionQueuedEventContext context = (ExceptionQueuedEventContext) event.getSource();

      Throwable throwable = context.getException();

      throwable = findCauseUsingPlainJava(throwable);

      FacesContext fc = FacesContext.getCurrentInstance();

      try {
        Flash flash = fc.getExternalContext().getFlash();
        flash.put("message", throwable.getMessage());
        flash.put("type", throwable.getClass().getSimpleName());
        flash.put("exception", throwable.getClass().getName());

        NavigationHandler navigationHandler = fc.getApplication().getNavigationHandler();

        navigationHandler.handleNavigation(fc, null, "/errorhandler.xhtml?faces-redirect=true");

        fc.renderResponse();
      } finally {
        iterator.remove();
      }
    }

    // Let the parent handle the rest
    getWrapped().handle();
  }

  /**
   * Helper method to find the exception root cause.
   * 
   * See: https://www.baeldung.com/java-exception-root-cause
   */
  public static Throwable findCauseUsingPlainJava(Throwable throwable) {
    Objects.requireNonNull(throwable);
    Throwable rootCause = throwable;
    while (rootCause.getCause() != null && rootCause.getCause() != rootCause) {
      System.out.println("cause: " + rootCause.getCause().getMessage());
      rootCause = rootCause.getCause();
    }
    return rootCause;
  }

}

This wrapper overwrites the default ExceptionHandlerWrapper. In the method handle() (which is the imprtant one) we search the root cause of the exception and put some meta information into the JSF flash scope. The flash is a memory that can be used by the JSF page we redirect to – ‘errorhandler.xhtml’

Next you need to create a custom ExceptionHanlderFactor. This class simple registers our new ExceptionHandler:


import jakarta.faces.context.ExceptionHandler;
import jakarta.faces.context.ExceptionHandlerFactory;

public class MyExceptionHandlerFactory extends ExceptionHandlerFactory {
    public MyExceptionHandlerFactory(ExceptionHandlerFactory wrapped) {
        super(wrapped);
    }

    @Override
    public ExceptionHandler getExceptionHandler() {
        ExceptionHandler parentHandler = getWrapped().getExceptionHandler();
        return new MyExceptionHandler(parentHandler);
    }

}

The new Factory method need to be registered in the faces-config.xml file:

 .... 
    <factory>
      <exception-handler-factory>
        org.foo.MyExceptionHandlerFactory
      </exception-handler-factory>
    </factory>
 ....

And finally we can create a errorhandler.xhtml page that displays a user friendly error message. We can access the flash memory here to display the meta data collected in our ErrorHandler.

<ui:composition xmlns="http://www.w3.org/1999/xhtml"
	xmlns:c="http://xmlns.jcp.org/jsp/jstl/core"
	xmlns:f="http://xmlns.jcp.org/jsf/core"
	xmlns:h="http://xmlns.jcp.org/jsf/html"
	xmlns:ui="http://xmlns.jcp.org/jsf/facelets"
	template="/layout/template.xhtml">
	<!-- 
		Display a error message depending on the cause of a exception
	 -->
	<ui:define name="content">
	  <h:panelGroup styleClass="" layout="block">
				<p><h4>#{flash.keep.type}: #{flash.keep.message}</h4>
		<br />
		<strong>Exception:</strong>#{flash.keep.exception}
		<br />
		<strong>Error Code:</strong>
		<br />
		<strong>URI:</strong>#{flash.keep.uri}
		</p>
		<h:outputText value="#{session.lastAccessedTime}">
			<f:convertDateTime pattern="#{message.dateTimePatternLong}" timeZone="#{message.timeZone}"
							type="date" />
		</h:outputText>
	<h:form>
	  <h:commandButton action="home" value="Close"
		immediate="true" />			
	</h:form>
  </h:panelGroup>
  </ui:define>

</ui:composition>

That’s it. You can extend and customize this to you own needs.

Find And Replace in ODF Documents

With the ODF Toolkit you got a lightweight Java Library to create, search and manipulate Office Document in the Open Document Format. The following tutorial will show some examples to find and replace parts of text and spreadsheet documents.

Maven

You can add the ODF Toolkit to your Java project with the following Maven dependency:

	<dependency>
		<groupId>org.odftoolkit</groupId>
		<artifactId>odfdom-java</artifactId>
		<version>0.12.0-SNAPSHOT</version>
	</dependency>

Note: Since version 0.12.0 new methods where added which I will explain in the following examples.

Text Documents

To find and replace parts of ODF text document you can use the class TextNavigation. The class allows you to search with regular expression in a text document and navigate through the content.

The following example show how to find all text containing the names ‘John’ or ‘Marry’ and replace the text selection with ‘user’:

OdfTextDocument odt = (OdfTextDocument) OdfDocument.loadDocument(inputStream);
TextNavigation textNav;

textNav = new TextNavigation("John|Marry", odt);
while (textNav.hasNext()) {
	TextSelection selection = textNav.next();
	logger.info("Found " + selection.getText() + 
                    " at Position=" + selection.getIndex());
	selection.replaceWith("User");
}

It is also possible to change the style of a selection during iterating through a document. See the following example:

    OdfStyle styleBold = new OdfStyle(contentDOM);
    styleBold.setProperty(StyleTextPropertiesElement.FontWeight, "bold");
    styleBold.setStyleFamilyAttribute("text");
    // bold all occurrences of "Open Document Format"
    TextNavigation search = new TextNavigation("Open Document Format", doc);
    while (search.hasNext()) {
       TextSelection selection = search.next();
       selection.applyStyle(styleBold);
    }

SpreadSheet Documents

To find and manipulate cells in a SpreadSheet document is also very easy. In case of a .ods document you can find a cell by its coordinates:

InputStream inputStream = getClass().getResourceAsStream("/test-document.ods");
OdfSpreadsheetDocument ods = (OdfSpreadsheetDocument) OdfDocument.loadDocument(inputStream);

OdfTable tbl = ods.getTableByName("Table1");
OdfTableCell cell = tbl.getCellByPosition("B3");
// set a new value
cell.setDoubleValue(100.0);

There are much more methods in the ODS Toolkit. Try it out and join the community.

Setup a Public Cassandra Cluster with Docker

UPDATE: I updated this origin post to the latest Version 4.0 of Cassandra.

In one of my last blogs I explained how you can setup a cassandra cluster in a docker-swarm. The advantage of a container environment like docker-swarm or kubernetes is that you can run Cassandra with its default settings and without additional security setup. This is because the cluster nodes running within a container environment can connect securely to each other via the kubernetes or docker-swarm virtual network and need not publish any ports to the outer world. This kind of a setup for a Cassandra cluster can be fine for many cases. But what if you want to setup a Cassandra cluster in a more open network? For example in a public cloud so you can access the cluster form different services or your client? In this case it is necessary to secure your Cassandra cluster.

Continue reading “Setup a Public Cassandra Cluster with Docker”

Build Your Own Modelling Tool with Eclipse GLSP

Eclipse GLSP is a new graphical language server platform allowing you to build powerful and highly adoptable modelling tools. Like many modern modelling frameworks it is based on Node.js and runs in a web browser. But unlike many other modelling tools, Eclipse GLSP takes a much broader approach. It forces the strict separation between the graphic modelling and the underlying model logic. With this concept Eclipse GLSP can not only be integrated in different tooling platforms like Eclipse Theia, Microsoft VS Code or the Eclipse desktop IDE, it also allows any kind of extension and integration within such platforms. On the project homepage you can find a lot of examples and videos demonstrating the rich possibilities.

Continue reading “Build Your Own Modelling Tool with Eclipse GLSP”

Jakarta EE8, EE9, EE9.1. …. What???

Jakarta EE is the new Java Enterprise platform as you’ve probably heard. There is a lot of news about this application development framework and also about the rapid development of the platform. Version 9.1 was released in May last year and version 10 is already in a review process. But what does this mean for my own Java project? Because I was also a bit confused about the different versions, hence my attempt to clarify things.

Continue reading “Jakarta EE8, EE9, EE9.1. …. What???”