
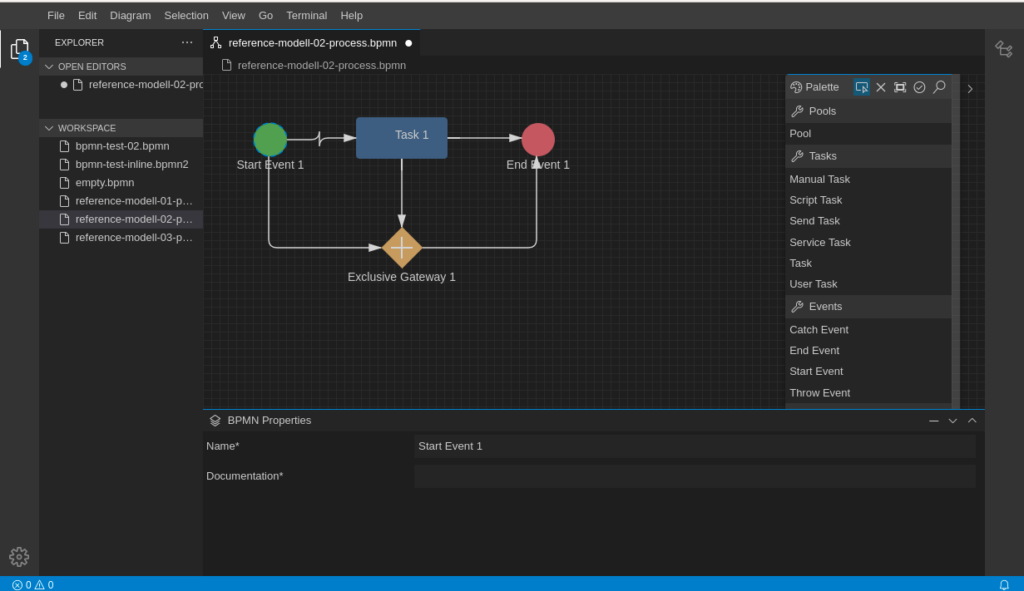
Eclipse GLSP is a new graphical language server platform allowing you to build powerful and highly adoptable modelling tools. Like many modern modelling frameworks it is based on Node.js and runs in a web browser. But unlike many other modelling tools, Eclipse GLSP takes a much broader approach. It forces the strict separation between the graphic modelling and the underlying model logic. With this concept Eclipse GLSP can not only be integrated in different tooling platforms like Eclipse Theia, Microsoft VS Code or the Eclipse desktop IDE, it also allows any kind of extension and integration within such platforms. On the project homepage you can find a lot of examples and videos demonstrating the rich possibilities.
Bring Your Own Model….
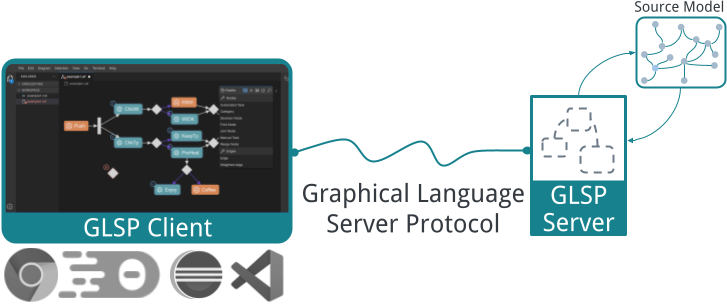
Most modelling libraries are forcing a specific metamodel as the base for the implementation of your own modeller. In Eclipse GLSP your implementation can strictly be based on your existing source model. This is possible because of a Client-Server concept implemented in the GLSP API. You implement first a GLSP Server component operating on your source model and than you implement the GLSP Client taking control of the visualisation. The Graphical Language Server Protocol manages the synchronisation between these to parts.
Your source model does not necessarily have to be a file. It can just as well be a database or a microservice. The GLSP Server operates on the source model and provides the client with a corresponding translation of this model. The client knows only how to display elements and edges but does not think about the domain specific model logic provided by your model. This makes the platform extremely flexible and extensible.
I will show this concept now in a short tutorial giving you an impression how to get started with Eclipse GLSP and your own source model.
Note: You can of course also start a new modelling project if you don’t have an existing source model. Eclipse GLSP provides a JSON based internal model implementation which can be used for a more simplified aprach. The GLSP Workflow example demonstrates this.
The GLSP Server
Lets assume we have a source model based on a very simple XML syntax like this:
<process id="process_1" name="Example">
<task id="Task_1" name="Task-1">
<somedata>...</somedata>
</task>
<task id="Task_2" name="Task-2">
<somedata>...</somedata>
</task>
<connection source="Task_1" target="Task_2" />
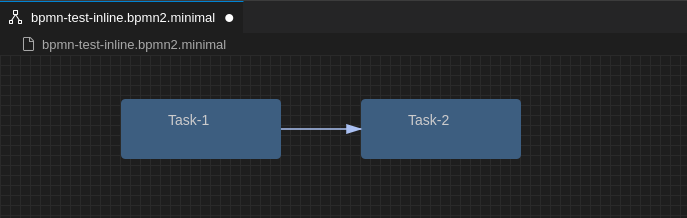
</process>This is an example of a very simple process with two task nodes connected with one edge. The graphical representation of such a model can look like this:
Now let’s see, how to get started with Eclipse GLSP….
The SourceModelStorage
First of all we need to implement a SourceModelStorage to load and save our source model.
public class MySourceModelStorage implements SourceModelStorage {

    @Inject
    protected MyModelState modelState;

    /**
     * Loads a source model into the modelState.
     */
    @Override
    public void loadSourceModel(final RequestModelAction action) {
        Map<String, String> options = action.getOptions();
        String uri = options.get("uri");
        String diagramType = options.get("diagramType");
        if (bNeedsClientLayout && uri != null && "bpmn-diagram".equals(diagramType)) {
            MyModel model = read(file);
            // store the meta model into the modelState
            modelState.setMyModel(model);
        }
    }

    /**
     * saves the current model state back into a file
     */
    @Override
    public void saveSourceModel(final SaveModelAction action) {
        Map<String, String> options = modelState.getClientOptions();
        String filePath = options.get("uri");
        MyModel model = modelState.getMyModel();
        try {
            java.net.URI targetURI = new URI(filePath);
            model.save(targetURI);
        } catch (URISyntaxException e) {
            logger.severe("Invalid Target URI: " + e.getMessage());
        }
    }
}

public class MyModelState extends DefaultGModelState {
    private MyModel model;

    public BPMNModel getBpmnModel() {
        return bpmnModel;
    }

    public void setMyModel(final MyModel model) {
        this.myModel = model;
        this.setRoot(null);
    }
}
The SourceModelStorage simply takes the file location from the client and loads for example the source model as an XML file. The result is stored in the GLSP ModelState which is a exclusive server session for the modelling client. Of course loading the model from a XML file is just an example. It is also possible to load your model from other sources, e.g. a database.
The FactoryClass
Next we need to implement a GModelFactory. This class is called by the GLSP Server each time the GLSP client needs a new or updated model. The goal of this class is to simply translate our source model (in this case the XML) into the GLSP Client Meta model. See the following example:
public class MyModelFactory implements GModelFactory {

    @Inject
    protected MyModelState modelState;

    /*
     * Update the modelState by creating a new GLSP GModel
     */
    @Override
    public void createGModel() {
        GGraph newGModel = null;
        List<GModelElement> entityNodes = new ArrayList<>();
         // iterate over the model stored in the modelState
        MyModel model = modelState.getBpmnModel();
        for (Task task: model.getTasks()) {
            // Build the GLSP Nodes and Edges....
            TaskNode taskNode = builder //
                    .id(activity.getId()) //
                    .position(point) //
                    .build();
           entityNodes.add(taskNode);
        }
        GGraph newGModel = new GGraphBuilder() //
                .id('process_1') //
                .addAll(entityNodes) //
                .build();
        // update model state with the new GLSP model
        modelState.updateRoot(newGModel);
        modelState.getRoot().setRevision(-1);
    }
Finally we need to implement a DiagaramModule which is a kind of central controller. The DiagramModule is used to register all the features provided by our GLSP Server implementation. A simplified version can look like in the following example. We just register our new SourceModelStorage and GModelFactory classes:
public class MyDiagramModule extends DiagramModule {
    @Override
    protected Class<? extends GModelState> bindGModelState() {
        return MyModelState.class;
    }

    @Override
    protected Class<? extends SourceModelStorage> bindSourceModelStorage() {
        return MySourceModelStorage.class;
    }

    @Override
    protected Class<? extends GModelFactory> bindGModelFactory() {
        return MyModelFactory.class;
    }

    @Override
    protected void configureOperationHandlers(final MultiBinding<OperationHandler> binding) {
        super.configureOperationHandlers(binding);
        // add a custom CreateTaskHandler
        binding.add(MyCreateTaskHandler.class);
        ....
    }
    .....

    @Override
    public String getDiagramType() {
        return "my-diagram";
    }
}
As you can see, we bind the GModelState, the SourceModelStorage and the GModelFactory. From this point a GLSP client can connect with our server to load a model and receive a GModel used for the graphical representation.
The GLSP Client
Now let’s look how the Client part works. The GLSP Client is written in Node.js. I don’t go into the details here as you can find pretty fine examples – e.g the GLSP Workflow example – providing all core features of a modeller.
The most important part in the GLSP Client code is to tell the client how to display the various parts of our model. GLSP provides already some default shapes which can be used out of the box. So in a very simple implementation we would just register a default view for each ElementType provided by our model:
// Node.js implementation
// skiped imports....
....
const myDiagramModule = new ContainerModule((bind, unbind, isBound, rebind) => {
    const context = { bind, unbind, isBound, rebind };

    rebind(TYPES.ILogger).to(ConsoleLogger).inSingletonScope();
    rebind(TYPES.LogLevel).toConstantValue(LogLevel.warn);
    bind(TYPES.ICommandPaletteActionProvider).to(RevealNamedElementActionProvider);
    bind(TYPES.IContextMenuItemProvider).to(DeleteElementContextMenuItemProvider);

    configureDefaultModelElements(context);
    // register a View to display the Task Element
    configureModelElement(context, 'task', TaskNode, RoundedCornerNodeView);

});

export default function createContainer(widgetId: string): Container {
    // Create the createClientContainer with the diagramModule
    const container = createClientContainer(bpmnDiagramModule);
    overrideViewerOptions(container, {
        baseDiv: widgetId,
        hiddenDiv: widgetId + '_hidden'
    });
    return container;
}
In the diagram module we simply register a RoundedCornerNodeView for our task element which is identified by the elementID ‘task’. This elementID is important here and also used by the TaskNode Builder in our server side factory. In this way the client knows how to render the different elements of our model.
I simplified the code example here just to explain the concept. But from this point our model is able to load a Source Model file and display the elements in the modelling plane.
Update the Source Model
Of course using a graphical modeller will also lead to situations where new elements are added into our diagram or properties change. This is the situation where we need to update our Source model.
Eclipse GLSP implements a protocol with allows the client and the server to communicate. In fact each time the client changes the model – e.g. the user adds a new task element into the diagram form the tool palette – the client sends a so called ‘CreateNodeOperation‘ to the sever. The server needs to react on this kind of action event with a corresponding Operation Handler to update the source model.
The following example shows how we can implement such a handler:
public class MyCreateNodeOperationHandler extends AbstractCreateOperationHandler<CreateNodeOperation> {

    @Inject
    protected GModelState modelState;

    @Inject
    protected ActionDispatcher actionDispatcher;

    public MyCreateNodeOperationHandler() {
        super("MyTask");
    }

    /**
     * Create and add new model element into the source model
     */
    @Override
    protected void executeOperation(final CreateNodeOperation operation) {
        String elementTypeId = operation.getElementTypeId();
        Optional<GPoint> position = operation.getLocation();
        // create a new Element and add it into the source model
        .....
        actionDispatcher.dispatchAfterNextUpdate(new SelectAction(), new SelectAction(List.of(newElementID)));
    }

}
The new OperationHandler needs to be registered it in the DiagramModule like before the SourceModelStorage or the GModelFactory classes. The method configureOperatenHandlers can be used for this:
public class MyDiagramModule extends DiagramModule {
    ....
    @Override
    protected void configureOperationHandlers(final MultiBinding<OperationHandler> binding) {
        super.configureOperationHandlers(binding);
        // add a custom CreateTaskHandler
        binding.add(MyCreateNodeOperationHandler.class);
        // bind additional operation handlers here
        ....

    }
    .....
}
Internally the GLSP Server will automatically call our GModelFactory implementation after each Operation to request a new GLSP Version of our model. So as you can see, from now on we only operate on our source model!
More Update Operations….
Eclipse GLSP provides various Operations which allow you to react on any kind of model update. For example there are operations to update the Bounds of an element (position and size) or change the routing points of an edge between two element nodes.
The following example shows an UpdateBoundsOperationHandler which can be used to react on move- and resize-events:
public class MyChangeBoundsOperationHandler extends AbstractOperationHandler<ChangeBoundsOperation> {
    @Inject
    protected MyGModelState modelState;

    @Override
    public void executeOperation(final ChangeBoundsOperation operation) {
        List<ElementAndBounds> bounds = operation.getNewBounds();
        for (ElementAndBounds bound : bounds) {
            logger.info("...changebound id: " + bound.getElementId());
            GPoint newPosition = bound.getNewPosition();
            GDimension newSize = bound.getNewSize();
            // update the source model state...
        }
    }
}
Note that we use the operation handler only to update our SourceModel. There is no more need to operate on the GModel directly!
Again you need to register the new handler in your DiagramModule. You can find the full list of all possible operations on Github. A more detailed description of the concepts of GLSP can be found on the project documentation.
Conclusion
Eclipse GLSP provides you with a powerful open source framework to implement graphical modellers. If you have already an existing source model, Eclipse GLSP allows you to easily integrate your own model into this framework. The openness of this framework is not restricted to file based models. You can operate also on model sources stored in a database or even in a Microservice.
We from Imixs are currently working on a new project to port the Eclipse BPMN2 modeller to Eclipse GLSP. You can look around this project for more inspiration for your own modelling project.
One Reply to “Build Your Own Modelling Tool with Eclipse GLSP”