WildFly – Reverse Proxy via SSL

In many web architectures it is common to access a Java EE Application through a reverse proxy server. A reverse proxy can be used for example as a dispatcher to redirect users to different servers or switch to a standby server in a failover scenario. Another typical use case is to run a dispatcher as the SSL Endpoint for a Java EE application. traefik.io or Squid are common tools to provide such a functionality. If you are running Wildfly behind such a reverse proxy server for SSL Endpoints you need to take care about some configuration issues.

Run Wildfly in HTTP only

In case you run Wildfly behind a modern reverse proxy like traefik.io things should work out of the box. It is fine for these scenarios that Wildfly is accessed by HTTP only. The reverse proxy in this scenario the SSL termination endpoint.

proxy-address-forwarding=”true”

A problem within this scenario ocures in JSF applications when a redirect is used. Such a redirect scenario is typical for JSF applications where a navigation rule uses a <redirect/>.

In this case Wildfly is not aware of the proxy and so it sends a HTTP redirect (302) which will lead to a situation where an already established SSL connection will be lost. To avoid the loss of SSL connections inside your WildFly application you need to add the HTTP header parameter into the HTTP listener of your dispatcher:

proxy-address-forwarding="true"

This will hold the existing SSL connection also for HTTP redirect 302. The complete configuration will look like this:

<subsystem xmlns="urn:jboss:domain:undertow:11.0" default-server="default-server" default-virtual-host="default-host" default-servlet-container="default" default-security-domain="other" statistics-enabled="${wildfly.undertow.statistics-enabled:${wildfly.statistics-enabled:false}}">
            <buffer-cache name="default"/>
            <server name="default-server">
                <http-listener name="default" socket-binding="http" redirect-socket="https" proxy-address-forwarding="true" enable-http2="true"/>
                <https-listener name="https" socket-binding="https" security-realm="ApplicationRealm" enable-http2="true"/>
                <host name="default-host" alias="localhost">
                    <location name="/" handler="welcome-content"/>
                    <http-invoker security-realm="ApplicationRealm"/>
                </host>
            </server>
            <servlet-container name="default">
                <jsp-config/>
                <websockets/>
            </servlet-container>
            <handlers>
                <file name="welcome-content" path="${jboss.home.dir}/welcome-content"/>
            </handlers>
        </subsystem>

The important part is the http-listener configuration wich now enables proxy-address-forwarding.

So this is the most easy configuration for wildfly running behind a reverse proxy. Only if you need to run Wildfly a an SSL Endpoint than continue reading the next section.

Run WildFly as an SSL Endpoint

To access an application running on Wildfly through a reverse proxy per SSL it may be necessary to enable also HTTPS connections in Wildfly. This means Wildfly is the SSL termination endpoint. Per default the WildFly server is only allowing HTTP connections. To enable HTTPS you need first to create a certificate and add this into the standalone.xml. Here are the steps to go:

(1) Create a Certificate 

(1.1) Self-signed Certificate:

Using the linux keytool you can easily create your own private certificate and store it into the  / configuration/ directory in Wildfly:

cd /opt/wildfly/standalone/configuration/
keytool -genkey -alias local-wildfly-cert -keyalg RSA -sigalg MD5withRSA -keystore local-wildfly-cert.jks -storepass adminadmin  -keypass adminadmin -validity 9999 -dname "CN=Server Administrator,O=MyOrg,OU=com,C=DE"

Replace the password and organisation name with appropriate values.

(1.2) CA-Certificate

Only in case that you already have an existing CA-Certificate and you want to use it for wildfly directly you can create the keystore file for wildfly with the openssl command line tool:

openssl pkcs12 -export -in yourdomain.com.crt -inkey yourdomain.com.key -out yourdomain.com.p12 -name local-wildfly-cert -CAfile your_provider_bundle.crt -caname root -chain

You need to define a password for the generated cert file. The pk12 file can now be imported into the keystore with the following command

keytool -importkeystore -deststorepass <secret password> -destkeypass <secret password> -destkeystore yourdomain.com.jks -srckeystore yourdomain.com.p12 -srcstoretype PKCS12 -srcstorepass <secret password used in csr> -alias local-wildfly-cert

The password again is needed for the configuration in wildfly.

(2) Configure a security realm

After you have generated the .jks file you can now add a new SecurityRealm with the name “UndertowRealm” in the standalone.xml file. This security realm is used to established https connections for wildfly/undertow later.  Add the following entry into the section “security-realms” of the standalone.xml file:

..... 
  <security-realm name="UndertowRealm">
      <server-identities>
         <ssl>
           <keystore path="local-wildfly-cert.jks" relative-to="jboss.server.config.dir" keystore-password="adminadmin" alias="local-wildfly-cert" key-password="adminadmin"/>
         </ssl>
      </server-identities>
  </security-realm>
</security-realms>

The new realm is using the local SSL certificate created before.
Note: Take care about the location of your key files.

(3) Setup the HTTPS Listener

Finally you need to update the http and https-listeners for undertow in the standalone.xml. Edit the server section ‘default-server’ in the following way:

.......
<server name="default-server">
 <http-listener name="default" socket-binding="http" proxy-address-forwarding="true"/>
 <https-listener name="https" socket-binding="https" security-realm="UndertowRealm"/>
   ....
.....

Note: Be careful about changing both listener settings – http and https! The default setting redirect-socket=https from the http-listener must be changed in proxy-address-forwarding=true.

The default port for https in wildfly/undertow is 8443. So you can test your https setup now with a direct https request:

https://myserver:8443/myapplication

See also more discussion here.

Wildfly – Logging

To activate logging for a specific category (path/class) from a deployed application follow these steps:

  1. Open the Wildfly Admin Console
  2. Switch to “Configuration -> Subsystem :Logging”
  3. Change the Console Loglevel to ‘FINE’ (or higher in case you need finer log levels) – default is ‘INFO’
  4. Add a new Log Category (Tab: Log Categories) with the following settings:
    • Category = package or class
    • Level = FINE (or higher in case you need finer log levels)
    • Use parent handler=true

WildFly Undertow – How to Configure a Request Dump

If you need to debug the request headers send to Wildfly application server you can configure a Request-Dumper. There for change the standalone.xml file and add a filter-ref and filter configuration into the subsystem section of undertow. See the following example:

... 
<subsystem xmlns="urn:jboss:domain:undertow:2.0">
....
 <server name="default-server">
       ...
      <host name="default-host" alias="localhost">
          .....
          <filter-ref name="request-dumper"/>
      </host>
 </server>
....
<filters>
    .....
    <filter name="request-dumper" class-name="io.undertow.server.handlers.RequestDumpingHandler" module="io.undertow.core" />
</filters

This will print out all the request information send by a browser.

Wildfly and MVC 1.0 Ozark

I just started to build a new Java EE Web Application based on the new MVC 1.0 Framework which will become part of Java EE8. I tried to run the application on Wildfly 9.0.2.

Setup a Maven Project

To setup a MVC 1.0 Web Application with maven is tquite simple. I Just added the following dependencies into my pom.xm :

<!-- mvc-api -->
<dependency>
  <groupId>javax.mvc</groupId>
  <artifactId>javax.mvc-api</artifactId>
  <version>1.0-pr</version>
</dependency>
<dependency>
  <groupId>org.mvc-spec.ozark</groupId>
  <artifactId>ozark-resteasy</artifactId>
  <version>1.0.0-m03</version>
</dependency>

As ozark is based on jersey you need the jersey-container-servlet. As ozark is based on Java 8 it is also necessary to start Wildfly with JDK 8. Otherwise the war file can not be deployed.

The application class

Next I added an application class with a resurce mapping /api/

@ApplicationPath("api")
public class MyApplication extends Application {
}

This class is necessary to call the application URL like

/myapp/api/hello?name=xx

Here is my controller class:

@Path("hello")
public class HelloController {
 @Inject 
 private Greeting greeting; 
 private static Logger logger = Logger.getLogger(HelloController.class.getName());

 @GET
 @Controller
 @View("/pages/hello.xhtml")
 public void hello(@QueryParam("name") String name) {
 logger.info("set new message: "+name);
 greeting.setMessage("Hello "+name);
 }
}

On the first look the conroller is triggered. But currently I am not able to return the target page (in my example /pages/hello.xhtml)

The reason seems to be that the jersey servlet container will not replace the resteasy implementation for the application.

Maybe someone knows how to solve this problem?


Update 15.Aug. 2017

Finally I solved the deployment issues in Wildfly. To get Ozark running together with Wildfly first you need to add the Jersey Dependencies to your project. So the pom.xml looks like this:

 ....
<dependencies>
 <!-- JEE Dependencies -->
 <dependency>
 <groupId>javax</groupId>
   <artifactId>javaee-api</artifactId>
   <version>7.0</version>
   <scope>provided</scope>
 </dependency>
 <!-- MVC Dependencies -->
 <dependency>
   <groupId>javax.mvc</groupId>
   <artifactId>javax.mvc-api</artifactId>
   <version>1.0-edr2</version>
 </dependency>
 <dependency>
   <groupId>org.glassfish.ozark</groupId>
   <artifactId>ozark</artifactId>
   <version>1.0.0-m02</version>
 </dependency>
 <dependency>
   <groupId>org.glassfish.jersey.containers</groupId>
   <artifactId>jersey-container-servlet</artifactId>
   <version>2.23.1</version>
 </dependency>
 <dependency>
   <groupId>org.glassfish.jersey.ext.cdi</groupId>
   <artifactId>jersey-cdi1x</artifactId>
   <version>2.23.1</version>
 </dependency>
 <dependency>
 <groupId>org.glassfish.jersey.ext</groupId>
 <artifactId>jersey-bean-validation</artifactId>
 <version>2.23.1</version>
   <exclusions>
     <exclusion>
      <groupId>org.hibernate</groupId>
      <artifactId>hibernate-validator</artifactId>
     </exclusion>
   </exclusions>
 </dependency>
  ....
 </dependencies>
....

The important part here is to deactivate the jersey hibernate-validation. This can be don with the ‘exclusion’ tag of maven.

Wildfly Deployment Descriptors

In the next step we need to provide two wildfly deployment descriptors to ensure that the RestEasy Subsystem is deactivated.

1. Deactivate Wildfly JAX-RS RestEasy Subsystem

To deactivate RestEasy add the file “jboss-deployment-structure.xml” into the WEB-INF-folder with the following content:

<?xml version="1.0" encoding="UTF-8"?> 
<jboss-deployment-structure xmlns="urn:jboss:deployment-structure:1.2"> 
 <deployment> 
  <exclude-subsystems> 
   <subsystem name="jaxrs" /> 
  </exclude-subsystems> 
 </deployment> 
</jboss-deployment-structure>

2. Prevent implizit bean archives without beans.xml

To deactivate bean archives with a beans.xml add the file “jboss-all.xml” into the Web-INF folder with the following content:

<jboss xmlns="urn:jboss:1.0"> 
   <weld xmlns="urn:jboss:weld:1.0" require-bean-descriptor="true"/> 
</jboss>

See also: https://docs.jboss.org/author/display/WFLY8/CDI+Reference

3. Add the bean.xml file

Finally make sure that your web project contain an empty beans.xml file in the WEB-INF folder:

<?xml version="1.0"?>
<beans xmlns="http://xmlns.jcp.org/xml/ns/javaee" xmlns:xsi="http://www.w3.org/2001/XMLSchema-instance"
       xsi:schemaLocation="http://xmlns.jcp.org/xml/ns/javaee http://xmlns.jcp.org/xml/ns/javaee/beans_1_1.xsd"
       version="1.1" bean-discovery-mode="all">
</beans>


Update 18.Sep. 2017

In the meantime the Ozark project worked on a new implementation to make the MVC implementation independend from Jersey. So now it is possible to user Ozark together with Wildfly without changing the configuration. You need to include the following dependencies:

 <dependency>
   <groupId>javax.mvc</groupId>
   <artifactId>javax.mvc-api</artifactId>
   <version>1.0-SNAPSHOT</version>
 </dependency>
 <dependency>
   <groupId>org.mvc-spec.ozark</groupId>
   <artifactId>ozark-resteasy</artifactId>
   <version>1.0.0-m03-SNAPSHOT</version>
 </dependency>

See als:

Wildfly – HeapSize

The default memory setting for Wildfly are not very high and can be to less for deployed applications. The default VM settings are typically:

  • -Xms64m
  • -Xmx512m
  • -XX:MaxPermSize=256m

For production mode this can be increased by editing the “bin/standalone.conf” file. To increase the memory size from 512MB to 2GB change the following line from:

JAVA_OPTS="-Xms64m -Xmx512m -XX:MaxPermSize=256m -Djava.net.preferIPv4Stack=true"

into

JAVA_OPTS="-Xms2048m -Xmx2048m -XX:MaxPermSize=256m -Djava.net.preferIPv4Stack=true"

The settings depend on the applications deployed on wildfly.

Debug an application in WildFly with Eclipse

You can debug a deployed applications running in WildFly with the Eclipse Debugging feature.

First you need to start WildFly in debug mode with the following command:

standalone.sh --debug --server-config=standalone.xml

Now WildFly starts in the debug mode and listens to the port 8787.

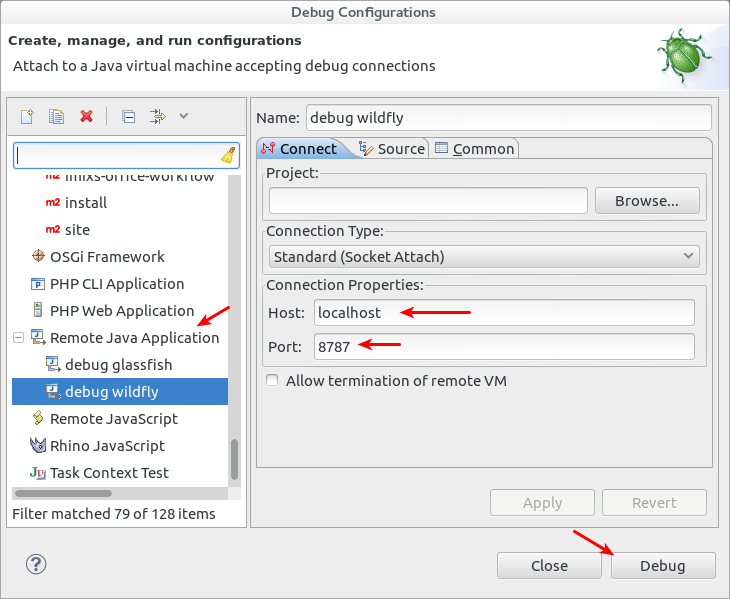
To enable debugging in your Eclipse IDE you now can add a new Debug Configuration:

wildfly_debug_eclipse

This will connect Eclipse to the WildFly Debug port.

Connection refused!

It may happen that – even if you have started glassfish in debug mode and configured all well – you got the following eclipse error message:

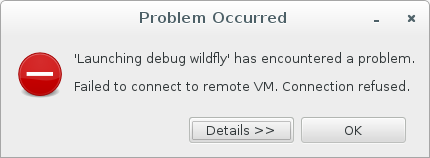
Failed to connect to remote VM. Connection refused.

eclipse-debug-02

In this case – it maybe can help if you add a project to the debug configuration. In the screen example above I have let the field ‘Project’ empty. It may help in some cases that you select a project there

GlassFish performance analyzing with VisualVM

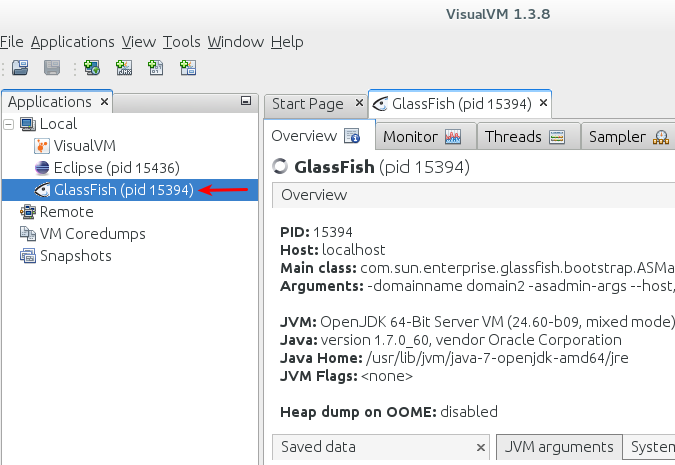
This is a short overview how to do a performance analyze in GlassFish using VisualVM. When GlassFish is running and you start VisualVM it will typically connect to GlassFish. You see a local node of your GlassFish instance.

visualvm01

If GlassFish Server is not found than you need to verfy your profiler settings n GlassFish Web Console.

Now you can test the performance of your application deployed on GlassFish. Continue reading “GlassFish performance analyzing with VisualVM”

WildFly – HotDeployment

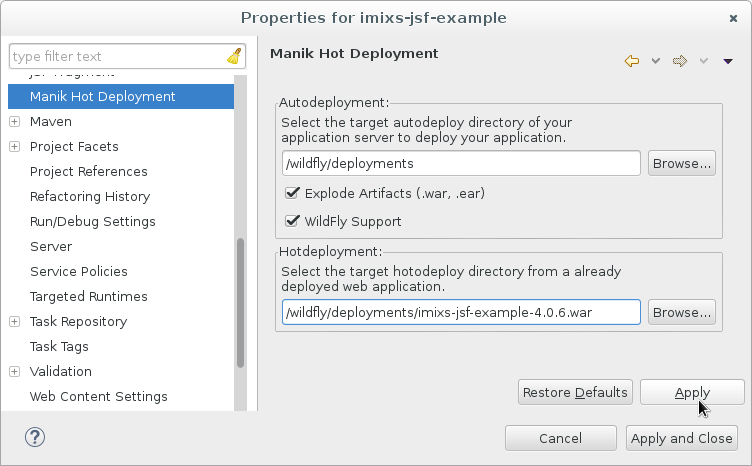
Today I extended the functionality of the manik-hot-deploy Plugin for Eclipse. The goal of this plugin is to provide an easy way for autodeployment and also hotdeployment (incremental deployment) in maven based Java Enterprise Projects.

With this Eclipse plugin you can add a configuration to your maven based JEE project to enable an autodeploy mechanism. Each time you build your maven jee project the artefacts will be automatically deployed on your application server.

Until version 1.3 only GlassFish was supported. But now I am also supporting the new WildFly Application server from Red Hat. This was a little bit tricky because in different to GlassFish WildFly did not extract (unzip) an artifact during the deployment process. But for hotdeployment you need access to the extracted web module folders. With a trick in the maven ear plugin you can create EAR artifacts with unpacked web modules. Simply add the following configuration to your ear pom.xml:

....
<build>
 <plugins>
  <plugin>
   <groupId>org.apache.maven.plugins</groupId>
    <artifactId>maven-ear-plugin</artifactId>
  <version>2.6</version>
 <configuration>
 <unpackTypes>war</unpackTypes>
    </configuration>
 </plugin>

   ...

With a new option in the manik-hot-deploy plugin you can now enable the feature to autodeploy extracted versions of ear and web modules and activate the WildFly autodeployment mechanism.

Read more about mani-hot-deploy on GitHub.


WildFly – Performance tuning

If you run the RedHat Application Server WildFly in standalone configuraiton you can customize the Java VM options to do some performance tuning.

The VM Options

In different to GlassFish the VM Options can not be set from the WildFly Web Console. But you can change or add VM Options by changing the standalone.conf file in the /bin directory. (Note that this is not the same as the standalone.xml configuration inside the /stanalone/ folder!)

Typical values to use for a 3G RAM machine  are:

-Xmx1024m 
-Xms1024m 
-Xss128k
-XX:MaxPermSize=256m
-XX:PermSize=64m
-XX:NewRatio=2

or for a machine with 4G RAM.

-Xmx2048m 
-Xms2048m 
-Xss128k
-XX:MaxPermSize=256m
-XX:PermSize=64m
-XX:NewRatio=2

The JAVA_OPTS section in your standalone.conf file then should look like this:

...
# Specify options to pass to the Java VM.
#
if [ "x$JAVA_OPTS" = "x" ]; then
JAVA_OPTS="-Xms1024m -Xmx1024m -XX:MaxPermSize=256m -XX:NewRatio=2 -XX:PermSize=64m -Djava.net.preferIPv4Stack=true"
 JAVA_OPTS="$JAVA_OPTS -Djboss.modules.system.pkgs=$JBOSS_MODULES_SYSTEM_PKGS -Djava.awt.headless=true"
else
 echo "JAVA_OPTS already set in environment; overriding default settings with values: $JAVA_OPTS"
fi

You can verify your new settings directly in the beginning of the output when starting your WildFly

=========================================================================

 JBoss Bootstrap Environment
 JBOSS_HOME: /opt/wildfly-8.0.0.Final
 JAVA: java
 JAVA_OPTS: -server -XX:+UseCompressedOops -Xms1024m -Xmx1024m -XX:MaxPermSize=256m -Djava.net.preferIPv4Stack=true -Djboss.modules.system.pkgs=org.jboss.byteman -Djava.awt.headless=true


Database Pool

Also the Database Pool Configuration in WildFly is different to the settings in GlassFish. GlassFish comes with some useful default values. In WildFly you should add the following Pool Settings:

  • Min Pool Size = 5
  • Max Pools Size = 25
  • Share Prepared Statements = true
  • Statement Cache Size: 32


Session EJB Pooling

For some reason the pooling of stateless EJBs is disabled per default in WildFly. If you have  expensive initialization in your stateless session EJBs it is very useful to add pooling for that kind of beans. This can increase the performance of your application dramatically.

Edit the standalone.xml file in the WildFly /standalone/configuration/ directory and change the section “session-bean” like in the following example:

...
  <subsystem xmlns="urn:jboss:domain:ejb3:2.0">
            <session-bean>
                <stateless>
                    <bean-instance-pool-ref pool-name="slsb-strict-max-pool"/>
                </stateless>
                <stateful default-access-timeout="5000" cache-ref="simple" passivation-disabled-cache-ref="simple"/>
                <singleton default-access-timeout="5000"/>
            </session-bean>
            <pools>
                <bean-instance-pools>
                    <strict-max-pool name="slsb-strict-max-pool" max-pool-size="32" instance-acquisition-timeout="5" instance-acquisition-timeout-unit="MINUTES"/>
                    <strict-max-pool name="mdb-strict-max-pool" max-pool-size="20" instance-acquisition-timeout="5" instance-acquisition-timeout-unit="MINUTES"/>
                </bean-instance-pools>
            </pools>
....
.....

See also: https://community.jboss.org/message/881747

Migrate from GlassFish to WildFly

In this blog I just want to post some of my thoughts about migrating from GlassFish to WildFly. The main issue here for me is to deploy an existing EAR currently running on GlassFish 3. This EAR contains EJBs, Web, and REST modules and includes TimerServices, Security Issues and custom servlets. So it’s not the easy hello-world example.

I am working on Linux Debian 7 and using Open JDK 1.7.0_55. The examples show the configuration for the Imixs Office Workflow Suite. Continue reading “Migrate from GlassFish to WildFly”