
In this tutorial I explain some of my experiences in extending the Eclipse BPMN2 Modeler with custom elements and properties. I am extending the BPMN2 Modeler to provide a custom BPMN runtime extension for the Imixs-Workflow Project. You will find the results of this project here.
The Tutorial is split in the following parts:
- Part I. explains the general Eclipse Plugin setup and how to create custom visual bpmn elements
- Part II. explains how to extend the BPMN model file and add custom property sections to visual elements.
- Part III. explains how to extend the custom property section.
You can also find useful information here:
- https://wiki.eclipse.org/BPMN2-Modeler/DeveloperTutorials
- https://github.com/eclipse/bpmn2-modeler
- https://github.com/reg-bas/CustomTaskExample
Environment
First verify that BPMN2 plugin is already installed in your Eclipse IDE. I am working with Eclipse Luna and BPMN2 in Version 1.1.1 in this tutorial. Version 1.1.1 of the BPMN Plugin can be installed from here. The BPMN2 Example from Bob Brodt which I used for my own project can be found here.
If you are working with Eclipse Luna the plugin development is much easier as in the early years of Eclipse. So most things can be controlled from the plugin editor and Eclipse will take care about necessary dependencies to the BPMN2 Plugin .
If you install also the BPMN2 Sources you can look around the BPMN 2 implementations which will help sometimes to understand some behavior in the background. Optional you can also import the following plugins into your Eclipse Workspace.
- org.eclipse.bpmn2.modeler.core
- org.eclipse.bpmn2.modeler.feature
- org.eclipse.bpmn2.modeler.runtime.example
- org.eclipse.bpmn2.modeler.ui
Create a Plugin project
First of all create a new Eclipse Plugin project. To extend the BPMN Plugin you first need to add some of the necessary dependencies.
Open the plugin.xml with the plugin editor and switch to the ‘dependencies’ tab and add the following bpmn2 and grafiti dependencies:
- org.eclipse.bpmn2
- org.eclipse.bpmn2.edit
- org.eclipse.bpmn2.editor
- org.eclipse.bpmn2.core
- org.eclipse.bpmn2.ui
- org.eclipse.graphiti
- org.eclipse.graphiti.ui
- org.apache.xerces
The dependencies are added into the MANIFEST.MF File into the section ‘Runtime-Bundle’. This section should look like this:
....
Require-Bundle: org.eclipse.core.runtime,
 org.eclipse.emf.ecore;visibility:=reexport,
 org.eclipse.emf.ecore.xmi;visibility:=reexport,
 org.eclipse.graphiti;bundle-version="[0.11.0,0.12.0]",
 org.eclipse.graphiti.ui;bundle-version="[0.11.0,0.12.0]",
 org.eclipse.gef,
 org.eclipse.bpmn2,
 org.eclipse.bpmn2.edit,
 org.eclipse.bpmn2.editor,
 org.eclipse.bpmn2.modeler.core,
 org.eclipse.bpmn2.modeler.ui,
 org.eclipse.emf.transaction,
 org.eclipse.emf.databinding,
 org.eclipse.emf.edit.ui,
 org.eclipse.ui.views.properties.tabbed,
 org.eclipse.jface.databinding,
 org.apache.xerces,
 org.eclipse.core.resources,
 org.eclipse.core.runtime,
 org.eclipse.ui,
 org.eclipse.jdt.core
.....
Creating a new RuntimeExtension
The core element of a BPMN2 Plugin extension is the BPMN2 Runtime Extension. So first of all you need to create a new Class which implements the Interface ‘IBpmn2RuntimeExtension’.
In the RuntimeExtension you need to provide a method for letting the editor know if a bpmn model should be handled by this plugin. This can be done by “peeking” at the contents of the file and checking the targetnamespace. If it not match the namespace of my extension, then I return ‘false’.
Note that the target namespace test does not have to be the only criterion for determining if the model file should be handled by your plugin. This can be as simple or complex as necessary, but care should be taken here since there my be several other bpmn extensions that will need to perform this same test.
This is how my RuntimeExtension will look like so far:
package org.imixs.bpmn.model;

import org.eclipse.bpmn2.modeler.core.IBpmn2RuntimeExtension;
import org.eclipse.bpmn2.modeler.core.LifecycleEvent;
import org.eclipse.bpmn2.modeler.core.utils.ModelUtil.Bpmn2DiagramType;
import org.eclipse.bpmn2.modeler.ui.DefaultBpmn2RuntimeExtension.RootElementParser;
import org.eclipse.bpmn2.modeler.ui.wizards.FileService;
import org.eclipse.ui.IEditorInput;
import org.xml.sax.InputSource;

public class ImixsRuntimeExtension implements IBpmn2RuntimeExtension {

 @Override
 public String getTargetNamespace(Bpmn2DiagramType arg0) {
 return "http://www.imixs.org/bpmn2";
 }

 @Override
 public boolean isContentForRuntime(IEditorInput input) {
 InputSource source = new InputSource(FileService.getInputContents(input));
 RootElementParser parser = new RootElementParser("http://www.imixs.org/bpmn2");
 parser.parse(source);
 return parser.getResult();
 }

 @Override
 public void notify(LifecycleEvent arg0) {
 // TODO Auto-generated method stub

 }

}
Define the target runtime Extension point
Now you can add a new runtime Extension point to your plugin. Open the plugin.xml with the Eclipse Plugin Editor and go to the tab ‘extensions’. Here you can add a new extension from the type:
org.eclipse.bpmn2.modeler.runtime
After you added your new extension you can start with the configuration of your extension.
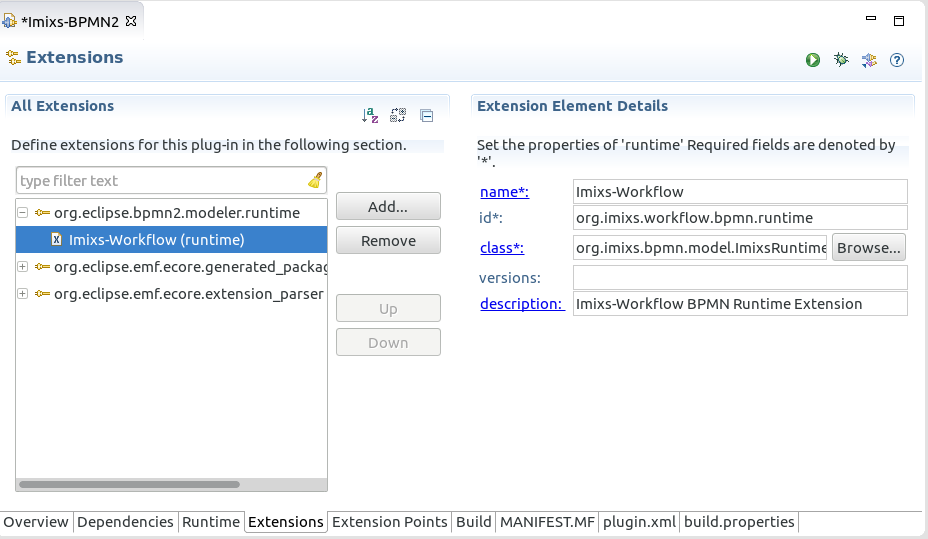
Click ‘new -> runtime’ to define your runtime Extension. Chose your java class file created before and define a Name and a unique ID. The ID of the runtimeExtension is necessary later!
Test the Plugin
Now you can start a first Test. Just launch your plugin as an Eclipse Application from the plugin.xml Editor. In the testing workspace you can create a new empty project. If you open the properties of your project you should see the section ‘BPMN2’ with a target runtime selector. Here your new RuntimeExtinsion should be listed. Selecting a runtime extension means that this runtime is used by the BPMN2 Modeler Plugin.

You can now add also a BPMN model within you project.
Create a Custom task
Now its time to extend the behavior of your new BPMN Extension. In this tutorial I will explain how to add a new customTask element extending the BPMN task element.
Extending a BPMN model element covers the following aspects:
- The visual modelling element
- The properties of the custom element
- Optional property sections to configure the element
To define a new customTask element just open the plugin.xml file and create a new ‘CustomTask’ to your bpmn plugin extension node. In the property ‘runtimeid’ add the previous defined Runtime ID. In the property ‘Type’ enter ‘Task’ to use the standard task object type to be extended from BPMN2. The Property ‘category’ defines a new section in the tool palette where your new element will be available.
Next you need to generate a new Java class for the FeatureContainer. This can be done form the plugin editor by click on ‘featureContainer*’. The class can be extended form the ‘CustomShapeFeatureContainer’. See the following example:
public class TestTaskElementFeatureContainer1 extends CustomShapeFeatureContainer {

 // these values must match what's in the plugin.xml
 private final static String TYPE_VALUE = "TestTask";
 private final static String CUSTOM_TASK_ID = "Imixs-BPMN2.customTask1";

 public TestTaskElementFeatureContainer1() {

 }

 @Override
 public String getId(EObject object) {
 // This is where we inspect the object to determine what its custom task ID should be.
 // In this case, the "type" attribute will have a value of "MyTask".
 // If found, return the CUSTOM_TASK_ID string.
 //
 // Note that the object inspection can be arbitrarily complex and may include several
 // object features. This simple case just demonstrates what needs to happen here.
 EStructuralFeature f = ModelDecorator.getAnyAttribute(object, "type");
 if (f!=null) {
 Object id = object.eGet(f);
 if (TYPE_VALUE.equals(id))
 return CUSTOM_TASK_ID;
 }

 return null;
 }


 @Override
 public ICustomFeature[] getCustomFeatures(IFeatureProvider fp) {
 return new ICustomFeature[] {new ShowPropertiesFeature(fp)};
 }
}
To identify the task element the class should be assigned to, you can add a new property named ‘type’ into the customTask extension point. Use the plugin.xml editor and add a new property to your customTask with the name ‘type’ and the value ‘TestTask’. These values are evaluated from the new TestTaskElementFeatureContainer1 class.

You can now also define additional custom properties. These properties will be displayed in the ‘Task’ property Section when you edit the new Task Element with the BPMN Editor. This kind of properties are called ‘dynamic properties’. This is the easiest way to create a custom BPMN element. In part II of this Tutorial I will explain how to extend the BPMN Model and create custom property sections.
Part II. explains how to extend the BPMN model file and add custom property sections to visual elements.
Hi,
I followed the steps you have mentioned in part I, but at the end when I am trying to create a new BPMN 2.0 model, it gives me an error “Configuration Error for target runtime Imixs-Workflow”
I am not sure which configuration part has led to this. Any suggestion will be mighty helpful for me in this regard. Cheers!
Hi,
please take also a look at the wiki page of the Eclipse BPMN Framework:
https://wiki.eclipse.org/BPMN2-Modeler/DeveloperTutorials
This includes an updated version of this tutorial.
===
Ralph