How to Configure Payara in Docker?

When I started with the Application Server Glassfish years ago I used to configure the Server always directly in the domain.xml file. This is the file containing the configuration and all your customizations when you configure your Glassfish form the Web Admin Interface. The same is true for Payara Server which is more widespread in projects today. (The main different from Glassfish to Payara is, that Payara offers support where Glassfish is the reference implementation for Jakarta EE).

I’ve never gotten rid of my habit of configuring the server directly in the domain .xml, although there is a command-line tool called ‘asadmin‘ for doing the configuration. When you run you projects in Docker you even can copy the domain.xml into a Payara Docker image as you will do with your application. But these days I learned that this is a clumsy and impractical way to do this. The problem with tweaking the domain.xml directly is that you can miss some important XML tags or new coniguration details. So using the asadmin tool is more stable also over differnt versions of Payara.

Docker and asadmin

To configure the Payara Sever directly in your Dockerfile can be done easily when you use so called Preboot and Postboot commands. This are asadmin commands which can be placed in separate files.

So simply create two files called post-boot-commands.asadmin and pre-boot-commands.asadmin and copy these files into your custom Payara Docker image using the COPY command in your Dockerfile:

FROM payara/server-full
# add configuration files
USER root

# Preconfigure Resources
COPY ./my-scripts/preboot-commands.asadmin $POSTBOOT_COMMANDS
COPY ./my-scripts/post-boot-commands.asadmin $POSTBOOT_COMMANDS
RUN chown payara $POSTBOOT_COMMANDS

## Copy additional deployments here
## e.g. Postgres Driver
COPY ./my-scripts/postgresql-42.2.5.jar /opt/payara/paasDomain/lib/
...
USER payara

The Preeboot and Postboot scripts can contain any asadmin command to configure your server. For example to configure a JDBC Database Pool for Postgres the command will look like this:

# Create the JDBC connection pool for Postgres:
create-jdbc-connection-pool --datasourceclassname=org.postgresql.ds.PGSimpleDataSource --restype=javax.sql.DataSource --property user=${ENV=POSTGRES_USER}:password=${ENV=POSTGRES_PASSWORD}:Url=${ENV=POSTGRES_CONNECTION} my-database

# Create the JDBC resource:
create-jdbc-resource --connectionpoolid my-database jdbc/my-database

Now build your Docker image and start you server:

$ docker build -t my-payara .
$ docker run -p 8080:8080 my-payara

The Payara server will automatically execute the PreBoot and PostBoot scripts during startup and creates the configuration. In case your command is wrong or misspelled you will see the error message in the log file directly in the log file.

That’s it. Now you have a stable configuration setup for a Payara Docker Image that you can easily adapt to the latest version of Payara by simply upgrading the payara version in your Dockerfile.

Cassandra – Upgrade from Version 3.11 to 4.0

In my last blog post ‘Setup a Public Cassandra Cluster with Docker‘ I described how to setup a Cassandra Cluster with docker in a public network. The important part of this blog post was how to secure the inter-node and client-node communication in such a scenario. In this bog post I will just cover some details about migrating from version 3.11 to version 4.0.

General Upgrade from 3.x to 4.0

In general it is quite simple to upgrade a Cassandra Node form version 3.x to 4.0 because the version 4.0 can handle the table files from version 3. So at least you need to change your Docker run command pointing to a 4.0 version:

docker run --name cassandra -d \
        -e CASSANDRA_BROADCAST_ADDRESS=<YOUR-PUBLIC-IP> \
        -e CASSANDRA_SEEDS=<COMMA SEPARATED IP LIST OF EXISTING NODES> \
        -p 7000:7000 \
        -p 9042:9042 \
        -v ~/cassandra.yaml:/etc/cassandra/cassandra.yaml\
        -v ~/cqlshrc:/root/.cassandra/cqlshrc\
        -v ~/security:/security\
        -v /var/lib/cassandra:/var/lib/cassandra\
        --restart always\
        cassandra:4.0.6

The cassandra.yaml File

Before you can start the new Cassandara node, you need to update the cassandra.yaml file.

First I recommand to start a local cassandra docker container and copy the origin cassandra.yaml file from the running container. This is necessary because a lot of parameters and settings have change form version 3.x to 4.0

Now you can tweak the cassandra.yaml file. In parallel you can check your current cluster configuration from a running node with docker:

docker exec -it cassandra cat /etc/cassandra/cassandra.yaml

First take care about the following parameters which should be set to your previous configuration settings:

  • cluster_name
  • num_tokens
  • authenticator
  • seed_provider
  • listen_address (usually out comment)
  • broadcast_address
  • broadcast_rpc_address

If you use the server_encryption_options as explained in my last post you need take care about the following sections:

...
server_encryption_options:
    #internode_encryption: none
    internode_encryption: all
    enable_legacy_ssl_storage_port: true
    keystore: /security/cassandra.keystore
    keystore_password: mypassword
    truststore: /security/cassandra.truststore
    truststore_password: mypassword

# enable or disable client/server encryption.
client_encryption_options:
    enabled: true
    optional: false
    keystore: /security/cassandra.keystore
    keystore_password: mypassword
    require_client_auth: false
....
# enable password authentication!
authenticator: PasswordAuthenticator
...

The important change is in the new parameter ‘enable_legacy_ssl_storage_port‘ which need to be set to ‘true’ during migration.

Expose Port 7000

Since version 4.0 the port 7001 is deprecated. This port was used in older version for the encrypted inter-node communication. Now port 7000 is handling both – encypted as also unencrypted communication. So it is sufficient to expose port 7000 now for inter-node communication.

But as long as your cluster contains nods running with version 3.11 you need to set the new parameter ‘enable_legacy_ssl_storage_port‘ to ‘true’. This parameter tells your 4.0 node to use still port 7001 when connecting to older nodes.

    # When set to true, encrypted and unencrypted connections are allowed on the storage_port
    # This should _only be true_ while in unencrypted or transitional operation
    # optional defaults to true if internode_encryption is none
    # optional: true
    # If enabled, will open up an encrypted listening socket on ssl_storage_port. Should only be used
    # during upgrade to 4.0; otherwise, set to false.
    enable_legacy_ssl_storage_port: true

Note: The parameter ‘enable_legacy_ssl_storage_port‘ is only needed as long as your cluster has nodes running in version 3.x. Later you ignore this param. Which is typically only during the migration phase.

If you have completed the settings you can start the node again in version 4.0.6.

Java – DataStax Driver

If you have a Java client using the DataStax Java Driver to connect to your Cassandra Cluster make sure hat you use the latest Driver verson:

<!-- DataStax Java Driver -->
<dependency>
	<groupId>com.datastax.cassandra</groupId>
	<artifactId>cassandra-driver-core</artifactId>
	<!-- for cassandra 4.0 use 3.11.3 or later -->
	<version>3.11.3</version>
	<scope>compile</scope>
</dependency>

Firewall

If you are running a firewall as explained in my last post you need take care about the new port settings. Port 7001 should no longer be needed.

Wildfly Running on Docker with Custom Setup

WildFly is a modular & lightweight application server based on the Jakarta EE standard.

You can start a Wildfly Sever with the help of Docker quite simple. To start a blank wildfly server in its standard configuration run:

$ docker run -it quay.io/wildfly/wildfly

Bundle Your Application

If you want to bundle your own application you just need a simple Docker file like this:

FROM quay.io/wildfly/wildfly:26.0.0.Final
COPY ./target/*.war /opt/jboss/wildfly/standalone/deployments/

This will copy your web application or microservice from a maven project into the Wildfly deployment directory. The applicaton will be be automatically deployed during startup.

Wildfly & Microprofile

Wildfly comes with different configuration profiles (e.g. cluster mode, full version, microprofile). These configuration files are located in the server directory /opt/jboss/wildfly/standalone/configuration

To start your Wildfly container with one of these configurations – for example with the Eclipse Microprofiles you just need to add a parameter to the startup command, specifying the configuration profile:

FROM quay.io/wildfly/wildfly:26.0.0.Final
COPY ./target/*.war /opt/jboss/wildfly/standalone/deployments/
# Run with microprofiles
CMD ["/opt/jboss/wildfly/bin/standalone.sh", "-b", "0.0.0.0", "-bmanagement", "0.0.0.0", "-c","standalone-microprofile.xml"]

This Dockerfile will now activate the standalone-microprofile.xml configuration during next startup.

Custom Configurations

Of course you can also customize your configuration. For this purpose just copy one of the standalone-*.xml Files form a running container to your host:

$docker cp [CONTAINER_ID]:/opt/jboss/wildfly/standalone/configuration/standalone.xml ./my-standalone.xml

Replace [CONTAINER_ID] with the ID of your running wildfly container.

Next you can edit the standalone.xml file and add your project specific configurations. Finally add you custom file to the container Image via the COPY command in your Dockerfile:

FROM quay.io/wildfly/wildfly:26.0.0.Final
COPY .my-standalone.xml /opt/jboss/wildfly/standalone/configuration/
COPY ./target/*.war /opt/jboss/wildfly/standalone/deployments/
# Run with custom configuration
CMD ["/opt/jboss/wildfly/bin/standalone.sh", "-b", "0.0.0.0", "-bmanagement", "0.0.0.0", "-c","my-standalone.xml"]

That’s it!

CockroachDB – an Alternative to PostgreSQL

The project CockroachDB offers a completely new kind of database. The CockroachDB is a distributed database optimized for container based environments like Kubernetes. The database is Open Source and hosted on Github. CoackroachDB implements the standard PostgreSQL API so it should work with Java Persistence API (JPA). But the CockroachDB does not fully support transaction API with the same isolation level as a PostgreSQL DB. Transactions are important for Java Enterprise applications in combination with JPA – so it may work but it is not as easy as it should be.

Anyway, CockroachDB has a build in replica mechanism. This allows to replicate the data over several nodes in your cluster. With is Automated-Repair feature the database detects data inconsistency on read and write and automatically and fixes faulty data.

So it seems worth to me to test it in combination with Imixs-Workflow which we typically run with PostgreSQL. In the following I will show how to setup the database with docker-compose and run it together with the Imixs-Process-Manager.

Docker-Compose

To run a test environment with Imixs-Workflow I use docker-compose to setup 3 database nodes and one instance of a Wildfly Application server running the Imixs-Process-Manager.

version: "3.6"
services:

  db-management:
    # this instance exposes the management UI and other instances use it to join the cluster
    image: cockroachdb/cockroach:v20.1.0
    command: start --insecure --advertise-addr=db-management
    volumes:
      - /cockroach/cockroach-data
    expose:
      - "8080"
      - "26257"
    ports:
      - "26257:26257"
      - "8180:8080"
    healthcheck:
      test: ["CMD", "/cockroach/cockroach", "node", "status", "--insecure"]
      interval: 5s
      timeout: 5s
      retries: 5

  db-node-1:
    image: cockroachdb/cockroach:v20.1.0
    command: start --insecure --join=db-management --advertise-addr=db-node-1
    volumes:
      - /cockroach/cockroach-data
    depends_on:
      - db-management

  db-node-2:
    image: cockroachdb/cockroach:v20.1.0
    command: start --insecure --join=db-management --advertise-addr=db-node-2
    volumes:
      - /cockroach/cockroach-data
    depends_on:
      - db-management

  db-init:
    image: cockroachdb/cockroach:v20.1.0
    volumes:
      - ./scripts/init-cockroachdb.sh:/init.sh
    entrypoint: "/bin/bash"
    command: "/init.sh"
    depends_on:
      - db-management

  imixs-app:
    image: imixs/imixs-process-manager
    environment:
      TZ: "CET" 
      LANG: "en_US.UTF-8"  
      JAVA_OPTS: "-Dnashorn.args=--no-deprecation-warning"
      POSTGRES_CONNECTION: "jdbc:postgresql://db-management:26257/workflow-db"
      POSTGRES_USER: "root"
      POSTGRES_PASSWORD: "dummypassword"
    ports:
      - "8080:8080"
      - "8787:8787"

You can start the environment with

$ docker-compose up

The root user is created by default for each cluster which is running in the ‘insecure’ mode. The root user is assigned to the admin role and has all privileges across the cluster. To connect to the database using the PostgreSQL JDBC driver, the user root with a dummy password can be provided. Note: this is for test and development only. For production mode you need to start the cluster is the ‘secure mode’. See details here.

The Web UI

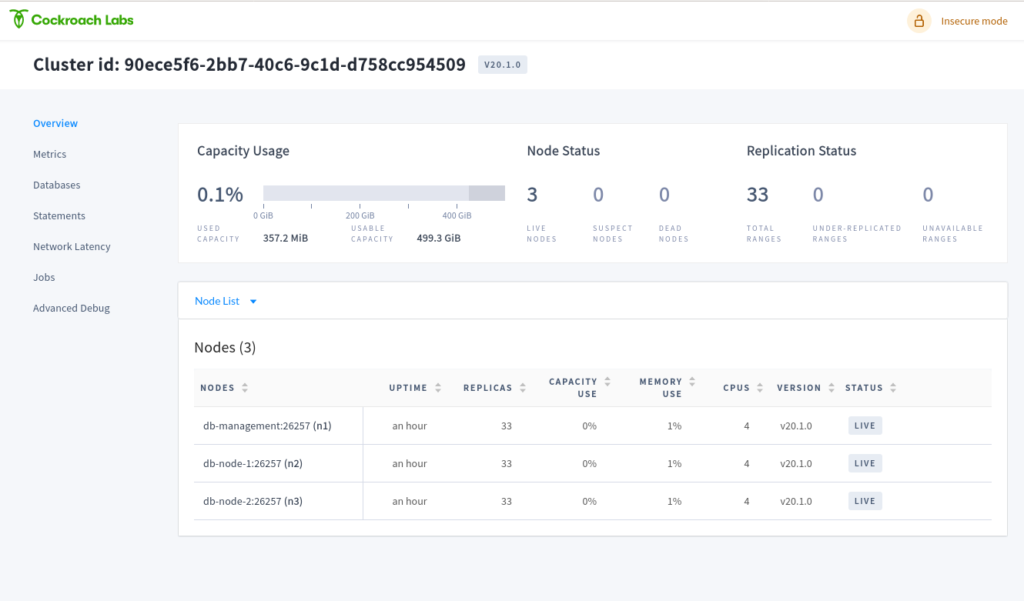
CockroachDB comes with a impressive Web UI which I expose on port 8180. So you can access the Web UI form your browser:

http://localhost:8180/

Create a Database

The Web UI has no interface to create users or databases. So we need to do this using the PostgreSQL command line syntax. For that open a bash in one of the 3 database nodes

$ docker exec -it imixsprocessmanager_db-management_1 bash

Within the bash you can enter the SQL shell with:

$ cockroach sql --insecure
#
# Welcome to the CockroachDB SQL shell.
# All statements must be terminated by a semicolon.
# To exit, type: \q.
#
# Server version: CockroachDB CCL v20.1.0 (x86_64-unknown-linux-gnu, built 2020/05/05 00:07:18, go1.13.9) (same version as client)
# Cluster ID: 90ece5f6-2bb7-40c6-9c1d-d758cc954509
#
# Enter \? for a brief introduction.
#
root@:26257/defaultdb>

now you can create an empty database for the Imixs-Workflow system:

> CREATE DATABASE "workflow-db";

That’s it! When you restart you deployment, the Imixs-Workflow engine successfully connects to CoackroachDB using the PSQL JDBC Driver. In the future I will provide some additional posts about running CockRoach in a Kubernetes Cluster based on the Open Source environment Imixs-Cloud.

NOTE: Further testing shows that the weak isolation level support of ACID transactions in CockroachDB makes it risky to run it in more complex situation. For that reason the Imixs-Workflow project does NOT recommend the usage of CockroachDB. See also the discussion here.

How to Set Timezone and Locale for Docker Image

When I deployed my java applications on the latest Wildfly Docker image I noticed a missing language support for German Umlaute and the timezone CET. So the question was: How can I change this general setting in a Docker container?

Verify Timezone and Language

To verify the timezone and language supported by your running docker container can verify the settings by executing the date and locale command:

$ docker exec <CONTAINER-ID> date
Fri Oct 23 15:21:54 UTC 2020

$ docker exec <CONTAINER-ID> locale
LANG=
LC_CTYPE="POSIX"
LC_NUMERIC="POSIX"
LC_TIME="POSIX"
LC_COLLATE="POSIX"
LC_MONETARY="POSIX"
LC_MESSAGES="POSIX"
LC_PAPER="POSIX"
LC_NAME="POSIX"
LC_ADDRESS="POSIX"
LC_TELEPHONE="POSIX"
LC_MEASUREMENT="POSIX"
LC_IDENTIFICATION="POSIX"
LC_ALL=

Replace <CONTAINER-ID> with the docker id of your running container.

In this example we can see that the container is supporting only the most basic setup. But there are ways to change these settings.

Changing Timezone and Locale by Environment Variables

I most cases you can adjust language and timezone with the standard Linux environment variables TZ, LANG, LANGUAGE and LC_ALL. See the following example:

docker run -e TZ="CET" \
   -e LANG="de_DE.UTF-8" \
   -e LANGUAGE="de_DE:de" \
   -e LC_ALL="en_US.UTF-8" \
   -it jboss/wildfly

In this example I run the official Wildfly container with timezone CET and locale de_DE. You can verify the settings again with the date and locale command.

In most cases it will be sufficient to just set the timezone and the en_US UTF-8 support:

docker run -e TZ="CET" \
   -e LANG="en_US.UTF-8" \
   -it jboss/wildfly

Changing Timezone and Language by Dockerfile

Another way is to change the Docker image during build time:

FROM jboss/wildfly:20.0.1.Final

# ### Locale support de_DE and timezone CET ###
USER root
RUN localedef -i de_DE -f UTF-8 de_DE.UTF-8
RUN echo "LANG=\"de_DE.UTF-8\"" > /etc/locale.conf
RUN ln -s -f /usr/share/zoneinfo/CET /etc/localtime
USER jboss
ENV LANG de_DE.UTF-8
ENV LANGUAGE de_DE.UTF-8
ENV LC_ALL de_DE.UTF-8
### Locale Support END ###

CMD ["/opt/jboss/wildfly/bin/standalone.sh", "-b", "0.0.0.0", "-bmanagement", "0.0.0.0"]

In this example I run the localdef and change the language in /etc/locale.conf/

This will build a complete new Image with standard Locale ‘de_DE’ and timzone CET.

VisualVM & Wildfly running in Docker

In Imixs-Workflow project we use mostly use Wildfly Server to run the Imixs-Worklfow engine. If you want to profile your workflow instance in details you can use the VisualVM profiling tool. To use this tool when running Wildfly in a container will be the topic of this blog post. You can download VisualVM form Github.

When running Wildfly in a container you need to use the remote profile capabilities of VIsualVM to analyse your services. There for your wildfly server running in a docker container should publish the port 9990 which is also the port for the Wildfly Web Interface. Using the Imixs Wildfly Docker image you can simply launch your server with the option “DEBUG=true”.

Next you need to download the wildfly version running in your container into your local workstation as you need some libraries only contained in the corresponding wildfly version. Go to the Wildfly Download page to download the version your are running in your container.

Lets assume you have extracted the wildfly server packages into the following directory

$ /opt/wildfly-18.0.0.Final

than you can start VisualVM with the following option:

$ ./visualvm -cp:a /opt/wildfly-18.0.0.Final/bin/client/jboss-cli-client.jar  -J-Dmodule.path=/opt/wildfly-18.0.0.Final/modules	

Take note of the correct server path.

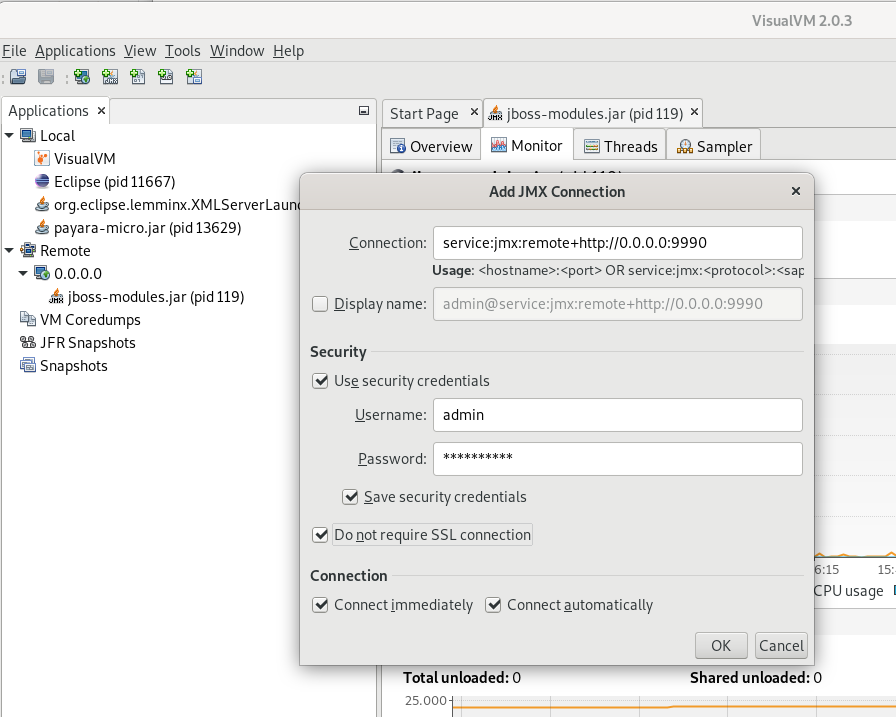
Now you can connect to your wildfly server with a new JMX Connection which you can open from the ‘file’ menu in VisualVM

To connec to to use the following URL:

service:jmx:remote+http://0.0.0.0:9990

Note that you may need a admin user account on your wildfly server. If you are unsure open your wildfly web console first form a web browser:

http://0.0.0.0:9990

OpenLiberty – Performance

In the course of our open source project Imixs-Office-Workflow, I have now examined OpenLiberty in more detail. And I came up to the conclusion that OpenLiberty has a very impressive performance.

Docker

I run OpenLiberty in Docker in the version ‘20.0.0.3-full-java8-openj9-ubi’. Our application is a full featured Workflow Management Suite with a Web Interface and also a Rest API. So for OpenLiberty we use the following feature set:

...
	<featureManager>
		<feature>javaee-8.0</feature>
		<feature>microProfile-2.2</feature>>
		<feature>javaMail-1.6</feature>
	</featureManager>
...

As recommended by OpenLiberty I use the following Dockerfile layout:

FROM openliberty/open-liberty:20.0.0.3-full-java8-openj9-ubi
# Copy postgres JDBC driver
COPY ./postgresql-9.4.1212.jar /opt/ol/wlp/lib
# Add config
COPY --chown=1001:0 ./server.xml /config/server.xml

# Activate Debug Mode...
# COPY --chown=1001:0 ./jvm.options /config/

# Copy sample application
COPY ./imixs-office-workflow*.war /config/dropins/

RUN configure.sh

The important part here is the RUN command at the end of the Dockerfile. This script adds the requested XML snippets and grow image to be fit-for-purpose. This makes the docker build process a little bit slower, but the startup of the image is very fast.

I measured a startup time of round about 12 seconds. This is very fast for the size and complexity of this application. And it is a little bit faster than the startup of Wildfly with round about 15 seconds. Only in case of a hot-redeploy of the application Wildfly seems to be a little bit faster (6 seconds) in compare to OpenLiberty (8 seconds).

Open LibertyWildfly
Docker Startup Time12 sec15 sec
Application Hot Deploy8 sec6 sec

Debug Mode

Note: activating the debug port makes OpenLiberty performance very poor. So do not forget to deactivate debugging in productive mode! The debug mode can be activated by providing a jvm.options file like this:

-agentlib:jdwp=transport=dt_socket,server=y,suspend=n,address=7777

I have commented on this in the Dockerfile example above.

Payara Micro with Custom Configuration

This is a short guideline how to create a payara-micro Docker container with a custom configuration. A custom configuration is needed if you want to configure application server resources like database pools, mail resources or other stuff needed by your application.

1) Downlaod the payara-micro.jar

First you need to download the payara-mciro jar. Go the the official payara download page: https://www.payara.fish/software/downloads/

2) Copy the domain.xml

Next you can inspect the jar file and copy the domain.xml from the config directory

/MICRO-INF/doman/domain.xml

Now you can customize the domain.xml as needed by your project. The configuration is identically to payara-full so you can add all additional resources and configuration. For example you can add a custom data pool configuration into the resources section of the domain.xml.

3) Create a Dockerfile

Now you can create your custom Dockerfile. Payara-micro can be configured with launch options in several ways. One of them allows you to define a custom location of your configuration and domain.xml files. See the following example:

FROM payara/micro
USER root
# create a custom config folder
RUN mkdir ${PAYARA_HOME}/config
COPY domain.xml ${PAYARA_HOME}/config/
COPY postgresql-42.2.5.jar ${PAYARA_HOME}/config
RUN chown -R payara:payara ${PAYARA_HOME}/config
USER payara
WORKDIR ${PAYARA_HOME}
# Deploy artefacts
COPY my-app.war $DEPLOY_DIR
CMD ["--addLibs","/opt/payara/config/postgresql-42.2.5.jar", "--deploymentDir", "/opt/payara/deployments", "--rootDir", "/opt/payara/config","--domainConfig", "/opt/payara/config/domain.xml"]]

In this Dockerfile derived from the official payra/micro I create a new config/ folder to copy the jdbc-driver and the domain.xml.

The CMD option is important here. I added the following custom settings:

  • –addLibs – adds the postgresql jdbc driver
  • –deploymentDir – set the default deployment directory
  • –rootDir set the configuration directory to our new /opt/payara/config/ folder
  • –domainConfig – define the location of the custom domain.xml

With the CMD option –rootDir you can specify what directory Payara Micro should use as its new domain directory. Adding files to this directory will replicate the behavior of a Payara Server’s domain configuration. Payara-Micro automatically copies the folder with configuration files we do not specified explicitly. So at the end the folder contains all necessary configuation.

The CMD option –domainConfig is necessary. Otherwise payara-micro will ignore your custom domain.xml . More information which options can be added can be found here.

4) Build and Launch your Custom Docker Image

Finally you can now build your custom Docker image…

$ docker build --tag=my-custom-payara-micro .

…and start your docker container:

$ docker build --tag=my-custom-payara-micro .

Now you launched (hopefully without errors your custom payara-micro). I hope this helps you to get started with payara-micro and docker.