VisualVM & Wildfly running in Docker

In Imixs-Workflow project we use mostly use Wildfly Server to run the Imixs-Worklfow engine. If you want to profile your workflow instance in details you can use the VisualVM profiling tool. To use this tool when running Wildfly in a container will be the topic of this blog post. You can download VisualVM form Github.

When running Wildfly in a container you need to use the remote profile capabilities of VIsualVM to analyse your services. Make sure hat you publish port 9990 in addition to port 8080. Port 9990 is the management port for the Wildfly Web Interface and JMX capabilities.

Next you need the wildfly client command line tool to start later visualvom. This is java library provided by your Wildfly container. You can simply copy the jar file out from your running wildfly with the Docker command

$ docker cp 7cd7d73ec7a7:/opt/jboss/wildfly/bin/client/jboss-client.jar ./

Replace the Docker Container ID with your own one.

Now that you have the jboss-client.jar on your host, just copy it into your VisualVM install directory and start VisualVM with the following option:

$ ./bin/visualvm -cp:a jboss-client.jar

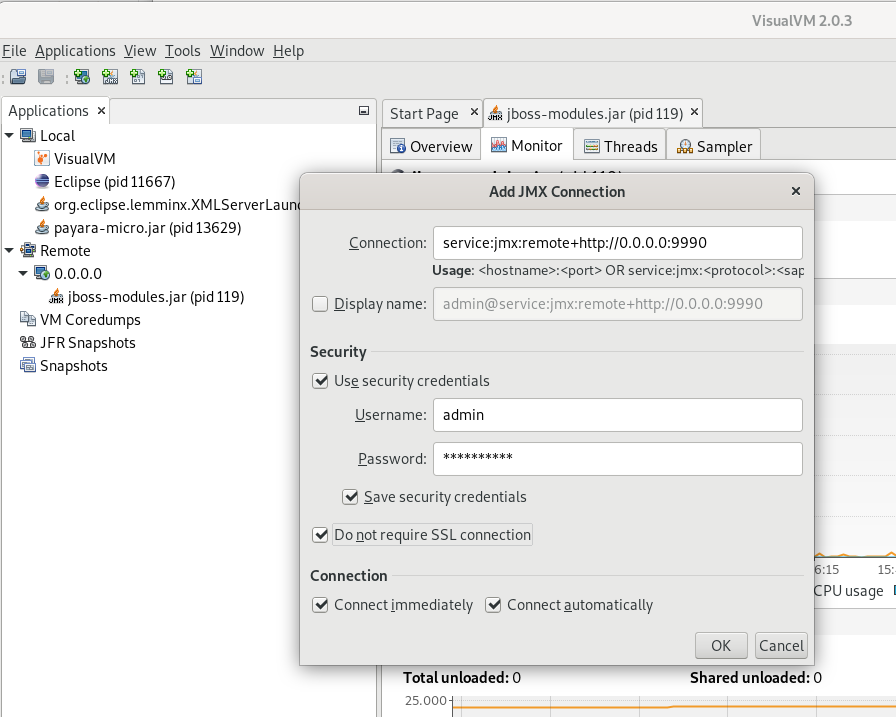
Now you can connect to your wildfly server running in the container with a new JMX Connection which you can open from the ‘file’ menu in VisualVM

To connec to to use the following URL:

service:jmx:remote+http://0.0.0.0:9990

Note that you may need a admin user account on your wildfly server. If you are unsure open your wildfly web console first form a web browser:

http://0.0.0.0:9990

If you do not have yet a remote admin account you can create one within your Wildfly Docker container. Open a bash inside your running container and add the new admin user with the command:

$ ./wildfly/bin/add-user.sh

After you have created your new account you can test the connection from a browser window by opening the URL http://localhost:9990/

The user account you use to login into the Wildfly Admin console is now the same you use for the VisualVM Remote Connection to your server.

ManagedScheduledExecutorService vs EJB Timer

Over the past years I always used EJB Timer Service to implement scheduled tasks in my Java Enterprise applications. Since Java EE7 the ManagedScheduledExecutorService is a new pattern to implement a scheduler service. The ManagedScheduledExecutorService is part of the SE ScheduledExecutorService and provides methods for submitting delayed or periodic tasks for execution.

Implementing a ManagedScheduledExecutorService is quite simple. See the following example:

@Startup
@Singleton
@LocalBean
public class MyScheduler {
  
    @Resource
    ManagedScheduledExecutorService scheduler;    

    @Inject
    MyService myService; 

    @PostConstruct
    public void init() {
        this.scheduler.scheduleAtFixedRate(this::run, 500, 500,
          TimeUnit.MILLISECONDS);
    }    

    public void run() {
        myService.processSomething();
    }
}

In compare to a EJB Timer it seems to be quite simple to use this pattern. But the ManagedScheduledExecutorService is more a lightweight scheduling framework and it does not support features like transaction support, full lifecycle operations (create, read, cancel timers) which are supported by EJB Timers. In addition EJB Timers can be persisted and so survive server crash and restart. And in fact I personally run into a problem with execution exceptions during a redeployment scenario in Wildfly a few days ago. So is a EJB Timer an outdated technology just because it’s an EJB?

The Advantage and Restrictions of EJB Timers

In the early beginning of my Java EE career I learned that EJB timers are persisted an managed by the ejb container on the application server level. This ensures that the timer is executed correctly without conflicts in scenarios with multiple threads. This means even in a clustered environment, a persistent EJB timer runs only in one cluster member which might not necessarily be the same cluster member it was created in. Since we are today mostly talking about horizontally scalable applications spread across multiple servers, this seems to be a restriction. And this was also my first thought when I switched from EJB Timer to ManagedScheduledExecutorService.

But on the other hand, that’s the common expectation for a timer at a specific point to fire only at one of the nodes in order to avoid duplication. For example, you might probably do not want to send out meeting notices twice from different nodes. So the idea that a persisted EJB Timer runs only in one instance even in a large cluster environment can be an important feature and not a restriction.

Non-Persistent EJB Timers

Since EJB 3.1 specification there is a variant of non-persistent EJB Timers. Non-persistent timers have similar semantics and behaviour as the origin persistent timers, but without the overhead of a data store. This means they have a different life cycle and are easier to use than persistent timers. Non-persistent timers are active only while the application server is active and are not maintained across application server crashes, shutdowns and restarts. But in difference to the ManagedScheduledExecutorService the non-persistent EJB Timer is transactional during the creation and cancellation which can be important for many scenarios. If a timer is created within a transaction and that transaction is later rolled back, the creation of the timer is rolled back as well. Similar rules apply to the cancellation of a timer.

This is an example how a EJB Timer can be implemented:

@Singleton
public class MyTimerService {
    @EJB
    MyService myService;
  
    @Schedule(second="*/1", minute="*",hour="*", persistent=false)
    public void doWork(){
        myService.processSomething();
    }
}

In a clustered environment a non-persistent timer runs in each cluster member that it was created in. And a automatic non-persistent timers run in each cluster member that contains the EJB. So this means the non-persistent EJB Timer scales horizontal within a clustered environment – e.g. a Kubernetes cluster. More details about the EJB Timer variants can be found here.

Conclusion

So we have seen how ManagedScheduledExecutorService and EJB Timers can be used to implement scheduled tasks in Jakarta EE. In my personal opinion you should use EJB timers if you are running on a Jakarta EE stack. The EJB Timer provides you with more features and is even scalable as the more lightweight ManagedScheduledExecutorService. This is just my personal opinion. Choose the technology that best fits your app.

Microprofile OpenAPI and Swagger UI

With the Eclipse-Microprofile framework you can develop microservices quite easy. One of the build-in functionalities is the support for the OpenAPI standard. This means your REST services will automatically exposed in a OpenAPI format. For example on a Payara-Micro Server a rest service resource /api/training/ may look like this:

openapi: 3.0.0
info:
  title: Deployed Resources
  version: 1.0.0
servers:
- url: http://localhost:8080
paths:
  /api/training:
    post:
      operationId: getSomeData
      requestBody:
        content:
          application/xml:
            schema:
              $ref: '#/components/schemas/XMLConfig'
      responses:
        default:
          description: Default Response.
          content:
            application/xml:
              schema:
                type: object
components:
  schemas:
    XMLConfig:
     ....

You can request the OpenAPI resource form your server running your REST service:

http://localhost:8080/openapi

Swagger UI

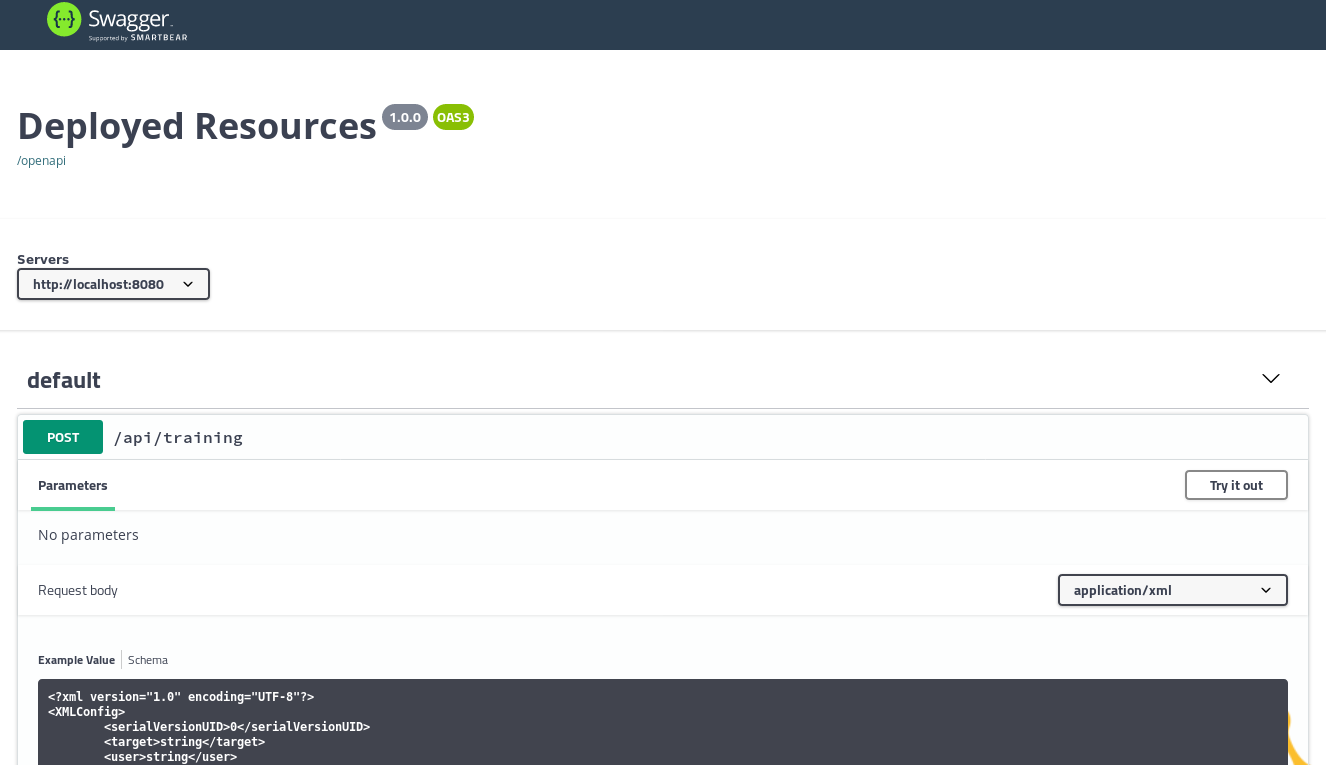
The Swagger UI is a web interface which can be used to interact with your REST API providing the OpenAPI standard. This is a nice feature, with is for example a build-in functionality from OpenLiberty. But also on other Microprofile Servers like Wildfly or Payara you can add the Swagger UI easily. Just add the following maven dependency into your microservice:

   ....
   <dependency>
      <groupId>org.microprofile-ext.openapi-ext</groupId>
      <artifactId>openapi-ui</artifactId>
      <version>1.1.3</version>
   </dependency>
   ...

This will automatically activate the swagger web UI. To access the UI from your web browser just open the resource /openapi-ui/

http://localhost:8080/api/openapi-ui/

Docker

If you are running your service in Docker, which is likely to be the case in most projects, you will need to overwrite the Docker internal host name. Within Eclipse Microprofile, this is very easy via the config API. You simply need to set the following environment variable:

version: "3.3"
services:
 
  my-service:
    image: ....
    environment:
      MP_OPENAPI_SERVERS: "http://localhost:8080"
    ....

You can also add multiple server instances by seperating with comma. You will find a complete a list of configurable items for the OpenAPI in the MicroProfile OpenAPI Specification.

OpenLiberty – Performance

In the course of our open source project Imixs-Office-Workflow, I have now examined OpenLiberty in more detail. And I came up to the conclusion that OpenLiberty has a very impressive performance.

Docker

I run OpenLiberty in Docker in the version ‘20.0.0.3-full-java8-openj9-ubi’. Our application is a full featured Workflow Management Suite with a Web Interface and also a Rest API. So for OpenLiberty we use the following feature set:

...
	<featureManager>
		<feature>javaee-8.0</feature>
		<feature>microProfile-2.2</feature>>
		<feature>javaMail-1.6</feature>
	</featureManager>
...

As recommended by OpenLiberty I use the following Dockerfile layout:

FROM openliberty/open-liberty:20.0.0.3-full-java8-openj9-ubi
# Copy postgres JDBC driver
COPY ./postgresql-9.4.1212.jar /opt/ol/wlp/lib
# Add config
COPY --chown=1001:0 ./server.xml /config/server.xml

# Activate Debug Mode...
# COPY --chown=1001:0 ./jvm.options /config/

# Copy sample application
COPY ./imixs-office-workflow*.war /config/dropins/

RUN configure.sh

The important part here is the RUN command at the end of the Dockerfile. This script adds the requested XML snippets and grow image to be fit-for-purpose. This makes the docker build process a little bit slower, but the startup of the image is very fast.

I measured a startup time of round about 12 seconds. This is very fast for the size and complexity of this application. And it is a little bit faster than the startup of Wildfly with round about 15 seconds. Only in case of a hot-redeploy of the application Wildfly seems to be a little bit faster (6 seconds) in compare to OpenLiberty (8 seconds).

Open LibertyWildfly
Docker Startup Time12 sec15 sec
Application Hot Deploy8 sec6 sec

Debug Mode

Note: activating the debug port makes OpenLiberty performance very poor. So do not forget to deactivate debugging in productive mode! The debug mode can be activated by providing a jvm.options file like this:

-agentlib:jdwp=transport=dt_socket,server=y,suspend=n,address=7777

I have commented on this in the Dockerfile example above.

OpenLiberty and Hot-Deployment

The OpenSource application server OpenLiberty from IBM is very suitable for running microservices and web applications in production. But also for development, the server offers a very good support of autodeploy and hotdeployment.

Per default you can simply drop a new .war file into the folder /config/dropins/ and OpenLiberty will immediately deploy your application. You can configure the behavior of dropins in detail in the server.xml file.

For example, if you add the following tag into your server.xml file:

...
 <applicationManager autoExpand="true" />
....

then your application will be automatically expanded into a new folder at

${server.config.dir}/apps/expanded/APP_NAME/

Now when you deploy your application you will have a file layout like this:

./server.xml
./dropins/myapplication.war
./apps/expanded/myapplication.war/my-page.jsf
./apps/expanded/myapplication.war/WEB-INF/classes/com/foo/SomeAppClass.class

In case you use autoexpand=true than the “active” set of files will be the files under the apps/expanded/ folder which you can then hot-update. This approach is useful if you want to deploy a single .war file and then make tweaks to it after you deploy it, such as in dev mode.

javax.faces.PROJECT_STAGE

Note that the hot-deployment for JSF files is only working if your PROJECT_STAGE param is set to ‘development’. So if not yet activated add the following into your web.xml file:

<context-param>
	<param-name>javax.faces.PROJECT_STAGE</param-name>
	<param-value>Development</param-value>
</context-param>

For production it is recommended to set the parameter to ‘Production’. In this mode JSF files will be cached by OpenLiberty internally.

Alternatively you can set the param ‘javax.faces.FACELETS_REFRESH_PERIOD’ to 1 which will also force OpenLiberty to scann for changed JSF files and class files:

<context-param>
 	<param-name>javax.faces.FACELETS_REFRESH_PERIOD</param-name>
    	<param-value>1</param-value>
</context-param>

Manik Hot-Deply Plugin

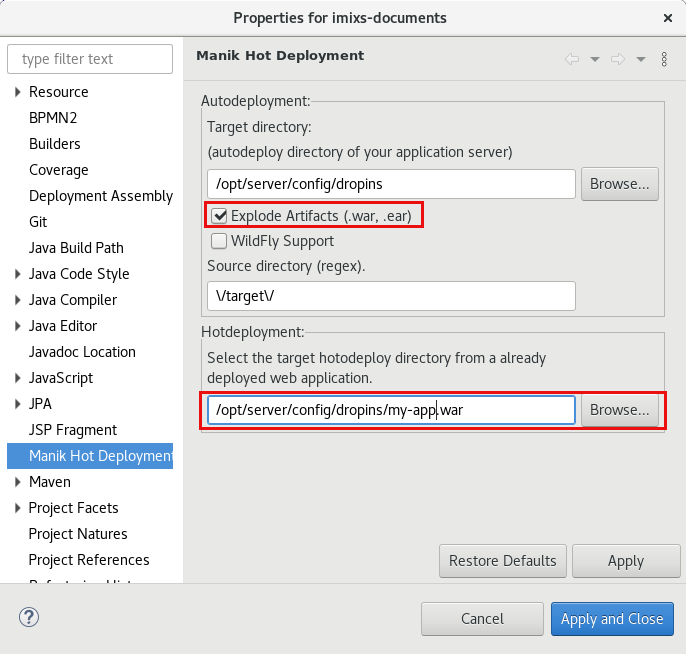
With the Eclipse Hot-Deploy Plugin ‘Manik’ you can enable autodeploy and hot-deploy easily for OpenLiberty.

If you use the Option ‘Explode Artifacts’ you can deploy the .war as a folder directly into the /config/dropins/ folder of your OpenLiberty installation. The Hotdeployment directory is than the .war/ sub directory after the first deployment. You can disable the ‘autoExpand’ feature of OpenLiberty in this case. See also the discussion here.

JSF Best Practice

I do developing with Java Server Pages (JSF) since the early beginning with version 1.0. Today , 17 years later,  we have version 2.3 and thus a lot of improvements and new features.  I’ve made many mistakes in using this standard web framework in my own applications. And therefore I would like to show some best practice rules in this Blog. And I hope this will simplify the work with JSF – for you and also for me – during refactoring my own applications. Most of which I write here comes from the great book ‘ The Definitive Guide to JSF in Java EE 8’ written by Bauke Scholtz (BalusC) and Arjan Tijms. I recommend you to buy this book if you have had already made experience with JSF.  So let’s start…

Continue reading “JSF Best Practice”

JSF, f:ajax and render…..

Designing JSF pages with the usage of the <f:ajax> tag can be a pretty frustrating affair.  For example, if you’re trying to build a table with Ajax behavior, it often won’t work the way you expect it to. For example imaging a table with a delete-button which changes the content of your table:

<h:panelGroup layout="block" 
   id="artikel_table_id" 
   binding="#{artikelTableContainer}">
	<table>
	<ui:repeat var="bookingItem" value="#{childItemController.childItems}">
		<tr>
			<td>....</td>
			<td><h:commandLink value="delete"
				actionListener="#{childItemController.remove(bookingItem.item['numpos'])}">
				<f:ajax render="artikel_table_id"/>
			    </h:commandLink>
			</td>
		</tr>
	</ui:repeat>
	</table>
....

This example won’t work even if it looks logical. The problem here is the render attribute pointing to the id of an outer h:panelGroup. This UI component tree is created during the initial build of the view.  If You’re manipulating the component references after building the view, the changes will not be reflected in the UI component tree during a ajax event life-cycle if you do not care to also execute the compete tree.

To solve this you can change the render attribute in the following way:

<f:ajax render="#{artikelTableContainer.clientId}" 
        execute="#{artikelTableContainer.clientId}"/>

In this way now you have a binding to a component instance which forces jsf to execute and to rebuild the complete UI component tree. Note:  the execution is necessary to update input fields placed within a table row.

ui:repeat versus c:forEach

At a first look it seems that between ui:repeat and c:forEach there is not big difference. This is true if only want to visualize a data set. But if you want to manipulate the entries too – e.g in a table with an embedded edit-mode than you can run in trouble if you are working with an ui:repeat. As explained in the example before, the elements inside a ui:repeat are not part of the component tree. This becomes an issue if your entries are editable. It will work on the first look if you simply submit the outer component. But in case of a JSF validation error, which is initiating the JSF-Life-Cycle the component tree will lost your entered values.

For that reason it is recommended to use a c:forEach tag instead of a ui:repeat if your data set is editable.

Enclosing Ajax Tags

If you use an enclosing ajax tag like in the following example, please note that you need to use a c:foreach instead of ui:repeat :

<h:panelGroup binding="#{artikelTableContainer}"> 
  <f:ajax onevent="updateOrderItems">
  <table>
    <c:forEach var="orderitem" items="#{childItemController.childItems}">        
     <tr> 
       <td>....</td>
       <td><h:commandLink value="delete"
        actionListener="#{childItemController.remove(bookingItem.item['numpos'])}">
      <f:ajax render="#{artikelTableContainer.clientId}" 
          execute="#{artikelTableContainer.clientId}"/>
      </h:commandLink> 
   </td> 
  </tr> 
 </c:forEach> 
</table>
</f:ajax>
</h:panelGroup>

In this case you should not call the ‘execute’ in the enclosing ajax!

Maven on Debian failed with JDK 1.9 – ClassFormatError

Today I ran into a problem with Maven under Debian GNU/Linux 9 (stretch). My Debian has OpenJDK 8 as also OpenJDK 9 installed. OpenJDK 9 is my default java version. My Maven version is 3.3.9.

mvn -version
Apache Maven 3.3.9
Maven home: /usr/share/maven
Java version: 9-Debian, vendor: Oracle Corporation
Java home: /usr/lib/jvm/java-9-openjdk-amd64
Default locale: de_DE, platform encoding: UTF-8
OS name: "linux", version: "4.9.0-6-amd64", arch: "amd64", family: "unix"

The problem is, that building one of my projects results in the following ClassFormat Error:

[ERROR] Failed to execute goal org.apache.maven.plugins:maven-surefire-plugin:2.17:test (default-test) on project imixs-workflow-core: Execution default-test of goal org.apache.maven.plugins:maven-surefire-plugin:2.17:test failed: There was an error in the forked process
[ERROR] java.lang.ClassFormatError: Absent Code attribute in method that is not native or abstract in class file javax/xml/bind/JAXBException
[ERROR] at java.base/java.lang.ClassLoader.defineClass1(Native Method)
[ERROR] at java.base/java.lang.ClassLoader.defineClass(ClassLoader.java:1007)
[ERROR] at java.base/java.security.SecureClassLoader.defineClass(SecureClassLoader.java:174)
[ERROR] at java.base/jdk.internal.loader.BuiltinClassLoader.defineClass(BuiltinClassLoader.java:801)
[ERROR] at java.base/jdk.internal.loader.BuiltinClassLoader.findClassOnClassPathOrNull(BuiltinClassLoader.java:699)
[ERROR] at java.base/jdk.internal.loader.BuiltinClassLoader.loadClassOrNull(BuiltinClassLoader.java:622)
[ERROR] at java.base/jdk.internal.loader.BuiltinClassLoader.loadClass(BuiltinClassLoader.java:580)
[ERROR] at java.base/jdk.internal.loader.ClassLoaders$AppClassLoader.loadClass(ClassLoaders.java:185)
[ERROR] at java.base/java.lang.ClassLoader.loadClass(ClassLoader.java:496)
[ERROR] at java.base/java.lang.Class.getDeclaredMethods0(Native Method)
[ERROR] at java.base/java.lang.Class.privateGetDeclaredMethods(Class.java:3139)
[ERROR] at java.base/java.lang.Class.getMethodsRecursive(Class.java:3280)
[ERROR] at java.base/java.lang.Class.getMethod0(Class.java:3266)
[ERROR] at java.base/java.lang.Class.getMethod(Class.java:2063)
[ERROR] at org.apache.maven.surefire.util.ReflectionUtils.tryGetMethod(ReflectionUtils.java:57)
[ERROR] at org.apache.maven.surefire.common.junit3.JUnit3TestChecker.isSuiteOnly(JUnit3TestChecker.java:64)
[ERROR] at org.apache.maven.surefire.common.junit3.JUnit3TestChecker.isValidJUnit3Test(JUnit3TestChecker.java:59)
[ERROR] at org.apache.maven.surefire.common.junit3.JUnit3TestChecker.accept(JUnit3TestChecker.java:54)
[ERROR] at org.apache.maven.surefire.common.junit4.JUnit4TestChecker.accept(JUnit4TestChecker.java:52)
[ERROR] at org.apache.maven.surefire.util.DefaultScanResult.applyFilter(DefaultScanResult.java:97)
[ERROR] at org.apache.maven.surefire.junit4.JUnit4Provider.scanClassPath(JUnit4Provider.java:206)
[ERROR] at org.apache.maven.surefire.junit4.JUnit4Provider.invoke(JUnit4Provider.java:103)
[ERROR] at org.apache.maven.surefire.booter.ForkedBooter.invokeProviderInSameClassLoader(ForkedBooter.java:200)
[ERROR] at org.apache.maven.surefire.booter.ForkedBooter.runSuitesInProcess(ForkedBooter.java:153)
[ERROR] at org.apache.maven.surefire.booter.ForkedBooter.main(ForkedBooter.java:103)
[ERROR] -> [Help 1]

The problem is a incompatibility of maven 3.3.9 with JDK 1.9. To solve this problem I switch to my OpenJDK 8 by setting the JAVA_HOME variable explicitly to JDK8 :

export JAVA_HOME=/usr/lib/jvm/java-8-openjdk-amd64/

After this change maven install works fine again in my projects.

To make the JAVA_HOME setting permanent follow this stepts.

1. find your preferred java version

ls -la /usr/lib/jvm/

2. edit the file /etc/profile and add the following line with the path to the JDK 8 you find before:

export JAVA_HOME="path to jdk8 that you found"

3. verify you maven installation

mvn -version

You maven should now be set to JDK8.

I hope this post will become obsolete in near future.

Cassandra – How to Handle Large Media Files

Using Apache Cassandra as an highly available  Big Data Platform is in my eyes a good choice as Cassandra Cluster is easy to handle. We are using Apache Cassandra as an archive platform for our human centric worklfow engine Imixs-Workflow. But how does Cassandra perform with large files?

If you start with Cassandra you have to change the way how you use databases, especially when you come from the SQL direction.  Although Cassandra can handle very large amounts of data easily, you have to consider the concept of the partition size. This means in short that the data within a partition (defined by the Partitionkey) should not exceed 100 MB. If you plan to store large files (e.g media files) you need to split up your data into smaller chunks. In the following I will explain in short how this can be done. Continue reading “Cassandra – How to Handle Large Media Files”

MVC 1.0 – Binding Input Values

MVC 1.0 is the new action based web framework for Jakarta EE. One advantage of the new technology is that you can work with plain html. With the expression language (EL) provided by JSP and Facelets you can easily bind values form a CDI controler to an input field:

<dl>
  <dt>Name:</dt>
  <dd>
    <input type="text" value="#{dataController.name}" name="name" />
   </dd>
</dl>

This works also for Textareas:

<dl>
  <dt>Description:</dt>
  <dd>
    <textarea name="descripton">#{dataController.description}</textarea>
  </dd>
</dl>

A little bit more tricky in this szeanrio is the handling of select options (Combobox). As the selected Item is defined by an attribute within the option tag a combination with EL is clumsy. But with the help of jQuery this can also be archived easily. See my following example:

<dl>
  <dt>Sort Order:</dt>
  <dd>
      <select name="sortOrder" id="sortOrder">
        <option value="DESC">Descanding</option>
        <option value="ASC">Ascanding</option>
      </select>
  </dd>
</dl>

<script type="text/javascript">
$(document).ready(function() {
  // update the select option....
  $("#sortOrder").val("#{dataController.sortOrder}");
});
</script>

See also the tutorial “MVC 1.0 in Java EE 8 – Handling Form Submits” to learn how you can submit you form inputs with MVC 1.0.