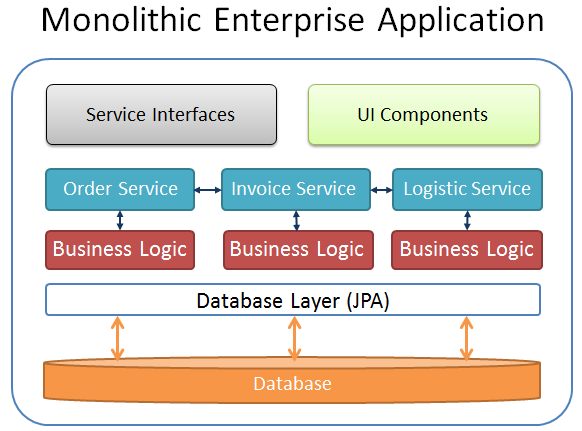
If you think about modern architecture, you will possibly find that one of the best solution (for the moment) seems to be a microservice architecture. Microservices are a quite different approach as we followed in the past, where we often designed monolithic enterprise applications. In a monolithic application context a single software system is encapsulating the business-logic, the database-layer and the UI components. The Java EE architecture provides a perfect framework to build such kind of applications to be deployed and executed in a scalable and transactional application server environment.
But monolithic enterprise applications are sometimes difficult to maintain, even if only little changes need to be made to one of its components. This is one reason why the idea came up to split a monolithic application block into several microservices.
One of the question is, how to change the architecture from a monolith approach to a modern service based architecture? A good overview what this means can be read in Christians Posta’s Blog.
Vertical Services
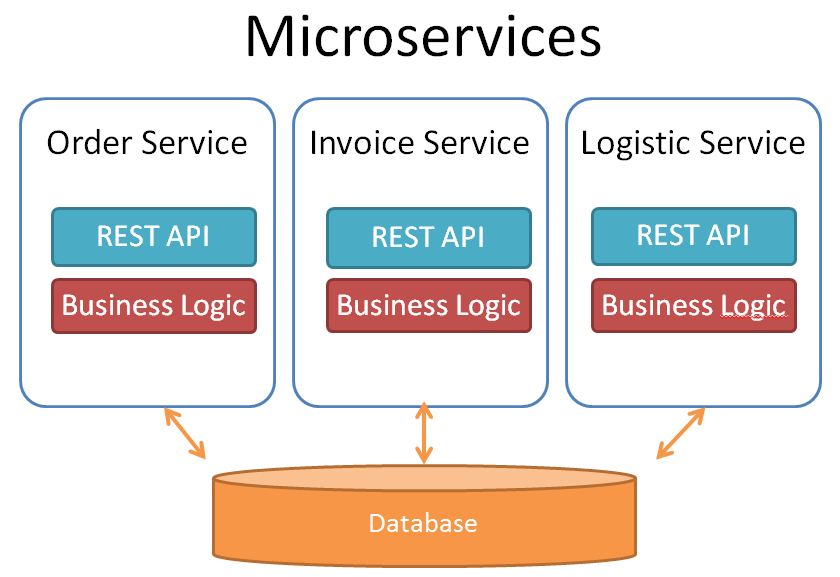
At the first look it seems to be easy to separate business logic into isolated services. But often this approach ends with a closely spaced set of microservices, which are not really loose coupled. One of the reasons can be the database layer which survives as a monolithic block behind all the new microservices. This happens when we think that database objects are related to each other. And this is only a very realistic picture of our real business world. But this creates complex synchronization points between all of our services and teams and you have to coordinate all of the changes in the database layer. Often a database change caused by one service affects also other services.
One solution to solve this problem can be, dividing the functionality into cohesive “verticals”, which are not driven by technical or organizational aspects. Each vertical will have its own “business logic”, “database” and an optional “UI component”. With this approach, we don’t need to re-deploy the entire monolithic business-service tier, if we made changes to a single database object or a functionality of one of these verticals. Ideally, a single team can own and operate on each vertical as well.
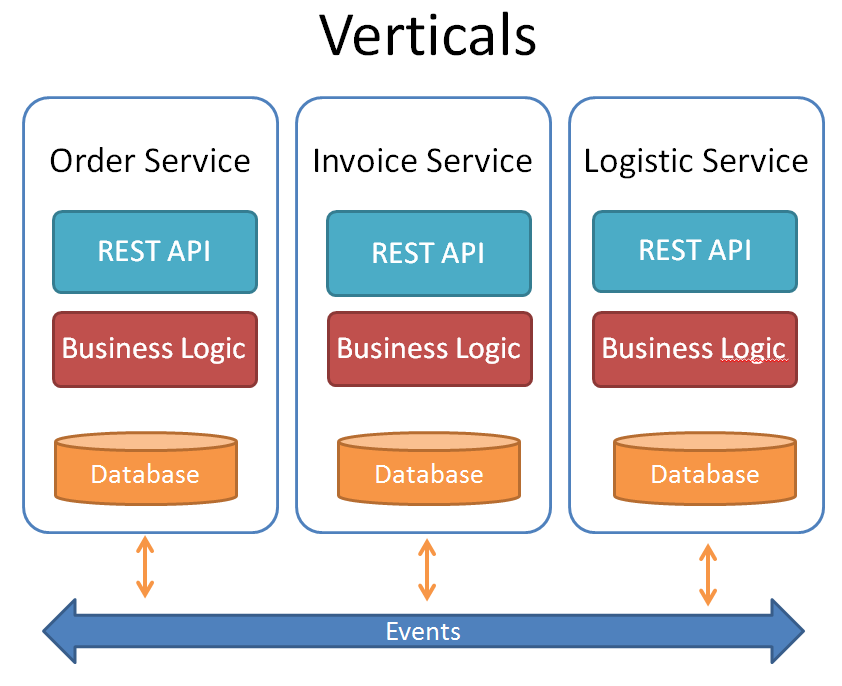
Usually, it is recommended to control the synchronization between the services by sending events. The approach behind this idea is the “Reactive Programming” style. The communication between the services is realized in an asynchronous way . So the business logic of one service layer did not depend on the result of another service layer. A service may or may not react on a specific event. And this is the idea of loose coupling.
But does this fit your business requirements?
The “Business Process Service Architecture”
One problem with decoupling the business logic into separate services is the fact, that there still exists an “Over-All-Business-Logic” behind all these services. This is known as the “Business Process.” If, in our example above, the Order-Service, Invoice-Service and Logistic-Service are implemented as separate building blocks, there is still the general bussiness process of the “Ordering-Management” in the background defining states and business rules. For example if a product is ordered by a customer (Order-Service) the product may not be shipped (Logistic-Service) before an invoice was sent to the customer (Invoice-Service). So it is not sufficient, if the Invoice-Service and the Logistic-Service react asynchronously on a new event, triggered by the Order-Service, without reflecting the business process.
What we can do now, is defining separate events indicating each phase in the Order-Management-Process. For example the Order-Service can send an “Order-Ready-For-Invoice-Event” to signal that the invoice need to be send. And a new “Order-Ready-For-Shipment-Event” can be triggered by the Invoice-Service to indicate that the invoice for the order was sent to the customer and the product can be shipped. But now we have again created the same problem as we had before with the common database. We couple our services via specific event types which are reflecting our business process. The business process is now spread across various services.
To avoid this effect of tightly coupled services we can separate the business process itself as a service. This means that we move the Over-All-Business-Logic out of our services and provide a separate new service layer reflecting only the business process.

I will call this a “Business-Process-Service-Architecture”. In this architecture style each service layer depends on the business-process-service. Events are sent only between a vertical and the Business-Process-Service layer. Our Order-Service, Invoice-Service and Logistic-Service may or may not react on those process events. The advantage of this architecture is, that we now have one service which controls the ordering management process and is reflecting the state for each process instance. Each vertical can call the business-service layer to query the status of the Over-All-Business-Process and also use these workflow information for further processing. Also we can change our business process independent from our vertical service layers.
BPMN 2.0 and Workflow Engines
One of the most common technologies to describe a business process is the ‘Business Process Model and Notation’ – BPMN 2.0 standard. BPMN was initially designed to describe a business process without all the technical details of a software system. A BPMN diagram is easy to understand and a good starting point to talk about a business process with technician as also with management people. Beside the general description of a business process, a BPMN model can also be executed by a process or workflow engine. The Workflow Management System controls each task from the starting point until it is finished. So based on the model description the workflow engine controls the life-cycle of a business process. An example of a workflow engine which can be integrated into a Business Process Service Architecture is the Open Source project Imixs-Workflow.
Beside the general control of the business process, our new service can also collect any kind of meta information from our verticals. The service becomes the central information point in our microservice architecture. We can now change our business process model and integrate new verticals without affecting existing implementations. We have finally decoupled our services. This is one of the most important effects you can achieve with this architecture style. In a future article I will show an example how to integrate a Business Process Service based on a RESTfull service interface.
Continue Reading: How to Design a Business Process Service Architecture

