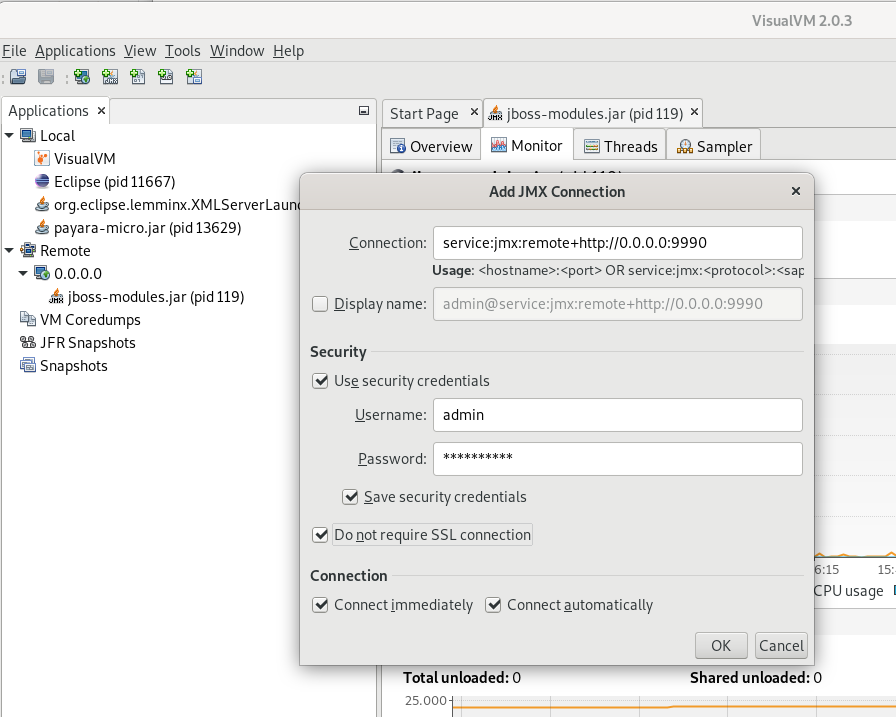
VisualVM & Wildfly running in Docker

In Imixs-Workflow project we use mostly use Wildfly Server to run the Imixs-Worklfow engine. If you want to profile your workflow instance in details you can use the VisualVM profiling tool. To use this tool when running Wildfly in a container will be the topic of this blog post. You can download VisualVM form Github.

When running Wildfly in a container you need to use the remote profile capabilities of VIsualVM to analyse your services. Make sure hat you publish port 9990 in addition to port 8080. Port 9990 is the management port for the Wildfly Web Interface and JMX capabilities.

Next you need the wildfly client command line tool to start later visualvom. This is java library provided by your Wildfly container. You can simply copy the jar file out from your running wildfly with the Docker command

$ docker cp 7cd7d73ec7a7:/opt/jboss/wildfly/bin/client/jboss-client.jar ./

Replace the Docker Container ID with your own one.

Now that you have the jboss-client.jar on your host, just copy it into your VisualVM install directory and start VisualVM with the following option:

$ ./bin/visualvm -cp:a jboss-client.jar

Now you can connect to your wildfly server running in the container with a new JMX Connection which you can open from the ‘file’ menu in VisualVM

To connec to to use the following URL:

service:jmx:remote+http://0.0.0.0:9990

Note that you may need a admin user account on your wildfly server. If you are unsure open your wildfly web console first form a web browser:

http://0.0.0.0:9990

If you do not have yet a remote admin account you can create one within your Wildfly Docker container. Open a bash inside your running container and add the new admin user with the command:

$ ./wildfly/bin/add-user.sh

After you have created your new account you can test the connection from a browser window by opening the URL http://localhost:9990/

The user account you use to login into the Wildfly Admin console is now the same you use for the VisualVM Remote Connection to your server.

Spring Boot or Jakarta EE – What’s Better?

No – I don’t want to start a new flame war in which I put one framework above the other. Both, Spring Boot and Jakarta EE are great frameworks to build great modern Java applications. Some developers prefer this, others prefer that. Why is that? I think it’s often just because the one developer has collected more experience with Spring Boot, the other one with Java EE. These technologies are developing very fast and it is difficult to learn and be able to apply everything correctly. Basically it is a kind of protectionism that you put one over the other so that you don’t appear stupid and ignorant. But there is a certain noise around Spring Boot that gives the impression that Spring Boot would be the far better system.

Continue reading “Spring Boot or Jakarta EE – What’s Better?”

Kustomize your Kubernetes Deployments

When you start working with Kubernetes, you may get to a point where you’re shocked at how complex your YAML files have become. For a complex application consisting of different containers your YAML files will become very very long and it will become harder to change a single piece of configuration like the name of your application without breaking things. This is also known as the YAML hell.

A lot has already been written about how to work around this. Bash programmers write their own scripts and you may have already heard of the tool Helm Charts. I myself am not a very good Bash programmer and also I am not a friend of Helm Charts, because they only make the topic worse. The good news is that there is already an official solution called Kustomize. This declarative approach was originally a separate project which has become a part of Kubernetes since version 1.14. So there is no longer any reason to deal with endlessly long YAML files or Helm Charts if you just want to customize some details of your Kubernetes deployments. And you don not need to install any additional tools for this!

Note: Because of the very rapid development within the open source project Kubernetes, also good tutorials can quickly become obsolete. So be very careful about reading deployment tutorials written before May 2019!

In the following section I will give a brief an simple introduction about how to use Kustomize. You can find more details on the Kubernetes page. Also a good introduction about Kustomize can be found here.

Continue reading “Kustomize your Kubernetes Deployments”

Kubernetes – How to map Config Files

If you are familiar with Docker than you may know that it is a common practise for Docker containers to map local config files. For example in a docker-compose.yaml file you can use the following kind of mapping:

  my-app:
    image: concourse/concourse
    ports: ["8080:8080"]
    volumes: ["./keys/web:/concourse-keys"]

In this example I map the local directory /keys/web/ into a directory /etc/config in my container. In this way my container can read config files or other kind of file data.

Kubernetes – ConfigMap

In Kubernetes there is also such a concept. And as expected for Kubernetes it is much more powerful as in plain docker. But who expects the mapping of config files is hidden behind a concept called ConfigMap?

A ConfigMap in Kubernetes is a very flexible object to be used to provide a docker container with any kind of file data. Typically you store variables as key/value pars in a config map and you can provide these key/value pairs to a Kubernetes pod for example as environment variables. But not only property files can be setup with a ConfigMap, but also public/private keys or even binary data. One way to use a ConfigMap is to publish entire directories to a pod. I will explain this in the following example:

Continue reading “Kubernetes – How to map Config Files”

Why Don’t we Understand the Internet

Today, when we go into our beautiful Internet world, we have to admit that we have forgotten how the technology behind works. This is bad because it makes one of the most important inventions of modern times useless. Why is that? And what is the missing link?

The Beginning

In the beginning of the Internet and the World-Wide-Web (WWW) there was a problem to be solved. For universities, it was very difficult to organize the ever-increasing number of studies and publications in a way that this information could be found. How could a student be able to find out if there is an answer to his question in another university?

This was the moment as the Word-Wide-Web was invented by Tim Berners-Lee. The fact that the Internet already existed during this time and that university servers were connected to each other, it was obvious to use this technology also for publishing knowledge and not just for communication. After all universities published their publications on public self-hosted servers, it was possible to access the information from any point only by knowing the IP address or the name of the university. This was very simple and very efficient. And each university continued to have the control over its own information.

What Happens?

The idea was not limited to universities only and could be applied by any organization, any company and any individual with a public server. So everyone was now able to publish information. But what we did then was to publish information more and more only on a few centrally managed servers. At least most people today believe the internet consists only of this points of information. This severs are known as Facebook, Twitter or Tiktok. And so we have lost control, leading to all the unpleasant excesses that we see in society today.

What can you do about it? Very simple – look for answers to your questions from the person who knows it. not someone who may have found a part of the answer. Even if that is sometimes more time intensive.

We Did it Again!

Ok, that was the general part of my thinking. But since I am a software architect, I like to look at these things from the technical side. Even if we think we know the Internet technology, we are begin using it in the wrong way again.

Microservices are the latest excesses of this development. The basic idea of the microservice is again comparable to Tim Berners-Lee’s invention. Manage different kind of Data on separate (micro)servers. Connect those servers with each other and you can gain more flexibility and faster solutions. James Lewis and Martin Fowler explain this idea in very detail in their definition of Microservices on martinFowler.com.

But the most upsetting thing is – just as we have reduced the WWW to a few social networks by concentrating the distribution of information, we are now starting to do the same with microservice technology. If you read current blogs about microservices, you’ll find that most posts recommend to run your services on only a view central platforms such as AWS, Azure or Google Cloud. This is absolutely terrifying.

I myself recently applied this concept of centralizing data access in one of my open source projects (Imixs-SAGA) and developed a central registry service. Although it may sometimes seem useful to centralize things to facilitate access or data management, we should always consider what the basics of a technology are. In the case of the Internet technology, this is the decentralization of services and the usage and publication of known access points. We should apply these basics also to our microservice solutions. Only in this way can we say that we understand the Internet.

ManagedScheduledExecutorService vs EJB Timer

Over the past years I always used EJB Timer Service to implement scheduled tasks in my Java Enterprise applications. Since Java EE7 the ManagedScheduledExecutorService is a new pattern to implement a scheduler service. The ManagedScheduledExecutorService is part of the SE ScheduledExecutorService and provides methods for submitting delayed or periodic tasks for execution.

Implementing a ManagedScheduledExecutorService is quite simple. See the following example:

@Startup
@Singleton
@LocalBean
public class MyScheduler {
  
    @Resource
    ManagedScheduledExecutorService scheduler;    

    @Inject
    MyService myService; 

    @PostConstruct
    public void init() {
        this.scheduler.scheduleAtFixedRate(this::run, 500, 500,
          TimeUnit.MILLISECONDS);
    }    

    public void run() {
        myService.processSomething();
    }
}

In compare to a EJB Timer it seems to be quite simple to use this pattern. But the ManagedScheduledExecutorService is more a lightweight scheduling framework and it does not support features like transaction support, full lifecycle operations (create, read, cancel timers) which are supported by EJB Timers. In addition EJB Timers can be persisted and so survive server crash and restart. And in fact I personally run into a problem with execution exceptions during a redeployment scenario in Wildfly a few days ago. So is a EJB Timer an outdated technology just because it’s an EJB?

The Advantage and Restrictions of EJB Timers

In the early beginning of my Java EE career I learned that EJB timers are persisted an managed by the ejb container on the application server level. This ensures that the timer is executed correctly without conflicts in scenarios with multiple threads. This means even in a clustered environment, a persistent EJB timer runs only in one cluster member which might not necessarily be the same cluster member it was created in. Since we are today mostly talking about horizontally scalable applications spread across multiple servers, this seems to be a restriction. And this was also my first thought when I switched from EJB Timer to ManagedScheduledExecutorService.

But on the other hand, that’s the common expectation for a timer at a specific point to fire only at one of the nodes in order to avoid duplication. For example, you might probably do not want to send out meeting notices twice from different nodes. So the idea that a persisted EJB Timer runs only in one instance even in a large cluster environment can be an important feature and not a restriction.

Non-Persistent EJB Timers

Since EJB 3.1 specification there is a variant of non-persistent EJB Timers. Non-persistent timers have similar semantics and behaviour as the origin persistent timers, but without the overhead of a data store. This means they have a different life cycle and are easier to use than persistent timers. Non-persistent timers are active only while the application server is active and are not maintained across application server crashes, shutdowns and restarts. But in difference to the ManagedScheduledExecutorService the non-persistent EJB Timer is transactional during the creation and cancellation which can be important for many scenarios. If a timer is created within a transaction and that transaction is later rolled back, the creation of the timer is rolled back as well. Similar rules apply to the cancellation of a timer.

This is an example how a EJB Timer can be implemented:

@Singleton
public class MyTimerService {
    @EJB
    MyService myService;
  
    @Schedule(second="*/1", minute="*",hour="*", persistent=false)
    public void doWork(){
        myService.processSomething();
    }
}

In a clustered environment a non-persistent timer runs in each cluster member that it was created in. And a automatic non-persistent timers run in each cluster member that contains the EJB. So this means the non-persistent EJB Timer scales horizontal within a clustered environment – e.g. a Kubernetes cluster. More details about the EJB Timer variants can be found here.

Conclusion

So we have seen how ManagedScheduledExecutorService and EJB Timers can be used to implement scheduled tasks in Jakarta EE. In my personal opinion you should use EJB timers if you are running on a Jakarta EE stack. The EJB Timer provides you with more features and is even scalable as the more lightweight ManagedScheduledExecutorService. This is just my personal opinion. Choose the technology that best fits your app.

Kubernetes – Force to Delete volumeattachments

In kubernetes it may happen that you can not get rid of a volumeattachment in deletion status. This situation is strange and should not happen but it happens. In this case can solve this undesired status as followed:

Frist list all existing volumeattachments:

$ kubectl get volumeattachment

copy the name of the volumeattachment causing the problem. Next you can try to delete it with:

$ kubectl delete volumeattachment csi-3a184154fxxxxxxxxxxxxxxxxxxxxx

Test if the volumeattachment was delete successfully.

If not, you can force the deletion by editing the volumeattachment resource itself – run:

$ kubectl edit volumeattachment csi-3a184154fxxxxxxxxxxxxxxxxxxxxx

Search for a section starting with

  finalizers:
  - external-attacher/.....

And delete this lines so that no more ‘finalizers’ section exists. Save and close the editor (in VI this is the command ‘wq!’

Now your volumeattachment should be deleted.

If anybody knows a better solution let me know 😉

Microprofile OpenAPI and Swagger UI

With the Eclipse-Microprofile framework you can develop microservices quite easy. One of the build-in functionalities is the support for the OpenAPI standard. This means your REST services will automatically exposed in a OpenAPI format. For example on a Payara-Micro Server a rest service resource /api/training/ may look like this:

openapi: 3.0.0
info:
  title: Deployed Resources
  version: 1.0.0
servers:
- url: http://localhost:8080
paths:
  /api/training:
    post:
      operationId: getSomeData
      requestBody:
        content:
          application/xml:
            schema:
              $ref: '#/components/schemas/XMLConfig'
      responses:
        default:
          description: Default Response.
          content:
            application/xml:
              schema:
                type: object
components:
  schemas:
    XMLConfig:
     ....

You can request the OpenAPI resource form your server running your REST service:

http://localhost:8080/openapi

Swagger UI

The Swagger UI is a web interface which can be used to interact with your REST API providing the OpenAPI standard. This is a nice feature, with is for example a build-in functionality from OpenLiberty. But also on other Microprofile Servers like Wildfly or Payara you can add the Swagger UI easily. Just add the following maven dependency into your microservice:

   ....
   <dependency>
      <groupId>org.microprofile-ext.openapi-ext</groupId>
      <artifactId>openapi-ui</artifactId>
      <version>1.1.3</version>
   </dependency>
   ...

This will automatically activate the swagger web UI. To access the UI from your web browser just open the resource /openapi-ui/

http://localhost:8080/api/openapi-ui/

Docker

If you are running your service in Docker, which is likely to be the case in most projects, you will need to overwrite the Docker internal host name. Within Eclipse Microprofile, this is very easy via the config API. You simply need to set the following environment variable:

version: "3.3"
services:
 
  my-service:
    image: ....
    environment:
      MP_OPENAPI_SERVERS: "http://localhost:8080"
    ....

You can also add multiple server instances by seperating with comma. You will find a complete a list of configurable items for the OpenAPI in the MicroProfile OpenAPI Specification.