
In this blog I would like to give you a short introduction and installation guide for kubernetes.
I worked for years with Docker, Docker-Compose and Docker Swarm. I tried to switch to this ‘common standard’ kubernetes. But to be honest, I’ve always failed in the complexity of kubernetes and given up in frustration. I ask my self – why is kubernetes so complex? The short answer: it is not.
Kubernetes is in compare to Docker Swarm (the build-in scheduler of Docker) much more powerful and has a lot of additional features. But the core concept is similar. The real problem I think is that many people believe, if they follow the installation guideline from an operation teams from Netflix or Google, this should fit there own problems in any way. But if you’re honest with yourself, you’re not dealing with tens of thousands of servers like these companies. So you don’t have to solve similar problems. If you want to run your application on a small cluster of 2 or 3 servers, than read on and learn what I found out.
Installation
In the following I will show how to install a Kubernetes cluster consisting of 3 nodes running Linux Debian 9 (Stretch):
- Master
- Worker1
- Worker2
I assume that you have 3 servers running in the internet or your intranet. In my opinion, it makes little sense to install Minikube or install a kubernetes cluster into a virtualbox running on your workstation. If you want to run your docker images during development you can use docker-compose to setup a small infrastructure. The effort to install Kubernetes makes only sense if you want to run your applications in a potential productive environment.
Disable Swap Partition
Kubernetes don’t allows swap partitions. Check your /etc/fstab file and uncomment the swap partition if available on your system.
The Install Script
In order not to annoy you with endless command line calls, you can use the following bash script for installation on a debian system. (or you can adapt this script to a different Lnux distribution). The script installs the following tools:
- docker-ce (the docker engine)
- docker-ce-cli (the docker command line interface)
- containerd.io (the container runtime)
- kubelet (the kubernetes node agent)
- kubeadm (the kubernetes cluster tool)
- kubectl (the kubernetes command line interface)
setup.sh
#!/bin/sh
############################################################
# Kubernetes Install Script for Debian 9 (Stretch)
#
# run as sudo
############################################################

# determine if we run as sudo
userid="${SUDO_USER:-$USER}"
if [ "$userid" == 'root' ]
  then
    echo "Please run the setup as sudo and not as root!"
    exit 1
fi
if [ "$EUID" -ne 0 ]
  then
    echo "Please run setup as sudo!"
    exit 1
fi

echo "#############################################"
echo " adding repositories..."
echo "#############################################"
apt-get update
apt-get install -y apt-transport-https ca-certificates ne curl gnupg2 software-properties-common

# Add docker repositry
curl -fsSL https://download.docker.com/linux/debian/gpg | apt-key add -
add-apt-repository \
          "deb [arch=amd64] https://download.docker.com/linux/debian \
           $(lsb_release -cs) \
           stable"

# Add kubernetes repository
curl -s https://packages.cloud.google.com/apt/doc/apt-key.gpg | apt-key add -
cat <<EOF | tee /etc/apt/sources.list.d/kubernetes.list
deb https://apt.kubernetes.io/ kubernetes-xenial main
EOF


echo "#############################################"
echo " installing docker and kubernetes...."
echo "#############################################"
apt-get update
apt-get install -y docker-ce docker-ce-cli containerd.io kubelet kubeadm kubectl

#####################################################################################
# Kubernetes is now installed. To setup a new kubernetes cluster with a master node
# run:
#  $ kubeadm init --pod-network-cidr=10.244.0.0/16 --apiserver-advertise-address=[YOUR-NODE-IP-ADDRESS]
#
# This command will setup a new cluster. Follow the instructions of the output.
# The output will show also the command how to join a worker node.
# You can use this script also to install a worker node.
#####################################################################################
run the script as sudo
$ sudo ./setup.sh
Note: To run docker and kubernetes you need a linux kernel. It’s independent which Linux distribution you are using. Take the one you are most familiar with. The only thing you need is a package manager to install the components listed above (in my case I use debian and apt-get).
Note: I am running Kubernetes V 1.17.2 on Debian 9 (Stretch). In Debian 10 (buster) there are some changes in the network layer which affects Kubernetes internal network communication. If you use Debian 10 make sure you first reconfigure the network layers! Otherwise you will see internal API I/O timeout errors.
Setup the Cluster
After you have installed the necessary libraries you can initialize the Kubernetes cluster using the following kubeadm command:
$ sudo kubeadm init --pod-network-cidr=10.244.0.0/16 --apiserver-advertise-address=[NODE_IP_ADDRESS]
Replace [NODE_IP_ADDRESS] with your servers public IP address.
You will see a detailed protocol showing what happens behind the scene. If something went wrong you can easily roll back everything with the command:
$ sudo kubeadm reset
The last output form the protocol shows you the join token needed to setup a worker node. If you forgot to note the join token run:
$ sudo kubeadm token create --print-join-command
Setup kubectl on a Server
To make kubectl work for your non-root user, run these commands, which are also part of the kubeadm init output:
mkdir -p $HOME/.kube
sudo cp -i /etc/kubernetes/admin.conf $HOME/.kube/config
sudo chown $(id -u):$(id -g) $HOME/.kube/config
This will copy the configuration of your master node into the kubernetes config directory ./kube of your home directory.
Setup a flannel network
Next, deploy the flannel network to the kubernetes cluster using the kubectl command.
$ kubectl apply -f https://raw.githubusercontent.com/coreos/flannel/master/Documentation/kube-flannel.yml
The flannel network will been deployed to the Kubernetes cluster. After some seconds the cluster should be up and running. You can check the status with:
$ kubectl cluster-info
and list all nodes with:
$ kubectl get nodes
Install Worker Nodes
Now you can run the same script used to install the master node on each of your worker nodes. This will install the docker runtime and kubernetes tools. To add the new node to your cluster created in the previous step run the join command from the master setup. If you do not know the join command you can run the following command on your master node frist:
$ kubeadm token create --print-join-command
Run the output as a root user on your worker node:
$ sudo kubeadm join xxx.xxx.xxx.xxx:6443 --token xxx.xxxxxxxxx --discovery-token-ca-cert-hash xxxxxxxxxxxxxxxxxxxxxxxxxxxxxx
Controlling Your Cluster From your Workstation
In different to docker-swarm, a kubernetes cluster can be administrated remote from your workstation. The tool ‘kubectl’ is the kubernetes command line tool used to manage your cluster via the kubernetes api either from your server or from a workstatio..
Setup kubectl on Your Workstation
To run kubectl from your workstation you need first to install it. You will find the official install guide here. Note: you install only the kubectl tool, not a full kubernetes server as in the section before.
In order to get kubectl talking to your cluster, you can again copy the content from the administrator kubeconfig file (/etc/kubernetes/admin.conf) into your workstation. (See the section above ‘Setup cubectl on a Server’)
$HOME/.kube/config
Note: The admin.conf file gives the user superuser privileges over the cluster. This file should be used sparingly. For normal users, it’s recommended to generate an unique credential to which you whitelist privileges. Kubernetes supports different authentication strategies, defined here.
Manage your Cluster using K9S
K9s is a powerful terminal tool to interact with your Kubernetes cluster.
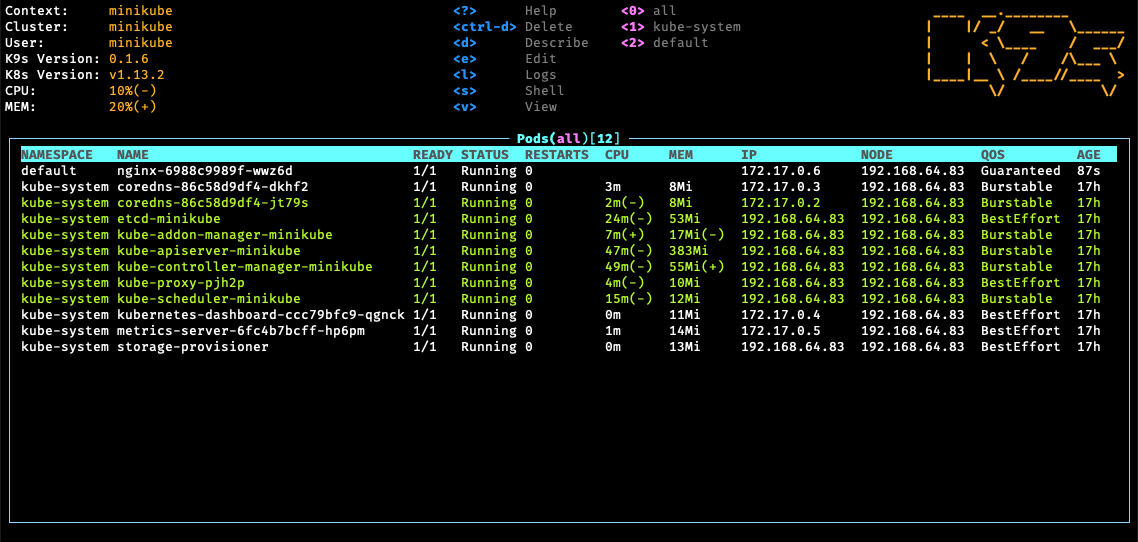
You can download the tool from the release page on Github. To install the tool on your home directory:
# create a directory
$ mkdir k9s
$ cd k9s
# download and extract the latest version
$ wget https://github.com/derailed/k9s/releases/download/0.12.0/k9s_0.12.0_Linux_x86_64.tar.gz
$ tar xvzf k9s_0.12.0_Linux_x86_64.tar.gz
Now you can start the tools with
$ ~/k9s/k9s
Deploy a Test Container
To test you new cluster run:
$ kubectl run whoami --image=emilevauge/whoami --port=80 --generator=run-pod/v1
This will create a simple service showing where it runs. With the next command you can check if your test container is up and running.
$ kubectl get pods
You can see if the pod was created.
Migrating a Docker-Compose file
If you have docker-compose stacks running on a docker swarm environment you can migrate those applications easily to kubernetes. With the tool ‘kompose‘ you can convert a docker-compose.yml file into a set of kubernetes object descriptions
$ kompose convert -f docker-compose.yaml
INFO Kubernetes file "frontend-service.yaml" created
INFO Kubernetes file "redis-master-service.yaml" created
...
Go ahead….
Now as you have setup your first kubernetes cluster you can go ahead and setup services and tools to enhance the functionality.
2 Replies to “From Docker-Swarm to Kubernetes – the Easy Way!”