
In my last blog I showed how you can setup a Kubernets cluster by your own. If your cluster is running in the internet you need some kind of load balancer to access your apps from outside. Traefik is a popular load balancer and reverse-proxy service useful also in a KUbernetes cluster. This tutorial is based on Traefik 1.7 and assumes that you have already an up and running Kubernetes master node and at lease one worker node. You can find also detailed information in the official traefik website.
Setup Traefik 1.7
First you need to provide some description files for traefik installation. First create a application directory:
$ mkdir traefik17
With in this directory you can create the different yaml files describing your application. It’s a good practice to describe your configuration in separate files. Each file should have a number-praefix which is useful for deployment, changes and deleting your application. For the traefik load-balancer confiugraiton we need at least 3 files.
001-rbac.yaml
In the first file we specify the cluster role bindings to allow traefik to detect your services automatically.
---
kind: ClusterRole
apiVersion: rbac.authorization.k8s.io/v1beta1
metadata:
  name: traefik-ingress-controller
rules:
  - apiGroups:
      - ""
    resources:
      - services
      - endpoints
      - secrets
    verbs:
      - get
      - list
      - watch
  - apiGroups:
      - extensions
    resources:
      - ingresses
    verbs:
      - get
      - list
      - watch
  - apiGroups:
    - extensions
    resources:
    - ingresses/status
    verbs:
    - update
---
kind: ClusterRoleBinding
apiVersion: rbac.authorization.k8s.io/v1beta1
metadata:
  name: traefik-ingress-controller
roleRef:
  apiGroup: rbac.authorization.k8s.io
  kind: ClusterRole
  name: traefik-ingress-controller
subjects:
- kind: ServiceAccount
  name: traefik-ingress-controller
  namespace: kube-system
002-deployment.yaml
The second config file contains the traefik deployment description. Note that I use version 1.17 here which is not the latest.
---
apiVersion: v1
kind: ServiceAccount
metadata:
  name: traefik-ingress-controller
  namespace: kube-system
---
kind: Deployment
apiVersion: apps/v1
metadata:
  name: traefik-ingress-controller
  namespace: kube-system
  labels:
    k8s-app: traefik-ingress-lb
    app: traefik
spec:
  replicas: 1
  selector:
    matchLabels:
      k8s-app: traefik-ingress-lb
  template:
    metadata:
      labels:
        k8s-app: traefik-ingress-lb
        name: traefik-ingress-lb
    spec:
      serviceAccountName: traefik-ingress-controller
      terminationGracePeriodSeconds: 60
      containers:
      - image: traefik:v1.7.20
        name: traefik-ingress-lb
        ports:
        - name: http
          containerPort: 80
          hostPort: 80
        - name: admin
          containerPort: 8080
          hostPort: 8080
        securityContext:
          capabilities:
            drop:
            - ALL
            add:
            - NET_BIND_SERVICE
        args:
        - --api
        - --kubernetes
        - --logLevel=INFO
---
kind: Service
apiVersion: v1
metadata:
  name: traefik-ingress-service
  namespace: kube-system
spec:
  selector:
    k8s-app: traefik-ingress-lb
  ports:
    - protocol: TCP
      port: 80
      name: web
    - protocol: TCP
      port: 8080
      name: admin
This deployment describes a ServiceAccount applied to the role bindings defined in the previous file and also the Service providing the load-balancer web port and the port 8080 used for the traefik-web-ui.
From this point of configuration your traefik load-balancer is ready to be used. But traefik comes also with a web-admin-ui which allows you to monitor your load balancer.
003-ingress.yaml
With an optional ingress configuration object we expose the traefik web-ui to the an internet host. This means we use traefk itself to proxy its ui:
---
apiVersion: v1
kind: Service
metadata:
  name: traefik-web-ui
  namespace: kube-system
spec:
  selector:
    k8s-app: traefik-ingress-lb
  ports:
  - name: web
    port: 80
    targetPort: 8080
---
apiVersion: extensions/v1beta1
kind: Ingress
metadata:
  name: traefik-web-ui
  namespace: kube-system
spec:
  rules:
  - host: {YOUR-WORKER-HOST-NAME}
    http:
      paths:
      - path: /
        backend:
          serviceName: traefik-web-ui
          servicePort: web
Replace the placeholder {YOUR-WORKER-HOST-NAME} with a dns name of your internet host name.
Deploy Traefik
To deploy your traefik load-balancer use the kubectl apply command:
$ kubectl apply -f traefik17/
This will apply all of the three configuration objects.
Now you can also monitor traefik from your web browser accessing the internet host defined in the ingress.yaml file

Debuging
To verify what is going on you can print the logfile:
$ kubectl get pods  --namespace kube-system
$ kubectl  --namespace kube-system logs traefik-ingress-controller-XXXX
You can also switch traefik into debug mode which will provide you with much more information in the log files. Just change the logLevel in the 002-daemon.yaml file from INFO to DEBUG
....
        args:
        - --api
        - --kubernetes
        - --logLevel=DEBUG
.....
Publish a Service via Traefik Load Balancer
After your traefik load balancer was succesful deployed you can now publish you application services via traefik to the internet. There for I will demonstrate the setup using the whoami service which is a simple web service telling some details about its host.
Again first create a deployment directory
$ mkdir whomai
Next we create again 3 configuration files.
001-deployment.yml
The first file contains the whoami container deployment
# Deployment
---
apiVersion: apps/v1
kind: Deployment
metadata:
  name: whoami-deployment
spec:
  replicas: 1
  selector:
    matchLabels:
      app: whoami
  template:
    metadata:
      labels:
        app: whoami
    spec:
      containers:
      - name: whoami-container
        image: containous/whoami
002-service.yaml
In the second file I describe the service which is simply publishing the port 80 of the web application:
# Service
---
apiVersion: v1
kind: Service
metadata:
  name: whoami-service
spec:
  ports:
  - name: http
    targetPort: 80
    port: 80
  selector:
    app: whoami
As mentioned earlier, the objects can also be described in one single yaml file. However, it is good practice to separte the different aspects in different files.
003-ingress.yaml
Until now we have only described the whoami application which is fine for internal usage. But if we want to access the service from outside we need the ingress configuration. This is our third file :
apiVersion: extensions/v1beta1
kind: Ingress
metadata:
  name: whoami-service
  namespace: default
spec:
  rules:
  - host: {YOUR-WORKER-HOST-NAME}
    http:
      paths:
      - path: /
        backend:
          serviceName: whoami-service
          servicePort: http
Again you replace the placeholder {YOUR-WORKER-HOST-NAME} with a dns name pointing to your worker node.
To deploy the app run the kubectl apply command:
$ kubectl apply -f whoami/
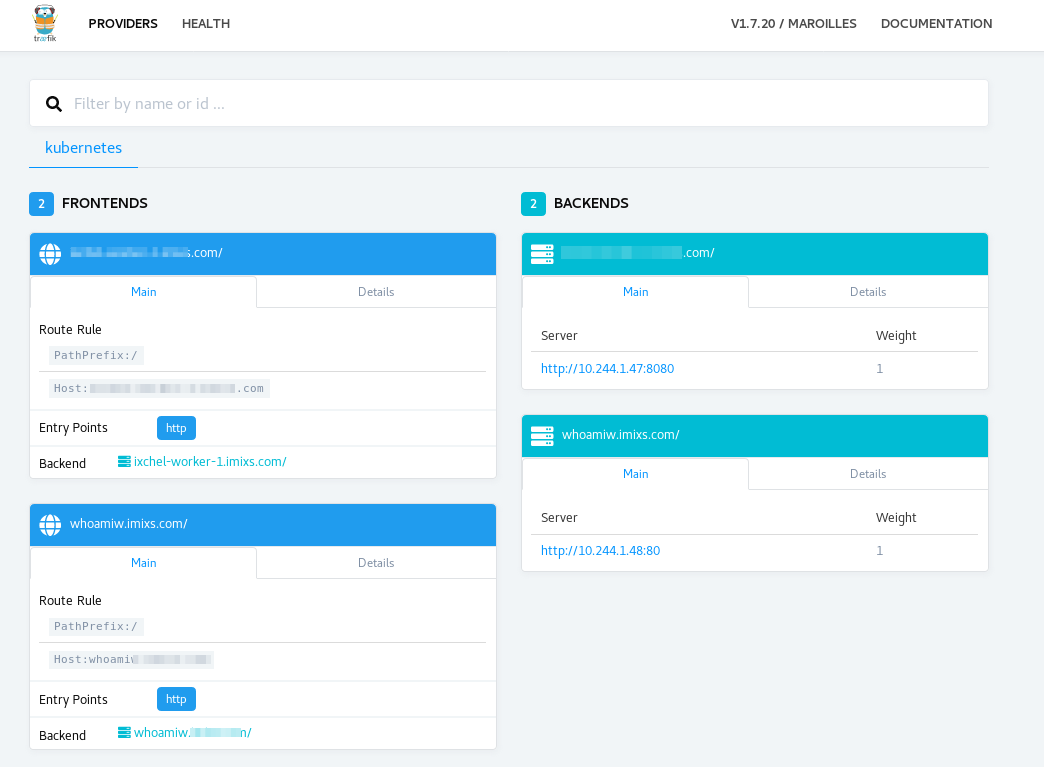
Your new service will shortly be visible in the traefik admin ui:
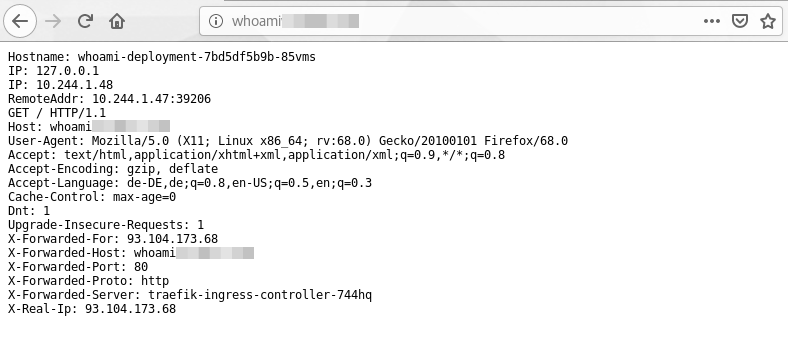
If every went fine you can now access your application from your web browser using the dns name defined in the ingress configuration:
http://{YOUR-WORKER-HOST-NAME}/
In one of my next blogs I will also provide a tutorial how to setup traefik 2.1. Treafik 2.1 comes with a number of new features but also the configuration has change.
It is a very clear procedure.
Is {YOUR-WORKER-HOST-NAME} the hostname of the Kubernetes worker-nodes or master-node? I do not see port 80 is listening, after I have applied ingress.yaml.
# kubectl get ingress
NAME HOSTS ADDRESS PORTS AGE
http2c-server-ingress * 80 37m
also I am not able to edit cm to change from INFO to DEBUG
The host name is the master node name.
But I recommend you to use traefik 2.x. You can find a newer setup guide here: https://github.com/imixs/imixs-cloud/blob/master/doc/INGRESS.md
Default Configuration can be found here:
https://github.com/imixs/imixs-cloud/tree/master/management/traefik