
In this Blog Post I will explain how you can integrate the LibreOffice Online Editor into your Web Application.
In my example I will use a very simple approach just to demonstrate how thinks are working. I will not show how you integrate the editor with a iFrame into your web application because I assume that if you plan to integrate LibreOffice Online into your own application you are familiar with all the web development stuff.
So let’s started….
Docker
LibreOffice Online is available as a Docker image. I strongly recommand to run it with Docker and docker-compose during development as things become more easy.
The Docker image is provided by LibreOffice and by Collabora. Collabora is the community mainly developing the LibreOffice Online code. You can get the collabora docker image from here. Another powerful Docker image for LibreOffice Online can be found on Github here.
General information about the Docker Image from Collabora and an integration guide can be found here:
A simple setup just to start the LibreOffice Online with a docker-compose.yaml file will look like this :
version: "3.6"
services:

  libreoffice-app:
    image: collabora/code:6.4.8.4
    container_name: libreoffice-app
    expose:
      - 9980
    ports:
      - "9980:9980"
    environment:
      - username=admin
      - password=adminadmin
    restart: always
Start the stack with :
$ docker-compose upYou will not see much, because you need a so called WOPI Host to view and edit office documents. But for a first test, just to see if you container is running you can call the so called ‘discovery’ endpoint:
https://localhost:9980/hosting/discoveryThis URL will show you the endpoints we will use later to open a document
Also the capabilities endpoint can be useful:
https://localhost:9980/hosting/capabilitiesThis URL shows you the version and the installed features of your LibreOffice Online instance.
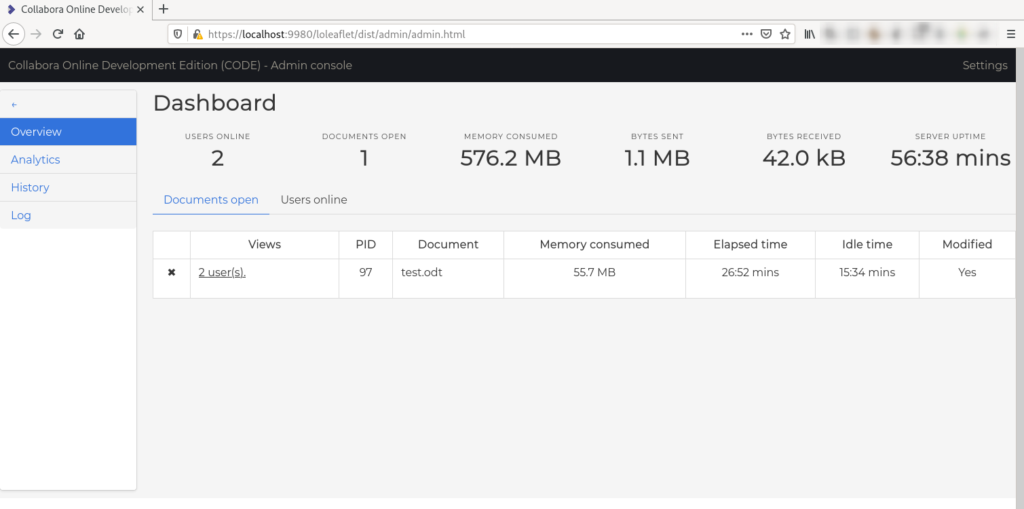
And finally you can open the Admin Interface with the URL:
https://localhost:9980/loleaflet/dist/admin/admin.htmlFor that URL you need the admin password you have defined in your docker-compose.yaml file:
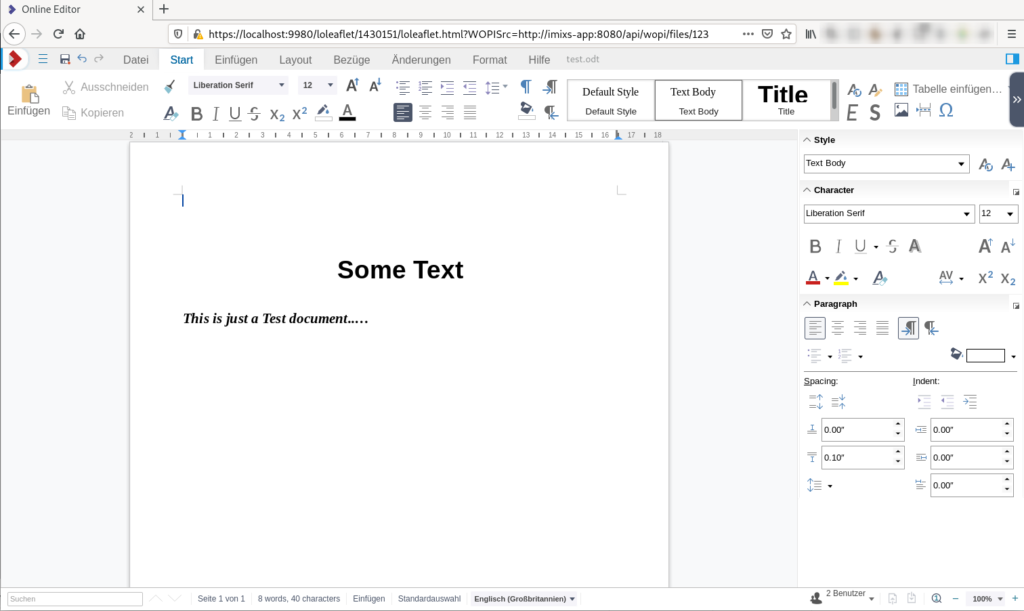
Now to get the Editor integrated into your Web Application as you can see in the first screenshot above you need to implement a Rest Service based on the WOPI API. This rest service is usually part of your Web Application. This service is also called the ‘WOPI Host’
The WOPI Host
The WOPI Host is a Rest Service base on the WOPI API. This API is not restricted to LibreOffice, it is also useable for Microsoft Office 365 – But I think we should continue with LibreOffice …
Note: The Collabora API can be found here.
So what you need is an implementation of a WOPI Host. As explained this service will be part of your own web application. The main function is to provide the documents to be edited and a method to store the result from the editor. For that you need three different endpoints:
CheckFileInfo – GET /wopi/files/{name}
This endpoint returns a JSON object providing information about the file {name}. It will be called by LibreOffice Online to know what kind of document will be shown in the edtior
GetFile – GET /wopi/files/{name}/contents
This endpoint provides the raw data of the file and is called by LibreOffice Online to open the file.
PutFile – POST /wopi/files/{name}/contents
This endpoint is called by LibreOffice Online when the user what save the file. After you have received the file content you can store it within your application. The POST request expects the same JSON object as in the CheckFileInfo GET request.
So you can say, the WOPI Host implementation is your service managing the files to be shown and stored within you application.
Jax-rs Example Implementation
I will show you here a very very simple example implementation base on the Java Jax-rs API. It is not necessary to implement it in java, but I will give you an idea how your service implementation should be working.
package org.imixs.application.wopi;

import java.io.BufferedInputStream;
import java.io.File;
import java.io.FileInputStream;
import java.io.IOException;
import java.io.InputStream;
import java.security.MessageDigest;
import java.security.NoSuchAlgorithmException;

import javax.ejb.Stateless;
import javax.json.Json;
import javax.json.JsonObject;
import javax.json.JsonObjectBuilder;
import javax.servlet.http.HttpServletRequest;
import javax.ws.rs.GET;
import javax.ws.rs.POST;
import javax.ws.rs.Path;
import javax.ws.rs.PathParam;
import javax.ws.rs.Produces;
import javax.ws.rs.core.MediaType;
import javax.ws.rs.core.Response;

@Path("/wopi")
@Produces({ "application/json" })
@Stateless
public class WopiHostService {

    @javax.ws.rs.core.Context
    private HttpServletRequest servletRequest;


    /**
     * Returns the file details.
     */
    @GET
    @Path("/files/{name}")
    @Produces({ MediaType.APPLICATION_JSON })
    public Response getFileInfo(@PathParam("name") String name) {
        byte[] content = loadFile(name);
        File file = new File("/tmp/" + name);

        // create the json object with the file details
        JsonObjectBuilder builder = Json.createObjectBuilder();
        builder.add("BaseFileName",name);
        builder.add("Size",content.length);
        builder.add("OwnerId","admin");
        builder.add("UserId",1);
        builder.add("Version",file.lastModified());
        builder.add("LastModifiedTime",file.lastModified());
        try {
            builder.add("Sha256",getSHA256(file));
        } catch (NoSuchAlgorithmException | IOException e) {
            e.printStackTrace();
        }
        builder.add("UserCanWrite",true);
        JsonObject result = builder.build();
        return Response.ok(result.toString(), MediaType.APPLICATION_JSON).build();
    }

    /**
     * Opens a file and returns the file content as an octet-stream
     *
     * @param name - the file name to be opended
     * @return
     */
    @GET
    @Path("/files/{name}/contents")
    public Response getFileContents(@PathParam("name") String name) {
        try {
            // load file
            byte[] content = loadFile(name);
            Response.ResponseBuilder builder = Response.ok(content, "application/octet-stream")
                    .header("Content-Disposition",
                            "attachment;filename=" + new String(name.getBytes("utf-8"), "ISO-8859-1"))
                    .header("Content-Length", content.length);
            return builder.status(Response.Status.OK).build();
        } catch (Exception ex) {
            ex.printStackTrace();
        }
        return Response.status(Response.Status.NOT_FOUND).build();
    }


    /**
     * saves a file content given form the wopi client
     *
     * @param name
     * @param content
     */
    @POST
    @Path("/files/{name}/contents")
    public void postFileContents(@PathParam("name") String name, InputStream content) {
        // not implemented - do something with the new file content....
        ......
        // build again a JSON checkfile info
        ........
        JsonObject result = builder.build();
        return Response.ok(result.toString(),
        MediaType.APPLICATION_JSON).build();
    }


    /**
     * This is just a helper method to load the content of a file from the
     * filesystem. Replace this implementation to you own needs.
     *
     * @return
     */
    private byte[] loadFile(String name) {
        String path = "/tmp/" + name;
        InputStream fis = null;
        byte[] buffer = null;
        try {
            fis = new BufferedInputStream(new FileInputStream(path));
            buffer = new byte[fis.available()];
            fis.read(buffer);
        } catch (IOException ex) {
            ex.printStackTrace();
        } finally {
            try {
                fis.close();
            } catch (IOException e) {
                e.printStackTrace();
            }
        }
        return buffer;
    }

    /**
     * compute the SHA256 of a file content
     *
     * @param file
     * @return
     * @throws NoSuchAlgorithmException
     * @throws IOException
     */
    private String getSHA256(File file) throws NoSuchAlgorithmException, IOException {
        // Use SHA-1 algorithm
        MessageDigest shaDigest = MessageDigest.getInstance("SHA-256");
        // SHA-1 checksum
        String shaChecksum = getFileChecksum(shaDigest, file);
        return shaChecksum;
    }

    /**
     * Build the checksum of a file
     *
     * @param digest
     * @param file
     * @return
     * @throws IOException
     */
    private static String getFileChecksum(MessageDigest digest, File file) throws IOException {
        FileInputStream fis = new FileInputStream(file);
        // Create byte array to read data in chunks
        byte[] byteArray = new byte[1024];
        int bytesCount = 0;
        // Read file data and update in message digest
        while ((bytesCount = fis.read(byteArray)) != -1) {
            digest.update(byteArray, 0, bytesCount);
        }
        fis.close();
        // Get the hash's bytes
        byte[] bytes = digest.digest();
        // Convert it to hexadecimal format
        StringBuilder sb = new StringBuilder();
        for (int i = 0; i < bytes.length; i++) {
            sb.append(Integer.toString((bytes[i] & 0xff) + 0x100, 16).substring(1));
        }
        return sb.toString();
    }

}
Starting Both Services….
If you have implemented your WOPI Host and build your own Docker image, you can now use docker-compose to start bot – the LibreOffice instance and your WOPI Host. Your docker-compose.yaml file can look like this:
version: "3.6"
services:

  wopi-app:
    image: mywopi-service
    ports:
      - "8080:8080"

  libreoffice-app:
    image: collabora/code:6.4.8.4
    container_name: libreoffice-app
    expose:
      - 9980
    ports:
      - "9980:9980"
    environment:
      - username=admin
      - password=adminadmin
    restart: always
Note we are running two services – wopi-app on port 8080 and LibreOffice on 9980. LibreOffice must be able to access the wopi-app. This access is done internally via the docker private network with the hostname ‘wopi-app’ with is the name of our service.
The Integration
To integrate LibreOffice with your application you need to construct a URL with two parts. The first part is the LibreOffice URL as provided in the discovery service explained above. The second part is pointing to your WOPI Host including the file to be opened:
https://localhost:9980/{libreoffice-editor}.html?WOPISrc=http://wopi-app:8080/api/wopi/files/{your-file}LibreOffice will first fetch the file infos and than loading the file. So you will see to requests against your WOPI Host Service.
The Editor Form
To open the Editor you need finally to define the following HTML Page. This page is necessary to load a file from your WOPI Host. You can later place this into an iFrame for a smooth integration into your own web application:
<html><body>
  <form action="https://localhost:9980/loleaflet/1430151/loleaflet.html?WOPISrc=http://imixs-app:8080/api/wopi/files/test.odt"
        enctype="multipart/form-data" method="post">
    <input name="access_token" value="test" type="text"/>
    <input type="submit" value="Load Collabora Online"/>
  </form>
</body></html>
What we are doing here is the following:
We provide a simple Web Form with an action url starting with the endpoint of your LibreOffice instance (part I. of the URL) and the URL param ‘WOPISrc’ pointing to the WOPI Host implementation (part II. of the URL). Don’t ask why you can’t open the URL form your browser URL. You need the web form to get the editor started (this takes me one day to figure it out).
So that’s it! You should now be able to edit your files in the web browser using LibreOffice!
Security
LibreOffice is not responsible for security. This is all part of your WOPI Host. Typically you will add a Query Param named ‘access_token’ to your access URL. LibreOffice will send the token to your WOP Host. In this way you can secure the calls. This is also important as you can not protect the WOPI Host Rest API endpoint. It must be accessible without any authentication. It is a common practice to work with a custom access_token generated by your we application. For example you can generate a JWT which is a common format to combine a random token with a payload.
Configuration
There is a lot of fine tuning possible with the collabora implementation. The most important part is the file
/etc/loolwsd/loolwsd.xmlYou can access this file via ssh from your running docker container. The file is well documented. You can tweak it and than replace your custom version running the container. For example you can set the log level from ‘warning’ to ‘debug’ which will give you much more insights what’s happening within the LibreOffice container. But you can also change the language support an other things.
Using PostMessage to interact with LibreOffice Online
You can interact with the LibreOffice Online editor form your web application using PostMessages. This way, you have a fine grained controll about the editor and all events send by the editor during runtime. The integration is based on the Web Messaging protocol, also known as PostMessage.
To enable the communication via Post Messages it is important that your application sends the ‘Host_PostmessageReady’ notification the first time the LibreOffice editor was full initialized. For that you need to register a event listenr and wait for the message ‘App_LoadingStatus’ with the status ‘Document_Loaded’.
See the following Example Script:
// This function is invoked when the iframe posts a message back.
function receiveMessage(event) {
	console.log('==== receiveMessage: ' + event.data);
	var msg = JSON.parse(event.data);
	if (!msg) {
		return;
	}
	// are we ready?
	if (msg.MessageId == 'App_LoadingStatus') {
		if (msg.Values) {
			if (msg.Values.Status == 'Document_Loaded') {
				console.log('==== inform the wopi client that we are ready to receife messages');
				window.frames[0].postMessage(JSON.stringify({ 'MessageId': 'Host_PostmessageReady' }), '*');
			}
		}
	}
}

// helper method to post a message
function post(msg) {
	console.log("==== sending new message : " + JSON.stringify(msg));
	window.frames[0].postMessage(JSON.stringify(msg), '*');
}

// example - save...
function save() {
	console.log('save the document....');
	post({
		"MessageId" : "Action_Save",
		"Values" : {
			"DontTerminateEdit" : true,
			"DontSaveIfUnmodified": false,
			"Notify" : true
		}
	});
}

//  Install the wopi message listener.
// receive messages form libreoffice online
window.addEventListener("message", receiveMessage, false);
Find more details about the Post Message in Collaboara here.
Inserting a Custom Button
For example to insert a new button you can send the following PostMessage (after send ‘Host_PostmessageReady’):
function insertCloseButton() {
	post({
		'MessageId' : 'Insert_Button',
		'Values' : {
			'id': 'close42',
			'imgurl': 'http://localhost:8080/layout/icons/close.png',
		    'hint': 'close editor',
		    'mobile': true,
		    'label': 'close',
		    'insertBefore': 'save'
		}
	});

}
It is not easy to figure out the existing button IDs. I only found this source code file which can give you some hints.
Cross Domain Scripting
There is one more important thing to note concerning the Cross Domain Scripting. In JavaScript it is in general not allowed to post messages between sites on different Internet domains. This is called cross domain scripting. But if you run LibreOffice Online on a different domain as your web application (which will usually be the case) than you run into the problem that your browser will avoid opening the LibreOffice editor in a iframe. To solve this problem, X-Frame-Options header set to ‘sameorigin’ comes into the game. To avoid this issue you need to edit the config file ‘/etc/loolwsd/loolwsd.xml’ in your LibreOffice container. In this file the tag ‘frame_ancestors’ can be used to add host names which are allowed to embed the editor into a iframe. So you need to add your application there.
...
<net>
 ...
 <frame_ancestors>my-app.foo.com</frame_ancestors>
</net>
Conclusion
LibreOffice Online provides an extremely powerful and flexible full open source web editor for all kinds of Office documents. The integration is not trivial but it is worth to do it.
If you have any questions or ideas, just leave a comment!
That is exactly the “getting started” I was looking for.
Thanks for your post!
A very good start document. Thank you
Am not able to pull the WOPI image. how can i do this?
Hi Victor, this blog is more a general technical overview about the WOPI concepts and the issues regarding integration. We have realized this in our Open Source Project Imixs-Office-Workflow and you can find more details here: https://doc.office-workflow.com/collabora/overview.html
Hi Ralph,
thank you for this outline, it very informative! We managed to install successfully LibreOffice on the server side, We are struggling with the integration into our application or interacting with the online installation.
Please assist!