How to Convert JSON to XML with XSLT 3.0

Working in a microservice architecture often includes service requests that return a JSON data structure instead of XML. I am personally not a friend of JSON because I think XML is more accurate than JSON when dealing with complex data structures. And with XSL there is also a mature and powerful template technique to adapt XML data structures to your own needs. But any way, we have to take what we have.

JSON and XSLT 3.0

The good news first: XSLT 3.0 can deal with JSON. So we can use the XSL template technique to transform JSON either into XML or a new format which fits best your application data structures. Let’s assume the following XML data containing a JSON structure:

<data>{
	"content": [
	  {
	    "id": 70805774,
	    "value": "1001",
	    "position": [1004.0,288.0,1050.0,324.0]
	  }
	]
}</data>

Working with XSLT, the JSON structure must be packed into a XML tag. In my case this the <data> tag

Now you can use the XSL function json-to-xml to convert the JSON into a XML structure. With the following template you will see how XSL 3.0 deals with JSON:

<?xml version="1.0"?>
<xsl:stylesheet
	xmlns:xsl="http://www.w3.org/1999/XSL/Transform"
	xmlns:math="http://www.w3.org/2005/xpath-functions/math"
	xmlns:xs="http://www.w3.org/2001/XMLSchema"
	exclude-result-prefixes="xs math" version="3.0">
	<xsl:output indent="yes" omit-xml-declaration="yes" />

	<xsl:template match="data">
	    <xsl:copy-of select="json-to-xml(.)"/>
	</xsl:template>
</xsl:stylesheet>

Based on the JSON example above this will result in the following output:

<map xmlns="http://www.w3.org/2005/xpath-functions">
   <array key="content">
      <map>
         <number key="id">70805774</number>
         <string key="value">1001</string>
         <array key="position">
            <number>1004.0</number>
            <number>288.0</number>
            <number>1050.0</number>
            <number>324.0</number>
         </array>
      </map>
   </array>
</map>

As you can see, the XSLT processor creates ‘map’ and ‘array’ tags to structure the data in a XML schema. It also converts numbers, strings and booleans into a corresponding XML tag. After you have transformed a JSON data structure with the function json-to-xml you can next transform this data using the template technique.

Take a look at the following example:

<?xml version="1.0"?>
<xsl:stylesheet
	xmlns:xsl="http://www.w3.org/1999/XSL/Transform"
	xmlns:math="http://www.w3.org/2005/xpath-functions/math"
	xmlns:xs="http://www.w3.org/2001/XMLSchema"
	exclude-result-prefixes="xs math" version="3.0">
	<xsl:output indent="yes" omit-xml-declaration="yes" />
	
	<xsl:template match="data">
		<!-- create a new root tag -->
		<my-document>
			<!-- apply the xml structure generated from JSON -->
			<xsl:apply-templates select="json-to-xml(.)" />
		</my-document>
	</xsl:template>

	<!-- template for the first tag -->
	<xsl:template match="map"
		xpath-default-namespace="http://www.w3.org/2005/xpath-functions">

		<position>
			<!-- select a sub-node structure  -->
			<xsl:apply-templates select="array[@key='content']/map/array[@key='position']/number" />
		</position>
		
	</xsl:template>
		
	<!-- template to output a number value -->
	<xsl:template match="number"
		xpath-default-namespace="http://www.w3.org/2005/xpath-functions">
		<num>
			<xsl:value-of select="." />
		</num>
	</xsl:template>

</xsl:stylesheet>

In this template example I create first a new xml-root tag ‘my-document’. Next – and this is important – I apply a template on the new JSON-to-XML structure. And so I can create some matching templates to select and transform different parts of the XML. The first matching template in my example selects the data of the ‘position’ array which is a sub node of the ‘content’ array. This is a general XSLT/XPath technique and you can apply any kind of template here. It should only demonstrate the power of XSLT.

The outcome of this example will look like this:

<my-document>
   <position>
      <num>1004.0</num>
      <num>288.0</num>
      <num>1050.0</num>
      <num>324.0</num>
   </position>
</my-document>

I hope this helps you to get started with converting your own JSON results.

Payara – Mail Resources

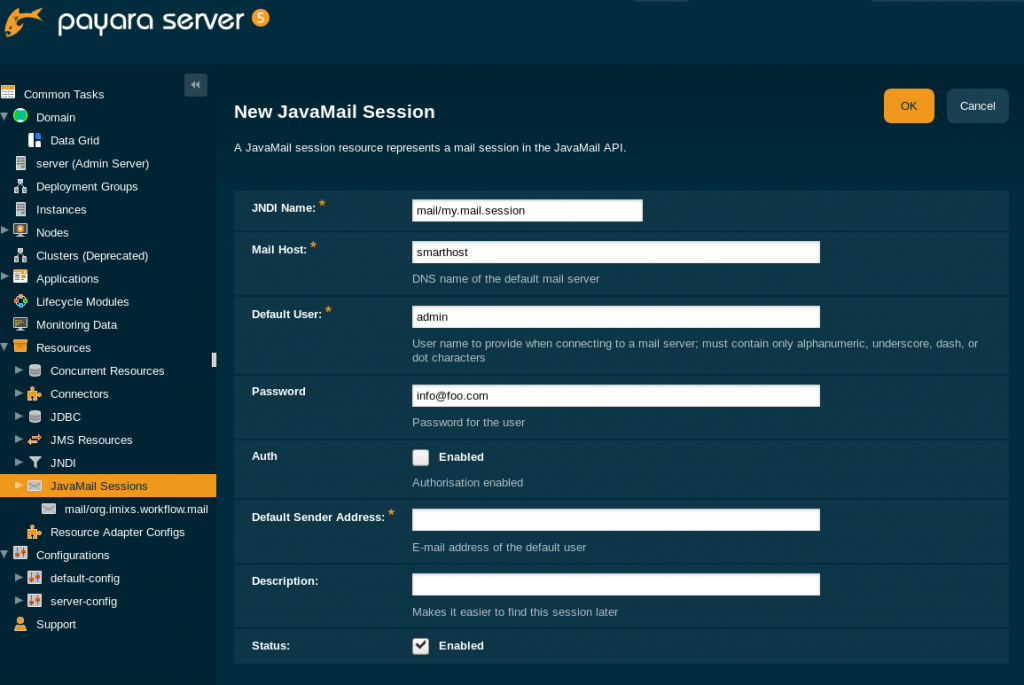
Running an application in Payara you can use a Mail Resource to send mails via SMTP.

In your Java EE code you can inject a Mail Resource by its name:

@Resource(lookup = "mail/my.mail.session")
....
Transport trans = mailSession.getTransport("smtp");
trans.connect();
.....

The Mail resource can be declared in the Payra Web Admin Console in the section “Resources ->JavaMail Sessions”.

Or you can define a mail resource directly in the domain.xml file:

....
 <resources>
  ...
  <mail-resource auth="false" host="smarthost" from="info@foo.com" user="admin" jndi-name="mail/my.mail.session"></mail-resource>
  </resources>
  <servers>
    <server config-ref="server-config" name="server">
      ....
      <resource-ref ref="mail/my.mail.session"></resource-ref>
    </server>
  </servers>
....

If you define the mail resource directyl in your domain.xml file take care about the ‘resource-ref’ declaration in the seciton ‘<servers>’. If you miss this, than your application will not find the mail resource to be injected!

Running Payara on Docker in Debug Mode

The Payara project provide a well maintained docker image on Docker Hub. Since version 5.192 you can easily create a docker image which runs Payara in Debug mode. You need just to add the environment variable “PAYARA_ARGS”

FROM payara/server-full:5.192
...
ENV PAYARA_ARGS --debug

COPY my-example.war $DEPLOY_DIR

Or you can also set the environment in your docker-compose.yml file:

version: "3.6"
services:
....  
  my-server:
    image: payara/server-full:5.192
    environment:
      PAYARA_ARGS: "--debug"
    ports:
      - "8080:8080"
      - "4848:4848"
      - "8181:8181"
      - "9009:9009"
....

After that Payara starts in Debug-Mode and listens to port 9009.

Cassandra and Docker-Swarm

Running a Apache Cassandra Cluster with Docker-Swarm is quite easy using the official Docker Image. Docker-Swarm allows you to setup several docker worker nodes running on different hardware or virtual servers. Take a look at my example docker-compose.yml file:

version: "3.2"

networks:
  cluster_net:
    external:
      name: cassandra-net  
  
services:  

  ################################################################
  # The Casandra cluster 
  #   - cassandra-node1
  ################################################################        
  cassandra-001:
    image: cassandra:3.11
    environment:
      CASSANDRA_BROADCAST_ADDRESS: "cassandra-001"
    deploy:
      restart_policy:
        condition: on-failure
        max_attempts: 3
        window: 120s
      placement:
        constraints:
          - node.hostname == node-001
    volumes:
        - /mnt/cassandra:/var/lib/cassandra 
    networks:
      - cluster_net

  ################################################################
  # The Casandra cluster 
  #   - cassandra-node2
  ################################################################        
  cassandra-002:
    image: cassandra:3.11
    environment:
      CASSANDRA_BROADCAST_ADDRESS: "cassandra-002"
      CASSANDRA_SEEDS: "cassandra-001"
    deploy:
      restart_policy:
        condition: on-failure
        max_attempts: 3
        window: 120s
      placement:
        constraints:
          - node.hostname == node-002
    volumes:
        - /mnt/cassandra:/var/lib/cassandra 
    networks:
      - cluster_net

I am running each cassandra service on a specific host within my docker-swarm. We can not use the build-in scaling feature of docker-swarm because we need to define a separate data volume for each service. See the section ‘volumes’.

The other important part are the two environment variables ‘CASSANDRA_BROADCAST_ADDRESS’ and ‘CASSANDRA_SEEDS’.

‘CASSANDRA_BROADCAST_ADDRESS’ defines a container name for each cassandra node within the cassandra cluster. This name matches the service name. As both services run in the same network ‘cluster_net’ the both cassandara nodes find each user via the service name.

The second environment ‘CASSANDRA_SEEDS’ defines the seed node which need to be defined for the second service only. This is necessary even if a cassandra cluster is ‘master-less’.

That’s is!

Mailspring – an Alternative for Thunderbird

The new Open Source E-Mail Client Mailspring is possible an alternative for your Thunderbird. I am running Linux Debian and there are not so much different mail clients available. Mailspring seems to become more and more interesting.

How to Install Mailspring on Linux Debian

To install mailspring on Linux Deiban first download the latest .deb package from the Download page. To install the client run:

sudo dpkg -i mailspring-*-amd64.deb 

Apache Cassandra and Java EE

In this Blog I will show you how we use Apache Cassandra in our Open Source Project Imixs-Archive. Imixs-Archive is a service which we use in Imixs-Workflow to push business data into a Cassandra Cluster. The service provides a Rest API based on JAX-RS and uses the DataStax Driver to write the data into the Cassandra Cluster.

The problem is that for a connection you need first to setup a Cluster Object and connect to your keyspace to get a Session object. This is time consuming and slows down the rest service call if you do this during the request. But within Java EE you can solve this problem easily

Continue reading “Apache Cassandra and Java EE”

Microprofile CustomConfigSource with Database

With the new Microprofile-Config API there is a new and easy way to deal with configuration properties in an application. The Microprofile-Config API allows you to access config and property values form different sources like:

  • System.getProperties() (ordinal=400)
  • System.getenv() (ordinal=300)
  • all META-INF/microprofile-config.properties files

You can find a good introduction into the Microprofile Config API here. And of course your can also implement your own config source. But most of the examples are based on reading custom config values from am existing file, like in the example here. Now in this Blog I will show how you can implement a Micorprofile ConfigSource based on values read from a Database.

Continue reading “Microprofile CustomConfigSource with Database”

How to configure Security in Open Liberty Application Server?

I started to run our Imixs-Workflow engine on OpenLiberty Application Server. One important thing in Imixs-Workflow is the authentication against the workflow engine. In Open Libertry, security can be configured in the server.xml file. But it takes me some time to figure out the correct configuration of the role mapping in combination with the @RunAs annotation which we use in our service EJBs.

Continue reading “How to configure Security in Open Liberty Application Server?”