Microsoft Teams on Linux

I am not a friend of Microsoft at all but for some reasons I need the Tool Microsoft Teams for some of my customer projects. In the past it was not possible to join a meeting from a Linux machine. But to be honest, Microsoft is working a lot in the Linux world and also contributes a lot of code. So Microsoft is now also supporting Teams .

To install Teams on Linux Debian is quite simple:

1. Download the Debian packages ‘teams….._amd64.deb’ from the microsoft official download page:
https://teams.microsoft.com/downloads#allDevicesSection

2. To install the package from your download run:

$ sudo dpkg -i teams_1.x.xx.xxx_amd64.deb

3. Now you can launch Microsoft Teams:

$ teams

Note: To use teams you should create a Microsoft Account. I am not sure if this is really necessary but I have had already an account.

Stop Microsoft Teams From Starting Automatically on Debian/Gnome

One of the most nasty features of Teams for Linux is that it starts automatically after a reboot and it will stay in background even if you have closed teams. This is an immorality, however, that can easily be avoided.

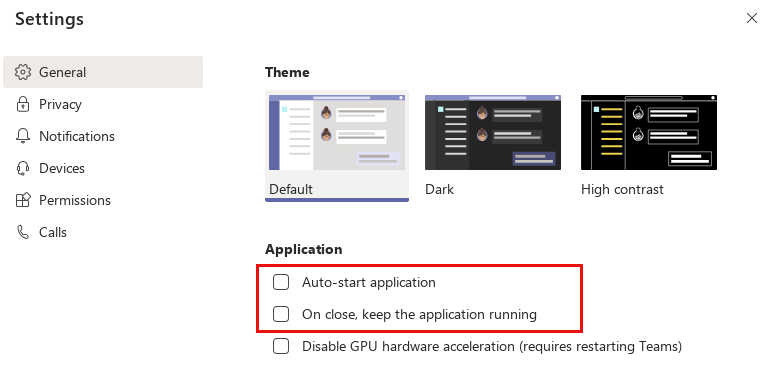
Within teams there is a ‘Settings’ dialog page where you can deactivate autostart function:

If you deactivate the first two application options Teams will be closed completely after you close the teams window. So you can be sure teams is not exchanging data in the background anymore.

To start teams manually again run:

$ teams

Kubernetes and GlusterFS

In this Blog I will explain how to install a distributed filesystem on a kubernetes cluster. To run stateful docker images (e.g. a Database like PostgreSQL) you have two choices.

  • run the service on a dedicated node – this avoids the lost of data if kubernetes re-schedules your server to another node
  • use a distributed storage solution like ceph or glusterfs storage

Gluster is a scalable network filesystem. This allows you to create a large, distributed storage solution on common hard ware. You can connect a gluster storage to Kubernetes to abstract the volume from your services. 

Continue reading “Kubernetes and GlusterFS”

Howto Install Ceph on CentOS 7

In this blog I will explain how to install the Ceph storage system on CentOS. In my previous blog I showed how to install ceph on Debian. But the newer version of ceph are not supported by Debian and Ceph is much better supported by CentOS because RedHat maintains both CentOS and Ceph.

In this blog I will install Ceph ‘Nautilus’ on CentOS 7. You will find detailed information about ceph and the installation process for nautilus release here.

Continue reading “Howto Install Ceph on CentOS 7”

Kubernetes – Storage Volumes with Ceph

In this blog I show how to setup a Kubernetes Storage Volume with Ceph. I assume that you have installed already a kubernetes cluster with one master-node and at least three worker-nodes. On each worker node you need a free unmounted device used exclusively for ceph. Within the ceph cluster I setup a Ceph Filesystem (CephFS) that we can use as a storage volume for kubernetes.

Continue reading “Kubernetes – Storage Volumes with Ceph”

Kubernetes – Setup Traefik 2.1

In my last blog about Traefik I showed how you can setup Traefik version 1.7 in a Kubernetes cluster. In this blog I will explain how to use the latest version 2.1 of Traefik. Version 2.x Traefik implements some new concepts and need of course a different setup. This blog post assumes that you have already an up and running Kubernetes master node and at lease one worker node. See also my Blog ‘From docker-swarm to kubernetes. You can find also detailed information in the official traefik website. A helpful tutorial can also be found here.

Continue reading “Kubernetes – Setup Traefik 2.1”

Kubernetes – Setup Traefik 1.7

In my last blog I showed how you can setup a Kubernets cluster by your own. If your cluster is running in the internet you need some kind of load balancer to access your apps from outside. Traefik is a popular load balancer and reverse-proxy service useful also in a KUbernetes cluster. This tutorial is based on Traefik 1.7 and assumes that you have already an up and running Kubernetes master node and at lease one worker node. You can find also detailed information in the official traefik website.

Continue reading “Kubernetes – Setup Traefik 1.7”

Payara – How To Set Loglevels

Running payara server for test or production requires sometimes more details about the running services. In this case you can increase the log level for a java-package or a single java class.

First you need to log into the server and run the asadmin command:

$ cd ~/appserver/glassfish/bin
$ asadmin

Next you can list the current loggers:

asadmin> list-log-levels
Enter admin password for user "admin"> 
ShoalLogger    
com.hazelcast    
com.sun.enterprise.server.logging.GFFileHandler    
com.sun.enterprise.server.logging.SyslogHandler    
.......

To set a specific log level run

set-log-levels com.foo.MyService=FINEST

And don’t forget to disable the log level after debugging 😉

From Docker-Swarm to Kubernetes – the Easy Way!

In this blog I would like to give you a short introduction and installation guide for kubernetes.

I worked for years with Docker, Docker-Compose and Docker Swarm. I tried to switch to this ‘common standard’ kubernetes. But to be honest, I’ve always failed in the complexity of kubernetes and given up in frustration. I ask my self – why is kubernetes so complex? The short answer: it is not.

Continue reading “From Docker-Swarm to Kubernetes – the Easy Way!”

How to Convert JSON to XML with XSLT 3.0

Working in a microservice architecture often includes service requests that return a JSON data structure instead of XML. I am personally not a friend of JSON because I think XML is more accurate than JSON when dealing with complex data structures. And with XSL there is also a mature and powerful template technique to adapt XML data structures to your own needs. But any way, we have to take what we have.

JSON and XSLT 3.0

The good news first: XSLT 3.0 can deal with JSON. So we can use the XSL template technique to transform JSON either into XML or a new format which fits best your application data structures. Let’s assume the following XML data containing a JSON structure:

<data>{
	"content": [
	  {
	    "id": 70805774,
	    "value": "1001",
	    "position": [1004.0,288.0,1050.0,324.0]
	  }
	]
}</data>

Working with XSLT, the JSON structure must be packed into a XML tag. In my case this the <data> tag

Now you can use the XSL function json-to-xml to convert the JSON into a XML structure. With the following template you will see how XSL 3.0 deals with JSON:

<?xml version="1.0"?>
<xsl:stylesheet
	xmlns:xsl="http://www.w3.org/1999/XSL/Transform"
	xmlns:math="http://www.w3.org/2005/xpath-functions/math"
	xmlns:xs="http://www.w3.org/2001/XMLSchema"
	exclude-result-prefixes="xs math" version="3.0">
	<xsl:output indent="yes" omit-xml-declaration="yes" />

	<xsl:template match="data">
	    <xsl:copy-of select="json-to-xml(.)"/>
	</xsl:template>
</xsl:stylesheet>

Based on the JSON example above this will result in the following output:

<map xmlns="http://www.w3.org/2005/xpath-functions">
   <array key="content">
      <map>
         <number key="id">70805774</number>
         <string key="value">1001</string>
         <array key="position">
            <number>1004.0</number>
            <number>288.0</number>
            <number>1050.0</number>
            <number>324.0</number>
         </array>
      </map>
   </array>
</map>

As you can see, the XSLT processor creates ‘map’ and ‘array’ tags to structure the data in a XML schema. It also converts numbers, strings and booleans into a corresponding XML tag. After you have transformed a JSON data structure with the function json-to-xml you can next transform this data using the template technique.

Take a look at the following example:

<?xml version="1.0"?>
<xsl:stylesheet
	xmlns:xsl="http://www.w3.org/1999/XSL/Transform"
	xmlns:math="http://www.w3.org/2005/xpath-functions/math"
	xmlns:xs="http://www.w3.org/2001/XMLSchema"
	exclude-result-prefixes="xs math" version="3.0">
	<xsl:output indent="yes" omit-xml-declaration="yes" />
	
	<xsl:template match="data">
		<!-- create a new root tag -->
		<my-document>
			<!-- apply the xml structure generated from JSON -->
			<xsl:apply-templates select="json-to-xml(.)" />
		</my-document>
	</xsl:template>

	<!-- template for the first tag -->
	<xsl:template match="map"
		xpath-default-namespace="http://www.w3.org/2005/xpath-functions">

		<position>
			<!-- select a sub-node structure  -->
			<xsl:apply-templates select="array[@key='content']/map/array[@key='position']/number" />
		</position>
		
	</xsl:template>
		
	<!-- template to output a number value -->
	<xsl:template match="number"
		xpath-default-namespace="http://www.w3.org/2005/xpath-functions">
		<num>
			<xsl:value-of select="." />
		</num>
	</xsl:template>

</xsl:stylesheet>

In this template example I create first a new xml-root tag ‘my-document’. Next – and this is important – I apply a template on the new JSON-to-XML structure. And so I can create some matching templates to select and transform different parts of the XML. The first matching template in my example selects the data of the ‘position’ array which is a sub node of the ‘content’ array. This is a general XSLT/XPath technique and you can apply any kind of template here. It should only demonstrate the power of XSLT.

The outcome of this example will look like this:

<my-document>
   <position>
      <num>1004.0</num>
      <num>288.0</num>
      <num>1050.0</num>
      <num>324.0</num>
   </position>
</my-document>

I hope this helps you to get started with converting your own JSON results.

Payara – Mail Resources

Running an application in Payara you can use a Mail Resource to send mails via SMTP.

In your Java EE code you can inject a Mail Resource by its name:

@Resource(lookup = "mail/my.mail.session")
....
Transport trans = mailSession.getTransport("smtp");
trans.connect();
.....

The Mail resource can be declared in the Payra Web Admin Console in the section “Resources ->JavaMail Sessions”.

Or you can define a mail resource directly in the domain.xml file:

....
 <resources>
  ...
  <mail-resource auth="false" host="smarthost" from="info@foo.com" user="admin" jndi-name="mail/my.mail.session"></mail-resource>
  </resources>
  <servers>
    <server config-ref="server-config" name="server">
      ....
      <resource-ref ref="mail/my.mail.session"></resource-ref>
    </server>
  </servers>
....

If you define the mail resource directyl in your domain.xml file take care about the ‘resource-ref’ declaration in the seciton ‘<servers>’. If you miss this, than your application will not find the mail resource to be injected!