Using “curl” to request the Imixs-Workflow Rest API

The command line tool ‘curl’ is useful in cases when you just want to check some REST APIs from a console. You can find a lot of information about how to use curl on curl.haxx.se.

If you want to test the Imixs Rest API you need in most cases a basic authentification against the Workflow Server. This is an example how to send username/password along with a GET request:

curl --user admin:mypassword http://localhost:8080/imixs-microservice/workflow/worklist

This examples returns the worklist for the User ‘admin’ from a Imixs-Workflow Rest Service running on localhost port 8080.

If you don’t specify the media type Imixs-Workflow will return an HTML output. You can see this also in your Browser. But Imixs-Workflow also supports the media types JSON and XML. To request the same URL in JSON you can add a Header parameter like this:

curl --user admin:mypassword -H "Accept: application/json" http://localhost:8080/imixs-microservice/workflow/worklist

or if you want to get the same response in XML format:

curl --user admin:mypassword -H "Accept: application/xml" http://localhost:8080/imixs-microservice/workflow/worklist

If you know the UniqueID of a workitem, which is included in the worklist result you can also request a single Workitem from the Imixs-Workflow. See the following curl example to request a workitem in JSON format:

curl --user admin:adminadmin -H "Accept: application/json" http://localhost:8080/imixs-microservice/workflow/workitem/14b65352f58-259f4f9b

This example returns the content of the Workitem with the UniqueID ’14b65352f58-259f4f9b’. You can also restrict the result to a subset of properties when you add the query parameter ‘items’:

curl --user admin:adminadmin -H "Accept: application/json" http://localhost:8080/imixs-microservice/workflow/workitem/14b65352f58-259f4f9b?items=txtname;$processid

See the Imixs-Workflow RestAPI for more information.

If you want to test what is possible with Imixs-Workflow REST API and curl you can try the Imixs-Microservice. Imixs-Microservice provides a full featured Workflow System based on a REST API. Imixs-Microservice also supports Docker so you do not need to install a Application Server by your self.

JSF and Transactioncontext

Today I want to talk about a detail in the JSF Framework, which is on the first view not obviously. In different to Spring, business logic placed in a JSF front-end controller (JSF Backing Beans) did not initializes a separate transaction context. Normally business logic which need to be transaction save should be spread out into EJBs. EJBs are the recommended place for business logic. So in JSF/EJB business logic should be put into stateless session EJBs and controlled the page flow of a web application through the so called front end controllers  – JSF Backing beans. As I mentioned before spring starts a transaction context also in front-end controllers, but jsf does not.

So what is the problem here? When you look at the following JSF example, you maybe will not recognize the problem at first:

//jsf bean...
@EJB ejb1;
...
public String process(businessobject) {
 ejb1.op1(businessobject);
 ejb1.op2(businessobject);
 ....
}

The JSF front-end controller method ‘process(businessobject)’ injects an EJB and calls two ejb methods. This will propaply work without any side effects. But it can produce errors in some cases. The problem in this pattern is that the front-end controller performed two apparently dependent business actions completely separately. If these two methods need to be transaction save but are operating on the same database entities this can result in serious problems. In a high concurrent system indeed this pattern can cause a corrupted DB state even if you thought JPA will solve all the transaction stuff for you.

The reason for the unexpected behavior is the missing wrapping transaction. Each ejb method starts it own transaction with all the transaction control provided by the ejb container. But the hole business method is not transaction save.

To solve this you have two possible solutions:

1) add a UserTranaction context to the front-end controller:

//jsf bean...
@Resource UserTransaction tx;
@EJB ejb1;
...
public String process(businessobject) {
 try {
   tx.begin();
   ejb1.op1(businessobject);
   ejb1.op2(businessobject);
 finaly {
   tx.commit();
 }....
}

In this example now the jsf controller starts itself the UserTransaction. As a result both EJB methods (with default transaction mode ‘mandatory’) run in the same transaction context. Even operations on the database in a high concurrent system will be transaction save.

2) Merge the EJB Methods into one transaction save business method

The second solution merges both ejb methods into a single EJB method call:

// JSF bean calls new ejb method...
public String process(Entity entity) {
 ejb1.op1op2(entity);
 // ...
}

with the following ejb implementation:

// EJB
public void op1op2(Entity entity) {
 op1(entity);
 op2(entity);
}

Now the new ejb method is transaction save an there is no need to fiddle with UserTransaction in the jsf fornt-end controller.

The second solution is recommended because there is no more risk that the transaction context is split by the front-end. And you can reuse the new ejb method easily with now need to think about the transaction context scenarios.

Maybe this will help you solving some problems with jsf transaction context in the future.

Force Git to hard checkout a branch

I run into a situation with a git repository that I was no longer able to switch between branches. Git complains about uncommitted changes. But I was sure that my local repository should not have any changes.

For force a hard checkout and pull use the following git commands. NOTE: this will overwrite any local changes – so be careful:

git checkout mybranch
git fetch --all
git reset --hard origin/mybranch
git pull


How to develop a business application?

If you start developing a business application you have two different approaches. In the first one – and this is the typically one – you start with the modelling of business objects. For example you have a “car” which can be easily modeled in a business object. You have a “buyer” and a “seller” which can be also simply stored into separated data tables. That’s it! It looks so easy to develop a business applications like in this example for a “used car dealer”. What you do is to describe the real things from the surrounding world into objects using a programming language of your choice. Today we have a lot of frameworks to map the real world things into databases and object orientated application frameworks. This all works well – at a glance. But as we all know, the real world is anything but simple. And in the moment when you realize that “used cars”, “sellers” and “buyers” have more complex relationships you need new objects like a “sales contract” and a “driver‘s license”. A “credit agreement” and awarranty”. And you see that the things of the real world are not so easy as they seems to be in the first time.

A complete different approach to develop a business application is to get rid of the things of the real world. In this case you don’t look for what the persons do with the things. But you look for why they do the things they do. Now you are looking at the process behind the things in our real world – the business process. In the example of our “used car dealer” you can see a buyer showing interest in a car – his desire to buy. You see the dealer who tries to regulate the payment and all the things which can happen when you buy or sell a car.

Now when you try to model this in your business application your thoughts revolve around what people do and what happened during the entire process. And this is the idea of a business process application or a workflow application. Talking about the objects and data tables as we do in the beginning we now need objects like “events”, “activities”, “process states”, “actors” and “time ranges”. This is more abstract because we are now looking behind the things in your visible world. The funny part of this developing is, that you will realize that it does no longer matter if your seller sells cars or flowers or if you buyer is interested in a used car or a holiday travel. Your application becomes more abstract and you begin to model the real abstraction of the world.

When you start developing a business application in the second way you don’t ask your customer what the things are he what’s to save into a database. You ask him why he need an application to do his work better.

Take a look at our open source project Imixs-Workflow. It maybe can help you to get on that way.

GlassFish and PostgreSQL

To setup a PostgreSQL database connection in GlassFish is quite simple. There is one point which required special attention. First, it looks sufficient for the GlassFish DataPool configuration to only define the parameters “DatabaseName”, “User” and “Password”. By default, the URL has the value:

jdbc:postgresql://localhost/?loginTimeout=0&socketTimeout=0&prepareThreshold=5&unknownLength=2147483647&tcpKeepAlive=false&binaryTransfer=true&disableColumnSanitiser=false

But it is very important that the URL contains also the DatabaseName after the hostname:

jdbc:postgresql://localhost/[YOURDATABASENAME]?loginTimeout=0&socketTimeout=0&prepareThreshold=5&unknownLength=2147483647&tcpKeepAlive=false&binaryTransfer=true&disableColumnSanitiser=false

Otherwise it can happen that GlassFish losts the connection and is unable to find any tables. When you change your pool configuration don’t forget to restart GlassFish.

EclipseLink – DataSources!

If you configure postgresql in GlassFIsh or WildFly it seems to be very important that the additional property ‘url’ is always set with the corresponding jdbc connection url. Even if the setup wizzard (wildfly) did not fill this param!

JPA – EclipseLink – MySQL – @OneToMany

Today I was faced with a really strange problem concerning JPA, EclipseLink an MySQL. I have Service EJB (3.1) with some JPA Entity Beans. They are joined with @OneToMany constraints. I am deploying my application typically under GlassFish 3.1 with MySQL Database. Everything works fine so far. But in some really strange cases – long complex transactions with a lot of updates and inserts I got a JPA Exception like this:

[#|2014-09-25T17:21:01.989+0200|WARNING|glassfish3.1.2|org.eclipse.persistence.session.file:/opt/glassfish-3.1.2/glassfish/domains/domain2/applications/office/office-ejb-1.0.0_jar/_org.imixs.workflow.jee.jpa|_ThreadID=160;_ThreadName=Thread-2;|Local Exception Stack: 
Exception [EclipseLink-4002] (Eclipse Persistence Services - 2.3.2.v20111125-r10461): org.eclipse.persistence.exceptions.DatabaseException
Internal Exception: com.mysql.jdbc.exceptions.jdbc4.MySQLIntegrityConstraintViolationException: Cannot delete or update a parent row: a foreign key constraint fails (`mydatabase`.`ENTITY_WRITEACCESS`, CONSTRAINT `FK_ENTITY_WRITEACCESS_writeAccessList_ID` FOREIGN KEY (`writeAccessList_ID`) REFERENCES `WRITEACCESS` (`ID`))
Error Code: 1451
Call: DELETE FROM WRITEACCESS WHERE (ID = ?)
    bind => [1 parameter bound]
Query: DeleteObjectQuery(org.imixs.workflow.jee.jpa.WriteAccess@5aa4670a)

I was confronted with such error messages in the past and solved them by changing the transaction boundaries in my code by encapsulating some of the jpa stuff in separate methods with new transaction context.

But The real reason for this kind of error is an inaccurate mapping of the database schema in MySQL made by EclipseLink. My table ‘ENTITY_WRITEACCESS’ is a crosstable needed for a @OneToMany relationship of my JPA entity beans.  I never looked at the schema in detail, because in my opinion that is stuff of the OR-Mapper.
The problem was that per default no CascadeType is defined for a @OneToMany relationship. But even when you define a CascadeType like CascadeType.DELETE – which is also implied by CascadeType.ALL – to your entity beans this will not necessarily be reflected to the database schema generated from the OR-Mapper. When you look at the generated schema you’ll notice that ON DELETE CASCADE is not added to the constraint. When you alter your schema and Add ON DELETE CASCADE to actual tables this will fix the problem above.

Note that this all depends on the JPA implementors how the constrains are created. So take a look at your generated table schemas.

New Version of Manik-Hot-Deploy for GlassFish and WildFly

Today I released a new Version of the Manik-Hot-Deploy Eclipse Plugin. The new version now stores the settings in a separate prefernces file stored in the project .settings/ directory. So now it is possible to share the Manik-Hot-Deploy settings with a source code repository in a team.

The Plugin can be used to deploy JEE applications in a GlassFish or JBoss/WildFly server. Manik-Hot-Deploy supports the hot deploy feature which speeds up development of JEE Web Applications.

https://github.com/rsoika/manik-hot-deploy

Debug an application in WildFly with Eclipse

You can debug a deployed applications running in WildFly with the Eclipse Debugging feature.

First you need to start WildFly in debug mode with the following command:

standalone.sh --debug --server-config=standalone.xml

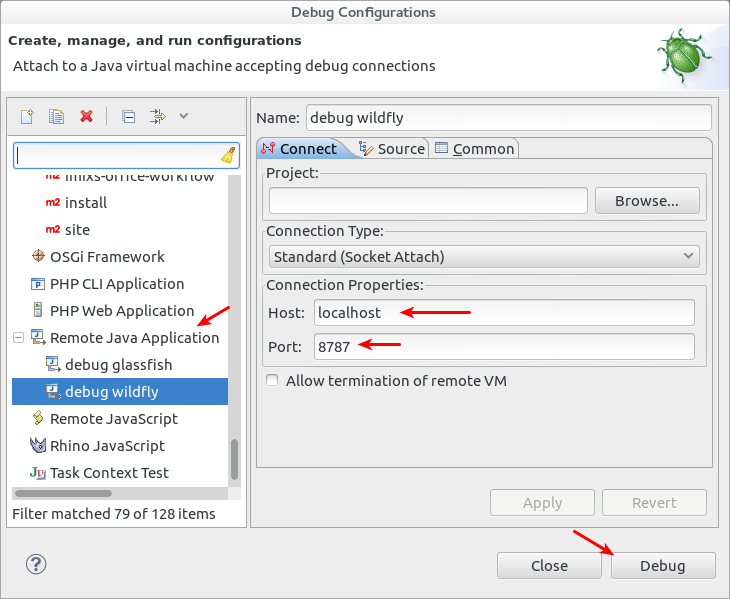
Now WildFly starts in the debug mode and listens to the port 8787.

To enable debugging in your Eclipse IDE you now can add a new Debug Configuration:

wildfly_debug_eclipse

This will connect Eclipse to the WildFly Debug port.

Connection refused!

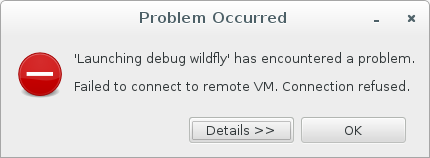
It may happen that – even if you have started glassfish in debug mode and configured all well – you got the following eclipse error message:

Failed to connect to remote VM. Connection refused.

eclipse-debug-02

In this case – it maybe can help if you add a project to the debug configuration. In the screen example above I have let the field ‘Project’ empty. It may help in some cases that you select a project there

GlassFish performance analyzing with VisualVM

This is a short overview how to do a performance analyze in GlassFish using VisualVM. When GlassFish is running and you start VisualVM it will typically connect to GlassFish. You see a local node of your GlassFish instance.

visualvm01

If GlassFish Server is not found than you need to verfy your profiler settings n GlassFish Web Console.

Now you can test the performance of your application deployed on GlassFish. Continue reading “GlassFish performance analyzing with VisualVM”