I have had the problem that I can’t connect a new SoundCore speaker device to my notbook running Debian. The problem was that the Bluetooth device was detected, but when I tried to connect it immediatly disconnected.
After a long trail and error the solution was simple:
When I started with the Application Server Glassfish years ago I used to configure the Server always directly in the domain.xml file. This is the file containing the configuration and all your customizations when you configure your Glassfish form the Web Admin Interface. The same is true for Payara Server which is more widespread in projects today. (The main different from Glassfish to Payara is, that Payara offers support where Glassfish is the reference implementation for Jakarta EE).
I’ve never gotten rid of my habit of configuring the server directly in the domain .xml, although there is a command-line tool called ‘asadmin‘ for doing the configuration. When you run you projects in Docker you even can copy the domain.xml into a Payara Docker image as you will do with your application. But these days I learned that this is a clumsy and impractical way to do this. The problem with tweaking the domain.xml directly is that you can miss some important XML tags or new coniguration details. So using the asadmin tool is more stable also over differnt versions of Payara.
Docker and asadmin
To configure the Payara Sever directly in your Dockerfile can be done easily when you use so called Preboot and Postboot commands. This are asadmin commands which can be placed in separate files.
So simply create two files called post-boot-commands.asadmin and pre-boot-commands.asadmin and copy these files into your custom Payara Docker image using the COPY command in your Dockerfile:
FROM payara/server-full
# add configuration files
USER root

# Preconfigure Resources
COPY ./my-scripts/preboot-commands.asadmin $POSTBOOT_COMMANDS
COPY ./my-scripts/post-boot-commands.asadmin $POSTBOOT_COMMANDS
RUN chown payara $POSTBOOT_COMMANDS

## Copy additional deployments here
## e.g. Postgres Driver
COPY ./my-scripts/postgresql-42.2.5.jar /opt/payara/paasDomain/lib/
...
USER payara
The Preeboot and Postboot scripts can contain any asadmin command to configure your server. For example to configure a JDBC Database Pool for Postgres the command will look like this:
# Create the JDBC connection pool for Postgres:
create-jdbc-connection-pool --datasourceclassname=org.postgresql.ds.PGSimpleDataSource --restype=javax.sql.DataSource --property user=${ENV=POSTGRES_USER}:password=${ENV=POSTGRES_PASSWORD}:Url=${ENV=POSTGRES_CONNECTION} my-database

# Create the JDBC resource:
create-jdbc-resource --connectionpoolid my-database jdbc/my-database
The Payara server will automatically execute the PreBoot and PostBoot scripts during startup and creates the configuration. In case your command is wrong or misspelled you will see the error message in the log file directly in the log file.
That’s it. Now you have a stable configuration setup for a Payara Docker Image that you can easily adapt to the latest version of Payara by simply upgrading the payara version in your Dockerfile.
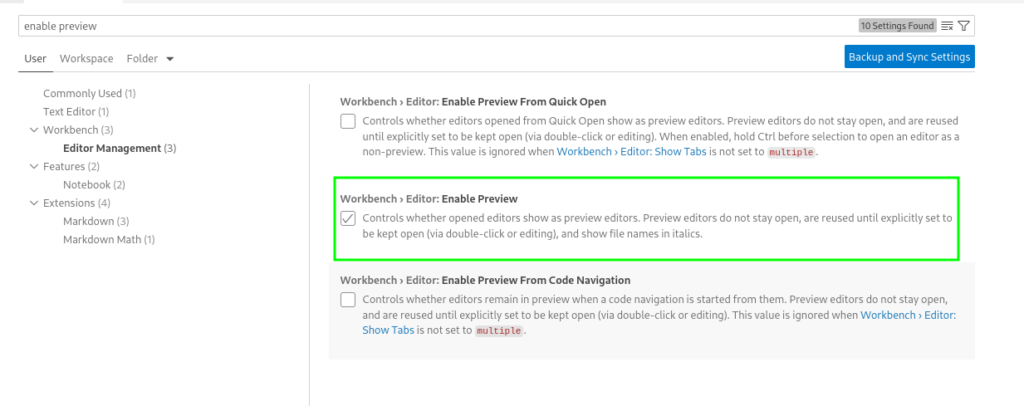
To disable to annoying feature that files will only open in a ‘preview’ mode instead each in a new Tab you can disable this featrue in settings:
Clean and Rebuild Java Projects
In some situations it may be helpful to rebuild all Java projects in your workspace
Java: Clean Java Language Server Workspace
Debug Jakarta EE Server
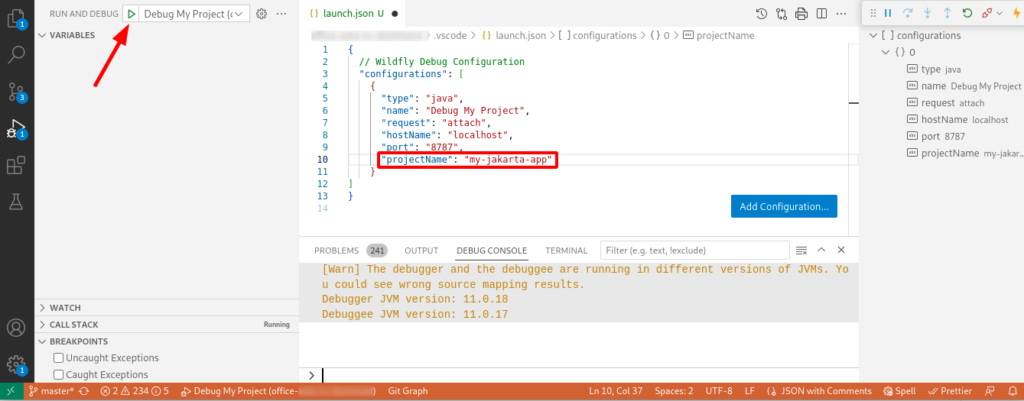
To use the Java Debugger to debug your code running in a Jakarta EE (or any Web Server) you need to create a so called launch-configuration first. Create or edit the project file .vscode/launch.json and add a configuration pointing to your remote server and project. The following example shows a configuration for Wildfyl in a project called ‘my-jakarta-app’
After creating the debug configuration you can launch the debugger:
Note: It is important that you enter the correct ‘projectName‘. If not, the debugger will not detect your sources correctly. You can see that the debug configuration is correct when the debug console print out something.
Appearance
Maybe it’s me who just gets too old, but I customize some appearance setting in vs-code to be able to work faster.
changing the ‘Tree indent’ in the Workbench Appearance from 8 to 16
SSH Key – Github Pull hangs…
In case you run into a scenario that your build-in git pull command within VSCode hangs forever, this may be an issue related to the ssh-agent (find background here).
You can test if yoru ssh-agent is running (which is necessary for VSCode) by checking the following command in a terminal:
$ ssh-add -l
The agent has no identities.
The result here shows, that not SSH IDs are available and this causes the hang in VSCode.
To solve such a situation, you can open a Terminal and enter
$ eval `ssh-agent`
$ ssh-add
This will promt you for the password of your ssh private key and register the ssh-agent with the SSH id. Now you can start VSCode:
$ code
This way VSCode will inherit the environment variables it needs to get key services from ssh-agent, and therefore will not prompt for your passphrase so long as the ssh-agent process continues running.
To automate this you can add the following script into your ~/.bashrc or ~/.bash_profile file:
if [ -z "$SSH_AUTH_SOCK" ]; then
   # Check for a currently running instance of the agent
   RUNNING_AGENT="`ps -ax | grep 'ssh-agent -s' | grep -v grep | wc -l | tr -d '[:space:]'`"
   if [ "$RUNNING_AGENT" = "0" ]; then
        # Launch a new instance of the agent
        ssh-agent -s &> .ssh/ssh-agent
   fi
   eval `cat .ssh/ssh-agent`
fi
If you open your workspace and see a message “Select a workspace folder to migrate” this can be caused by the Extension GitHub Copilot app modernization.
Try disabling the GitHub Copilot extension to avoid this popup.
The module ‘open-bpmn-app’ was ignored. As it turns out newer nx versions of lerna parse the .gitignore file in the root folder. You have to make sure that the root folder of your workspace packages is not excluded via .gitignore. In my case I had the following instructions included:
**/*-app/**
!**/*-app/package.json
By removing these two lines the problem was solved!
Today I once again came across a configuration issue in traefik.io regarding an authentication problem. Traefik is a cloud native networking solution for container platforms. It can be used for example within Kubernetes and is a build in function of K3S – a lightweight Kubernetes solution.
In K3S Traefik is used for the ingress configuration. For example to route Web traffic from an Internet domain to a specific service within your cluster.
My problem was that I wanted to install a private Docker Registry within my K3S cluster. The Docker Registry comes without any security. This is fine within a cluster, but in case you connect from outside you don’t want that your private registry is open for everyone. With Traefik you can easily secure you service. I will explain how you can do this.
JsonForms is a powerful and very flexible framework to build complex forms just from a JSON Schemata. A form can contain various different controls and controls can be separated into categories and layout sections. This makes JsonForrms a first-hand framework if you have to deal with dynamic forms in a JavaScript application.
JsonForms already provides different so called Renderer Sets to handle complex input widgets. But further more you can also create easily you own widget if you have special needs not supported by JsonForms out of the box.
Today I want to write about why comments are so important in software development and how you can improve them. For me, the most disappointing thing about good source code is when it is insufficiently commented. And this happens with closed code in the same way as with Open Source code. In the worst case, and this is usually the most common, source code is not commented at all. Especially in open source projects, this is a disdain against the community reading your code. But even in internal software projects, I consider missing comments to be a bad behaviour towards your colleagues, which should be avoided.
Of course, we all know the funny answers in this context. “Good code doesn’t need any comments” or “Take a look into the source code if you don’t understand something.” Is it laziness or ignorance not to write comments? No, I believe that many developers simply do not know how to write good comments. For this reason, I would like to explain here a very simple rule how to really improve your source code through comments.
Don’t Explain me the What and How!
The biggest mistake you can make when writing comments is assuming you have to explain what you are doing. In this case, you write comments that explain the obvious.
/**
 * Builder Class to build Events
 */
public class EventBuilder {
 ....
}
As long as the name of a class or method is not absolutely meaningless, a name should explain the usage of a class or method. So please do not explain that a Builder Class builds an object or a getter method returns an object. Writing such a comment is a waste of time. By the way, the same applies to those who have to read this kind of useless comments.
A second example for bad comments is explaining how the code works.
/**
 * Build the event and return it.
 */
public T build() {
   ....
   return event;
}
Of course, you shouldn’t assume that the users reading your code are complete idiots. You can assume that other developers can code just as well as you do. And explaining software patterns in the comment of a method or class is pointless.
So now we have seen what bad comments are. But what does a good comment look like?
Start with Why!
There is a great book from Simon Sinek with the Title “Start with Why: How Great Leaders Inspire Everyone to Take Action“. The core message of this book is, that you always should start by explaining the ‘Why’. The ‘What’ and ‘How’ are usually explaining the things later in more detail. For software developing the ‘What’ and ‘How’ is in deed in the code and needs no comments in many cases.
So starting with the ‘Why’ can make source code comments much more useful – for yourself and for others. Starting with ‘Why’ makes you think about what you’re actually doing. So going back to my previous examples a comment may look like this:
/**
 * When using Events in the client, the EventBuilder may help
 * to construct them in the correct way more easily.
 */
public class EventBuilder {
 ....
}
So instead of describing what the class is, answer the question why you have invented it. The same is true for methods. As explained before if I want to understand the ‘How’, than I can read the source code in detail. But why does the class or method exist? This is what a comment is for:
/**
 * To display the summary of an invoice in the client,
 * this method calculates the summary including all taxes.
 */
public float summarizeInvoice() {
   ....
   return event;
}
I don’t want to go into more details. It’s obvious that the better you explain why you have written a class or method, it helps others like yourself to understand your code. So when you start writing your next code, think about why you’re doing this and comment that into your class or method header. You’ll see – your colleagues and your community will love it and will much prefer using your code.
The last 3 days I tried to install kubernetes 1.25.4 on a Debian 11 (Bullseye) box without success. The problem was that the kubeadm init process always hangs with the message:
....
[wait-control-plane] Waiting for the kubelet to boot up the control plane as static Pods from directory "/etc/kubernetes/manifests". This can take up to 4m0s
I1121 08:17:12.320743    8096 round_trippers.go:466] curl -v -XGET  -H "Accept: application/json, */*" -H "User-Agent: kubeadm/v1.25.4 (linux/amd64) kubernetes/fdc7750" 'https://x.x.y.y:6443/healthz?timeout=10s'
I1121 08:17:12.321047    8096 round_trippers.go:508] HTTP Trace: Dial to tcp:x.x.y.y:6443 failed: dial tcp x.x.y.y:6443: connect: connection refused
....
Even as I tried several different tutorials and guidelines I failed to solve this issue. (See also here)
Using cri-o instead of containerd…..
Kuberentes supports different Container Runtimes. containerd is only one of them. Maybe containerd and Debian 11 are not the best friends. I don’t know…
cri-o is an alterative lightweight Container Runtime for Kubernetes. After I switched from containerd to cri-o everything worked like a charm. So here is my short guideline how to install cri-o on a fresh Debian 11 box.
Note: If you have already installed containerd you need to remove it first!
Install cri-o on Debian 11
As usual for kuberentes first make sure that you have enabled the necessary enable kernel modules and setup the iptables:
In my last blog post ‘Setup a Public Cassandra Cluster with Docker‘ I described how to setup a Cassandra Cluster with docker in a public network. The important part of this blog post was how to secure the inter-node and client-node communication in such a scenario. In this bog post I will just cover some details about migrating from version 3.11 to version 4.0.
General Upgrade from 3.x to 4.0
In general it is quite simple to upgrade a Cassandra Node form version 3.x to 4.0 because the version 4.0 can handle the table files from version 3. So at least you need to change your Docker run command pointing to a 4.0 version:
docker run --name cassandra -d \
        -e CASSANDRA_BROADCAST_ADDRESS=<YOUR-PUBLIC-IP> \
        -e CASSANDRA_SEEDS=<COMMA SEPARATED IP LIST OF EXISTING NODES> \
        -p 7000:7000 \
        -p 9042:9042 \
        -v ~/cassandra.yaml:/etc/cassandra/cassandra.yaml\
        -v ~/cqlshrc:/root/.cassandra/cqlshrc\
        -v ~/security:/security\
        -v /var/lib/cassandra:/var/lib/cassandra\
        --restart always\
        cassandra:4.0.6
The cassandra.yaml File
Before you can start the new Cassandara node, you need to update the cassandra.yaml file.
First I recommand to start a local cassandra docker container and copy the origin cassandra.yaml file from the running container. This is necessary because a lot of parameters and settings have change form version 3.x to 4.0
Now you can tweak the cassandra.yaml file. In parallel you can check your current cluster configuration from a running node with docker:
The important change is in the new parameter ‘enable_legacy_ssl_storage_port‘ which need to be set to ‘true’ during migration.
Expose Port 7000
Since version 4.0 the port 7001 is deprecated. This port was used in older version for the encrypted inter-node communication. Now port 7000 is handling both – encypted as also unencrypted communication. So it is sufficient to expose port 7000 now for inter-node communication.
But as long as your cluster contains nods running with version 3.11 you need to set the new parameter ‘enable_legacy_ssl_storage_port‘ to ‘true’. This parameter tells your 4.0 node to use still port 7001 when connecting to older nodes.
    # When set to true, encrypted and unencrypted connections are allowed on the storage_port
    # This should _only be true_ while in unencrypted or transitional operation
    # optional defaults to true if internode_encryption is none
    # optional: true
    # If enabled, will open up an encrypted listening socket on ssl_storage_port. Should only be used
    # during upgrade to 4.0; otherwise, set to false.
    enable_legacy_ssl_storage_port: true
Note: The parameter ‘enable_legacy_ssl_storage_port‘ is only needed as long as your cluster has nodes running in version 3.x. Later you ignore this param. Which is typically only during the migration phase.
If you have completed the settings you can start the node again in version 4.0.6.
Java – DataStax Driver
If you have a Java client using the DataStax Java Driver to connect to your Cassandra Cluster make sure hat you use the latest Driver verson:
<!-- DataStax Java Driver -->
<dependency>
	<groupId>com.datastax.cassandra</groupId>
	<artifactId>cassandra-driver-core</artifactId>
	<!-- for cassandra 4.0 use 3.11.3 or later -->
	<version>3.11.3</version>
	<scope>compile</scope>
</dependency>
Firewall
If you are running a firewall as explained in my last post you need take care about the new port settings. Port 7001 should no longer be needed.