Very large companies often tend to hire very large IT consulting firms to solve their IT problems. Often with moderate success. You can observe this all over the world when you read about failed big IT projects.
So why is this happening? Large IT consulting firms are perfect at telling you that they are the only ones able to solve your problem quickly and reliably. Typically, they also have a real expert who recognizes the problem very well and has an idea of a working solution. You should memorize this person’s face well, because you may never see this expert again. And he probably won’t be the one to solve your problem.
But what exactly is happening here? Why should an international big IT consulting company not be the right expert for your IT problem? To understand this, you simply think about the business model of such companies. It consists of selling you IT services at a fixed daily or hourly rate. This means that the more hours you buy, the better it is for the consulting firm. In order to further maximize profits, these companies are often looking for teams consisting of young enthusiastic university graduates. Typically in a completely different place in the world, where much lower wages are paid. It may be that you are lucky and you find an expert able to solve your problem. But it can also happen that he is confronted with this problem for the first time in his life.
So, now you have an international IT team managed by a large consulting firm and you may continue to have your original IT problem for a very long time. How can you solve this situation in a better way? It’s basically quite simple. Just take a look at the open source community. For every problem in IT, there is someone who deals with it. And if he or she makes the problem public and also publishes his proposed solution, then that’s your IT expert! If the problem is big enough, it may happen that the open source project grows a little. This means that there are now more than one experts able to solve your problem. You will save yourself a lot of money and time if you try to solve your IT problems in this way in the future.
So the biggest problem for you is actually only to find these IT experts in the open source community. However, you should not hire a large IT consulting company to search for such experts. If you’re wondering why – just read this article again from the beginning.
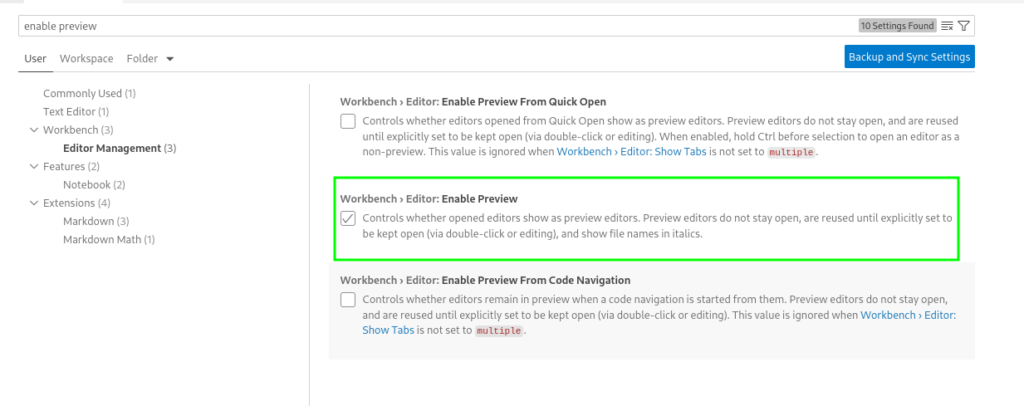
To disable to annoying feature that files will only open in a ‘preview’ mode instead each in a new Tab you can disable this featrue in settings:
Clean and Rebuild Java Projects
In some situations it may be helpful to rebuild all Java projects in your workspace
Java: Clean Java Language Server Workspace
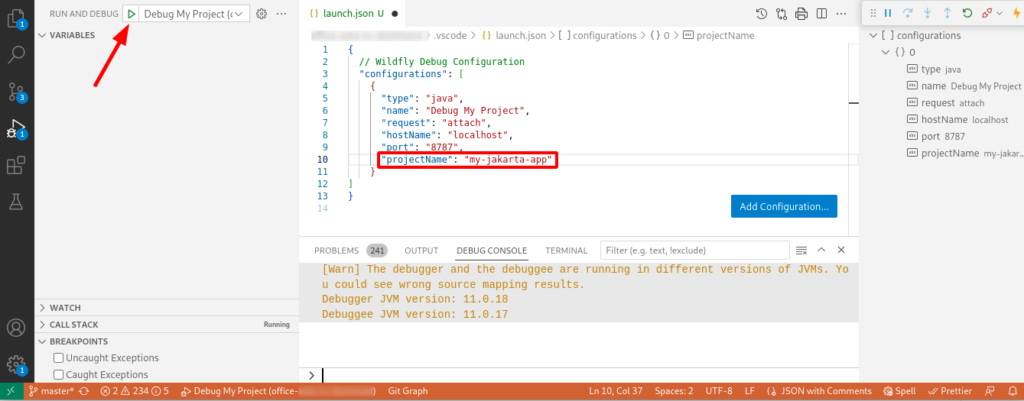
Debug Jakarta EE Server
To use the Java Debugger to debug your code running in a Jakarta EE (or any Web Server) you need to create a so called launch-configuration first. Create or edit the project file .vscode/launch.json and add a configuration pointing to your remote server and project. The following example shows a configuration for Wildfyl in a project called ‘my-jakarta-app’
After creating the debug configuration you can launch the debugger:
Note: It is important that you enter the correct ‘projectName‘. If not, the debugger will not detect your sources correctly. You can see that the debug configuration is correct when the debug console print out something.
Appearance
Maybe it’s me who just gets too old, but I customize some appearance setting in vs-code to be able to work faster.
changing the ‘Tree indent’ in the Workbench Appearance from 8 to 16
SSH Key – Github Pull hangs…
In case you run into a scenario that your build-in git pull command within VSCode hangs forever, this may be an issue related to the ssh-agent (find background here).
You can test if yoru ssh-agent is running (which is necessary for VSCode) by checking the following command in a terminal:
$ ssh-add -l
The agent has no identities.
The result here shows, that not SSH IDs are available and this causes the hang in VSCode.
To solve such a situation, you can open a Terminal and enter
$ eval `ssh-agent`
$ ssh-add
This will promt you for the password of your ssh private key and register the ssh-agent with the SSH id. Now you can start VSCode:
$ code
This way VSCode will inherit the environment variables it needs to get key services from ssh-agent, and therefore will not prompt for your passphrase so long as the ssh-agent process continues running.
To automate this you can add the following script into your ~/.bashrc or ~/.bash_profile file:
if [ -z "$SSH_AUTH_SOCK" ]; then
   # Check for a currently running instance of the agent
   RUNNING_AGENT="`ps -ax | grep 'ssh-agent -s' | grep -v grep | wc -l | tr -d '[:space:]'`"
   if [ "$RUNNING_AGENT" = "0" ]; then
        # Launch a new instance of the agent
        ssh-agent -s &> .ssh/ssh-agent
   fi
   eval `cat .ssh/ssh-agent`
fi
If you open your workspace and see a message “Select a workspace folder to migrate” this can be caused by the Extension GitHub Copilot app modernization.
Try disabling the GitHub Copilot extension to avoid this popup.
Eclipse is an IDE providing a lot of tools to develop software in various languages. Installing Eclipse is just download the latest version and unzipping it somewhere in your home folder.
But Eclipse comes with some non optimal default settings. So it’s better to fix these settings before you start coding.
Change the Memory Settings
First open the eclipse.ini file located in your install folder. You will find the following memory settings:
-Xms256m
-Xmx2048m
This settings are typical to low if you have 8G or more memory available in your notebook. So double both values first:
-Xms512m
-Xmx4g
Change the Workspace Settings
After your launched Eclipse you should change some other default settings in the preference dialog. Open Window -> Preferences and change the following defaults:
General -> Workspace: change the ‘Text file encoding’ to UTF-8
General -> Workspace : change ‘New Text file line delimiter’ to Unix
You all know the Single Page Layout of HTML pages. It means you have mainly only one page loaded. The page splits up the layout into different sections to get a clear and modern page design. There are a lot of web sites explaining this kind of modern web design and you can find hundreds of templates on different places like onepagelove.com. I also picked up such a design template to build a new site. As always the template is not perfect and you want to tweak it a little bit, to get your own individual style. After I looked into the CSS file and the layout setup, I was shocked. The CSS consisted of more then 2400 lines of code! And each HTML tag was applied with more than 5 style classes in average. For example a simple section within a 2-column layout looked something like this:
So I asked my self: is this complexity needed? You may guess it – my answer is ‘no’. Now let me explain what is needed for a simple single page layout.
The Grid Layout
To design a good-looking website, you need to follow the principle of the golden ratio. This principle was discovered by Leonardo Da Vinci 500 years ago and is nothing new. To make it short: you split up your page into 12 columns and place the elements inside. For example to get an 2/3 ratio you place one block into columns 1-4 and the rest into 5-12.
Often this is archived with defining a lot col-classes for each ratio like this:
You my see this kind of css classes in many many layouts. But you don’t need this as you can use the grid design rule supported today by all modern browsers.
To use the grid layout you simply define your container class as a grid with 12 columns. The browser overtakes the column layout for you. See the following example:
If you inspect the page with your browsers developer tools, you can see that the section is divided into 12 parts like Leonardo Da Vinci would do it.
So this is quite simple. And I do not use any css classes for my column sections. It is quite enough if you set the grid-column-start directly in the style attribute.
Finally you may want to get more responsive. My first example has a minimal width of 768px as each column is defined with a minim width of 64px. In small displays this is not perfect. So lets define a responsive design to cancel out 12 column ration if the display is smaller then 768 px. This can be done with a @meia definition:
This code creates a flexible “auto-responsive” grid in which elements are always at least 280 pixels wide. But now, the grid automatically reduces the number of columns as soon as the width falls below 280 pixels.
So we simply changed from 12 columns to responsive design. Thant’s it.
In case you want to document a network diagram in a fast way without using a graphical tool, you can find the necessary ASCII characters on this wiki page . In this way you can draw boxes and connectors. See the following example.
Once you have developed a project under Java EE8 or Jakarta EE8, sooner or later you will get to the point where you need to migrate to Jakarta EE9. The most important part is to replace the old Java package names javax.* with jakarta.* . The renaming of the package names is needed for all EE packages but some other packages like javax.xml.* are still valid. So you need to be careful. But with a shell script this works well as you will see.
Change the Maven Dependency
Fist of all you should change the maven dependencies in your project:
Replace the maven java compiler plugin to source and target version 11 if not yet done
If you have removed the old JavaEE8 dependency and added the new Jakarta EE 9 dependency you should see a lot of compiler errors in your Java files because of the wrong import package names.
Replace javax.* with jakarta.*
You can run the following shell script against your java code. This script will replace the java package names automatically for all your java files. Just place the script into the root of your project and run the script from there. (The script is written for Linux OS but I guess you can adapt it to Windows Power Shell if needed):
During testing Ceph & Kubernetes in combination with the ceph-csi plugin in run into a problem with some of my deployments. For some reason the deployment of a POD failed with the following event log:
Events:                                                                                                                                                                                                Type     Reason            Age                From                 Message
---------------------------------------------------------------------------------------------
Warning  FailedScheduling  29s                default-scheduler        0/4 nodes are available: 4 persistentvolumeclaim "index" not found.
Warning  FailedScheduling  25s (x3 over 29s)  default-scheduler        0/4 nodes are available: 4 pod has unbound immediate PersistentVolumeClaims.
Normal   Scheduled         11s                default-scheduler        Successfully assigned office-demo-internal/documents-7c6c86466b-sqbmt to worker-3
Warning  FailedMount       3s (x5 over 11s)   kubelet, worker-3  MountVolume.SetUp failed for volume "demo-internal-index" : rpc error: code = Internal desc = mount failed: exit status 32
Mounting command: mount
Mounting arguments: -t ext4 -o bind,_netdev /var/lib/kubelet/plugins/kubernetes.io/csi/pv/demo-internal-index/globalmount/demo-internal /var/lib/kubelet/pods/af2f33e0-06da-4429-9f75-908981cb85c3/volumes/kubernetes.io~csi/demo-internal-index/mount
Output: mount: /var/lib/kubelet/pods/af2f33e0-06da-4429-9f75-9034535485c3/volumes/kubernetes.io~csi/demo-internal-index/mount: special device /var/lib/kubelet/plugins/kubernetes.io/csi/pv/demo-internal-index/globalmount/demo-internal does not exist.
The csi-plugin logs messages like:
 csi-rbdplugin Mounting command: mount
 csi-rbdplugin Mounting arguments: -t ext4 -o bind,_netdev /var/lib/kubelet/plugins/kubernetes.io/csi/pv/demo-internal-index/globalmount/demo-internal-imixs /var/lib/kubelet/pods/af2f33e0-34535-4429-
 9f75-908981cb85c3/volumes/kubernetes.io~csi/demo-internal-index/mount
 csi-rbdplugin Output: mount: /var/lib/kubelet/pods/af2f33e0-06da-4429-35445-908981cb85c3/volumes/kubernetes.io~csi/demo-internal-index/mount: special device /var/lib/kubelet/plugins/kubernetes.io/cs
 i/pv/demo-internal-index/globalmount/demo-internal does not exist.
 csi-rbdplugin E0613 15:56:55.814449   32379 utils.go:136] ID: 33 Req-ID: demo-internal-imixs GRPC error: rpc error: code = Internal desc = mount failed: exit status 32
 csi-rbdplugin Mounting command: mount
 csi-rbdplugin Mounting arguments: -t ext4 -o bind,_netdev /var/lib/kubelet/plugins/kubernetes.io/csi/pv/demo-internal-index/globalmount/demo-internal /var/lib/kubelet/pods/af2f33e0-06da-5552-
 9f75-908981cb85c3/volumes/kubernetes.io~csi/demo-internal-index/mount
 csi-rbdplugin Output: mount: /var/lib/kubelet/pods/af2f33e0-06da-4429-9f75-908981cb85c3/volumes/kubernetes.io~csi/demo-internal-index/mount: special device /var/lib/kubelet/plugins/kubernetes.io/cs
 i/pv/demo-internal-index/globalmount/demo-internal does not exist.
After investigating many hours, I figured out that on the corresponding worker node there was something wrong with the corresponding PV directory
In this Blog Post I will explain how you can integrate the LibreOffice Online Editor into your Web Application.
In my example I will use a very simple approach just to demonstrate how thinks are working. I will not show how you integrate the editor with a iFrame into your web application because I assume that if you plan to integrate LibreOffice Online into your own application you are familiar with all the web development stuff.
In this blog post I will document the way, we at Imixs-Workflow migrated from Java EE to Jakarta EE 9. The Java Enterprise Stack has always been known for providing a very reliable and stable platform for developers. We at Imixs started with Java EE in the early beginnings in the year 2003. At that time Java EE was not comparable to the platform we know today. For me the most impressive part of the journey with Java EE over the last 17 years was the fact, that you can always trust on the platform. Even if new concepts and features where introduced, your existing code worked. For a human-centric workflow engine, like our open source project Imixs-Workflow, this is an important aspect. A workflow engine have to be sustainable. A long running business process my take years from its creation to its final state. An insurance process is one example of this kind of a business process. I personally run customer projects, started running Imixs-Workflow on Glassfish, switched to JBoss, migrated to Payara and run today on Wildfly. Upgrading the Java EE version and switching the server platform was never something special about which you had to write a lot. But with Jakarta EE9 the situation changed dramatically.