The OpenSource application server OpenLiberty from IBM is very suitable for running microservices and web applications in production. But also for development, the server offers a very good support of autodeploy and hotdeployment.
Per default you can simply drop a new .war file into the folder /config/dropins/ and OpenLiberty will immediately deploy your application. You can configure the behavior of dropins in detail in the server.xml file.
For example, if you add the following tag into your server.xml file:
...
 <applicationManager autoExpand="true" />
....
then your application will be automatically expanded into a new folder at
${server.config.dir}/apps/expanded/APP_NAME/
Now when you deploy your application you will have a file layout like this:
./server.xml
./dropins/myapplication.war
./apps/expanded/myapplication.war/my-page.jsf
./apps/expanded/myapplication.war/WEB-INF/classes/com/foo/SomeAppClass.class
In case you use autoexpand=true than the “active” set of files will be the files under the apps/expanded/ folder which you can then hot-update. This approach is useful if you want to deploy a single .war file and then make tweaks to it after you deploy it, such as in dev mode.
javax.faces.PROJECT_STAGE
Note that the hot-deployment for JSF files is only working if your PROJECT_STAGE param is set to ‘development’. So if not yet activated add the following into your web.xml file:
<context-param>
	<param-name>javax.faces.PROJECT_STAGE</param-name>
	<param-value>Development</param-value>
</context-param>
For production it is recommended to set the parameter to ‘Production’. In this mode JSF files will be cached by OpenLiberty internally.
Alternatively you can set the param ‘javax.faces.FACELETS_REFRESH_PERIOD’ to 1 which will also force OpenLiberty to scann for changed JSF files and class files:
<context-param>
 	<param-name>javax.faces.FACELETS_REFRESH_PERIOD</param-name>
    	<param-value>1</param-value>
</context-param>
Manik Hot-Deply Plugin
With the Eclipse Hot-Deploy Plugin ‘Manik’ you can enable autodeploy and hot-deploy easily for OpenLiberty.
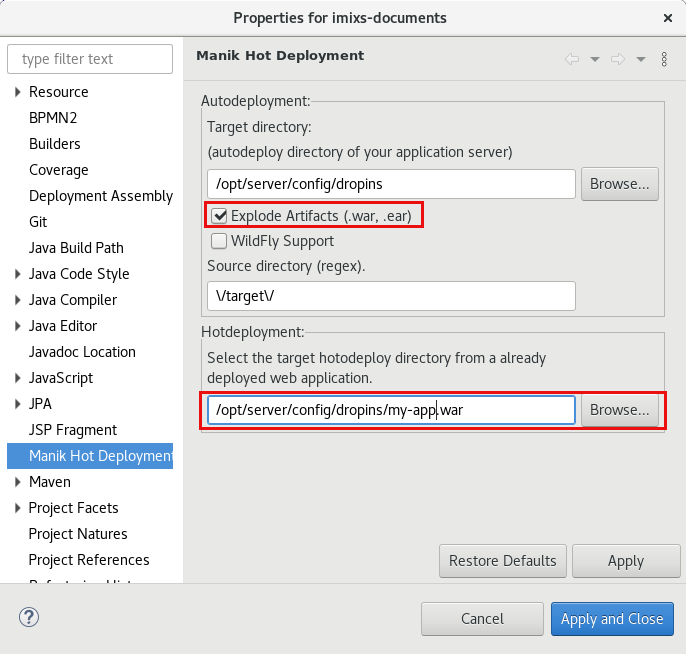
If you use the Option ‘Explode Artifacts’ you can deploy the .war as a folder directly into the /config/dropins/ folder of your OpenLiberty installation. The Hotdeployment directory is than the .war/ sub directory after the first deployment. You can disable the ‘autoExpand’ feature of OpenLiberty in this case. See also the discussion here.