
In my last blog about Traefik I showed how you can setup Traefik version 1.7 in a Kubernetes cluster. In this blog I will explain how to use the latest version 2.1 of Traefik. Version 2.x Traefik implements some new concepts and need of course a different setup. This blog post assumes that you have already an up and running Kubernetes master node and at lease one worker node. See also my Blog ‘From docker-swarm to kubernetes. You can find also detailed information in the official traefik website. A helpful tutorial can also be found here.
Setup Traefik 2.1
First you need to provide some description files for traefik installation in Kubernetes. First create a application directory:
$ mkdir traefik21
Within this directory you can create the different yaml files describing your application. It’s a good practice to describe your configuration in separate files. Each file should have a number-praefix which is useful for deployment, changes and deleting your application. For the traefik load-balancer configuration we need at least 3 files.
001-rbac.yaml
In the first file you specify the cluster role bindings to allow traefik to detect your services automatically:
---
apiVersion: apiextensions.k8s.io/v1beta1
kind: CustomResourceDefinition
metadata:
  name: ingressroutes.traefik.containo.us

spec:
  group: traefik.containo.us
  version: v1alpha1
  names:
    kind: IngressRoute
    plural: ingressroutes
    singular: ingressroute
  scope: Namespaced

---
apiVersion: apiextensions.k8s.io/v1beta1
kind: CustomResourceDefinition
metadata:
  name: ingressroutetcps.traefik.containo.us

spec:
  group: traefik.containo.us
  version: v1alpha1
  names:
    kind: IngressRouteTCP
    plural: ingressroutetcps
    singular: ingressroutetcp
  scope: Namespaced

---
apiVersion: apiextensions.k8s.io/v1beta1
kind: CustomResourceDefinition
metadata:
  name: middlewares.traefik.containo.us

spec:
  group: traefik.containo.us
  version: v1alpha1
  names:
    kind: Middleware
    plural: middlewares
    singular: middleware
  scope: Namespaced

---
apiVersion: apiextensions.k8s.io/v1beta1
kind: CustomResourceDefinition
metadata:
  name: tlsoptions.traefik.containo.us

spec:
  group: traefik.containo.us
  version: v1alpha1
  names:
    kind: TLSOption
    plural: tlsoptions
    singular: tlsoption
  scope: Namespaced

---
apiVersion: apiextensions.k8s.io/v1beta1
kind: CustomResourceDefinition
metadata:
  name: traefikservices.traefik.containo.us

spec:
  group: traefik.containo.us
  version: v1alpha1
  names:
    kind: TraefikService
    plural: traefikservices
    singular: traefikservice
  scope: Namespaced


---
kind: ClusterRole
apiVersion: rbac.authorization.k8s.io/v1beta1
metadata:
  name: traefik-ingress-controller
rules:
  - apiGroups:
      - ""
    resources:
      - services
      - endpoints
      - secrets
    verbs:
      - get
      - list
      - watch
  - apiGroups:
      - extensions
    resources:
      - ingresses
    verbs:
      - get
      - list
      - watch
  - apiGroups:
      - extensions
    resources:
      - ingresses/status
    verbs:
      - update
  - apiGroups:
      - traefik.containo.us
    resources:
      - middlewares
      - ingressroutes
      - traefikservices
      - ingressroutetcps
      - tlsoptions
    verbs:
      - get
      - list
      - watch

---
kind: ClusterRoleBinding
apiVersion: rbac.authorization.k8s.io/v1beta1
metadata:
  name: traefik-ingress-controller
roleRef:
  apiGroup: rbac.authorization.k8s.io
  kind: ClusterRole
  name: traefik-ingress-controller
subjects:
  - kind: ServiceAccount
    name: traefik
    namespace: kube-system
002-deployment.yaml
The second config file contains the Traefik deployment description. If you plan to run Traefik 2.0 with LetsEncrypt enabled, you should run Traefik on a single instance, however this could be a single point of failure. But this is the only way to ensure that the certificates are not stored on different instances. For that reason I am running Traefik as a deployment on a single node. I will run traefik in the kube-system namespace. Note also that I use the latest version 2.1.
apiVersion: apps/v1
kind: Deployment
metadata:
  labels:
    app: traefik
    release: traefik
  name: traefik
  namespace: kube-system

spec:
  replicas: 1
  selector:
    matchLabels:
      app: traefik
      release: traefik
  template:
    metadata:
      labels:
        app: traefik
        release: traefik
    spec:
      containers:
      - args:
        - --api.insecure
        - --accesslog
        - --global.checknewversion=true
        - --entryPoints.traefik.address=:8100
        - --entryPoints.web.address=:80
        - --entryPoints.websecure.address=:443
        - --certificatesresolvers.default.acme.tlschallenge
        # Please note that this is the staging Let's Encrypt server configuration.
        # Once you get things working, you should remove that following line.
        - --certificatesresolvers.default.acme.caserver=https://acme-staging-v02.api.letsencrypt.org/directory
        - --certificatesresolvers.default.acme.email={YOUR-E-MAIL}
        - --certificatesresolvers.default.acme.storage=acme.json
        - --api.dashboard=true
        - --ping=true
        - --providers.kubernetescrd
        # Use log level= INFO or DEBUG
        - --log.level=INFO
        image: traefik:2.1.4
        imagePullPolicy: IfNotPresent
        livenessProbe:
          failureThreshold: 3
          httpGet:
            path: /ping
            port: 8100
            scheme: HTTP
          initialDelaySeconds: 10
          periodSeconds: 10
          successThreshold: 1
          timeoutSeconds: 2
        name: traefik
        ports:
        - containerPort: 8100
          name: admin
          protocol: TCP
        - containerPort: 80
          name: web
          protocol: TCP
        - containerPort: 443
          name: websecure
          protocol: TCP
        readinessProbe:
          failureThreshold: 1
          httpGet:
            path: /ping
            port: 8100
            scheme: HTTP
          initialDelaySeconds: 10
          periodSeconds: 10
          successThreshold: 1
          timeoutSeconds: 2
        resources: {}
        terminationMessagePath: /dev/termination-log
        terminationMessagePolicy: File
      dnsPolicy: ClusterFirst
      restartPolicy: Always
      schedulerName: default-scheduler
      securityContext: {}
      serviceAccount: traefik
      serviceAccountName: traefik
      terminationGracePeriodSeconds: 60
In this configuration I disabled Let’s Encrypt to show the core functionallity. Later you can of course un-comment the parts to enable Lets’ Encrypt.
003-ingressroute.yaml
The last file defines a ServiceAccount named ‘traefik’ and the service exposing the traefik dashboard as also the http and https ports.
Note: replace the {YOUR-CLUSTER-NODE-IP} with the IP address of your worker node traefik is running. Also take notice that I map the dashboard to the port 8100 which is per default port 8080.
# ServiceAccount
---
apiVersion: v1
kind: ServiceAccount
metadata:
  name: traefik
  namespace: kube-system

# Service
---
apiVersion: v1
kind: Service
metadata:
  labels:
    app: traefik
    release: traefik
  name: traefik
  namespace: kube-system
spec:
  externalIPs:
  - {YOUR-CLUSTER-NODE-IP}
  externalTrafficPolicy: Cluster
  ports:
  - name: web
    nodePort: 31909
    port: 80
    protocol: TCP
    targetPort: 80
  - name: websecure
    nodePort: 30584
    port: 443
    protocol: TCP
    targetPort: 443
  - name: admin
    nodePort: 32316
    port: 8100
    protocol: TCP
    targetPort: 8100
  selector:
    app: traefik
    release: traefik
  sessionAffinity: None
  type: LoadBalancer
status:
  loadBalancer: {}
From this point you can start the Traefik service using the kubectl apply command:
$ kubectl apply -f traefik21/
This will apply all of the configuration objects in the folder traefik21/.
This basic setup opens the traefik dashboard in the ‘insecure’ mode with the option –api.insecure. So you should be able to access the dashboard from one of your worker nodes on port 8100 directly (below I will show how to secure the dashboard).
http://my-workernode:8100/dashboard
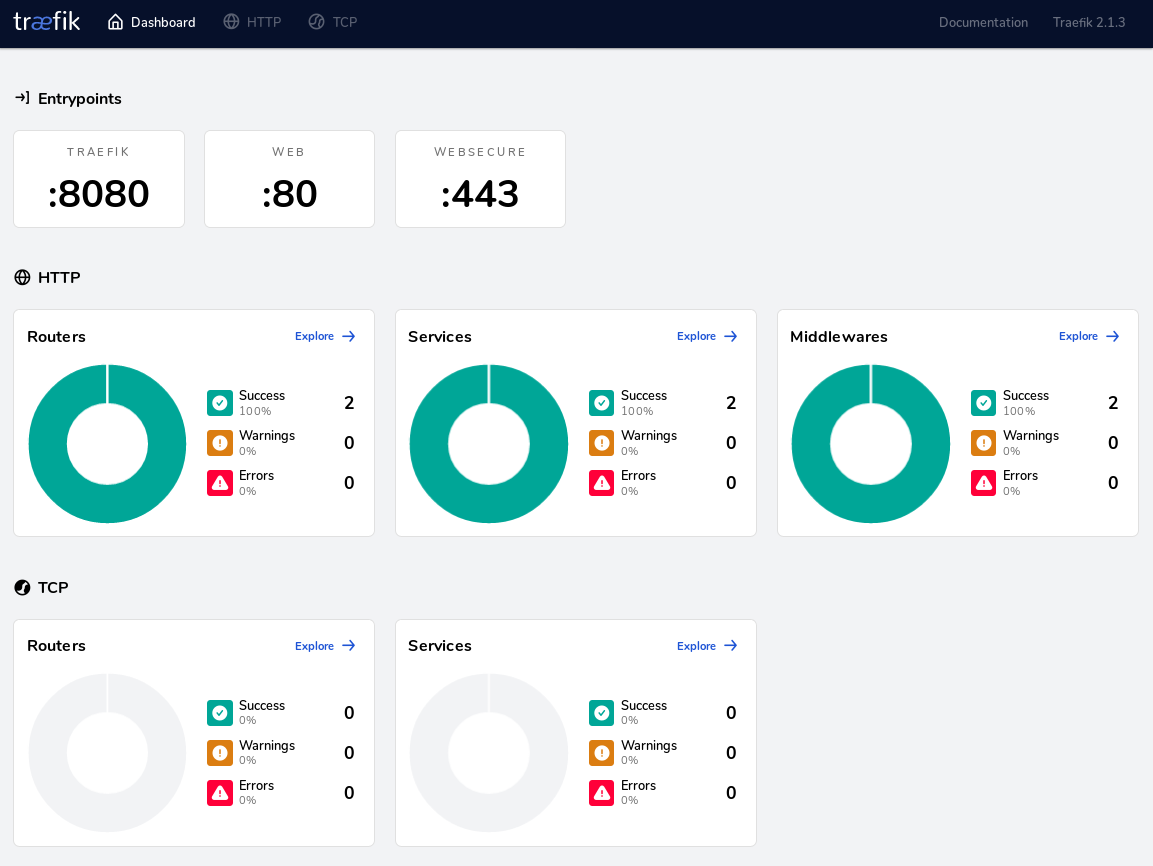
You can learn more about the Traefik Dashboard here.
Debugging
To verify what is going on you can print the logfile:
$ kubectl get pods  --namespace kube-system
$ kubectl  --namespace kube-system logs traefik-ingress-controller-XX
You can also switch traefik into debug mode which will provide you with much more information in the log files. Just change the argument log.level in the 002-daemon.yaml file from INFO to DEBUG
....
        args:
        - --log.level=DEBUG
.....
Publish a Service via Traefik Load Balancer
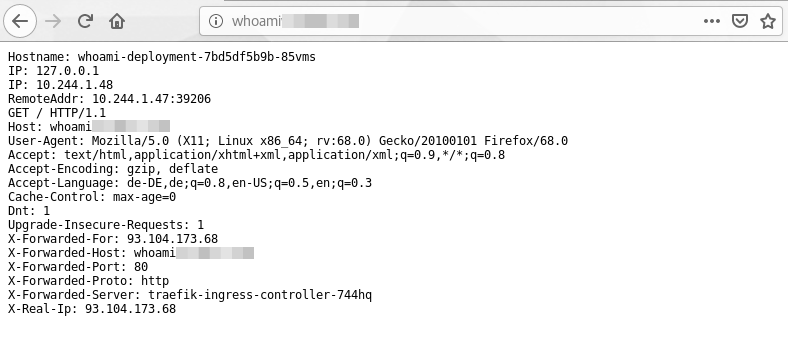
After your traefik load balancer was successful deployed you can now publish you application services via traefik to the internet. In this section I will demonstrate the setup using the whoami service which is a simple web service telling some details about its host.
Again first create a deployment directory
$ mkdir whomai
Next we create again 3 configuration files.
001-deployment.yml
The first file contains the whoami container deployment
# Deployment
---
kind: Deployment
apiVersion: apps/v1
metadata:
  namespace: default
  name: whoami
  labels:
    app: whoami
spec:
  replicas: 1
  selector:
    matchLabels:
      app: whoami
  template:
    metadata:
      labels:
        app: whoami
    spec:
      containers:
      - name: whoami-container
        image: containous/whoami
        ports:
          - name: web
            containerPort: 80
002-service.yaml
In the second file I describe the service which is simply publishing the port 80 of the web application:
# Service
---
kind: Service
apiVersion: v1
metadata:
  name: whoami

spec:
#  type: ClusterIP
  ports:
  - protocol: TCP
    port: 80
    name: web
  selector:
    app: whoami
As mentioned earlier, the objects can also be described in one single yaml file. However, it is good practice to separte the different aspects in different files.
003-ingressroute.yaml
Until now we have only described the whoami application which is fine for internal usage. But if we want to access the service from outside we need the ingress configuration. This is our third file :
# IngresRoute
---
kind: IngressRoute
apiVersion: traefik.containo.us/v1alpha1
metadata:
  name: whoami
  namespace: default

spec:
  entryPoints:
    - web
  routes:
  - match: Host(`{YOUR-WORKER-NAME}`)
    kind: Rule
    services:
    - name: whoami
      port: 80
Again you replace the placeholder {YOUR-WORKER-NAME} with a dns name pointing to your worker node.
To deploy the app run the kubectl apply command:
$ kubectl apply -f whoami/
Traefik will detect the new pod and your new service will shortly be visible in the traefik admin ui:

If every went fine you can now access your application from your web browser using the dns name defined in the ingress configuration:
http://{YOUR-WORKER-HOST-NAME}/
Secure Traefik
TBD…
how about secure https for whoami
Yes, of course, you are right. This can be done with the traefik middlewares configuration. Find the complete guideline here: https://github.com/imixs/imixs-cloud/blob/master/doc/INGRESS.md
Wow. I dont know how many times I have tried to migrate to k8s from docker swarm but am always failing because all the other tutorials on the internet assume you are using AWS, AZURE or GCP.
No one talks about setting up a cluster on a VPS. Your tutorial is fantastic. Thank you. Let me try setting up my cluster now
Thank you for this. Documentation on Traefik is very verbose, but somehow misses the initial parts of giving some practical setup examples and assumes a lot.
I think the most common scenario for Kubernetes is: you have some pod(s) with a service on http.
You want to expose this to the outside world on https.
You want to expose this internally on http (for testing / debugging purposes).
You’re probably on either a cloud provider or bare metal with metalLB, so can use a loadbalancer address.
You have a domain somewhere that points to a loadbalancer IP.
I’d love to see a further tutorial that focuses on getting those last steps in place.
Thanks for your feedback. Also take a look at my updated blog for traefik 2.2
https://ralph.blog.imixs.com/2020/04/05/traefik-v2-2-and-kubernetes-ingress/
Thanks for the quick reply Ralph!
I got most things up and running, but when I try to create an ingress I get the error:
“Error from server (InternalError): error when creating “ingress.yaml”: Internal error occurred: failed calling webhook “validate.nginx.ingress.kubernetes.io”: Post https://ingress-nginx-controller-admission.ingress-nginx.svc:443/extensions/v1beta1/ingresses?timeout=30s: service “ingress-nginx-controller-admission” not found”
FWIW: I’ve been at this for a bit and used to have nginx ingress installed (but removed it in favor of traefik2).
I’ve followed (and combined) both this and your 2.2 tutorial. When I create an ingress via your way it gives me this error. When I create an ingressroute it seems to work, but I get no certificate.
Hey Ralph,
thanks for this super helpfull tutorial.
Any chance you can give me some tipps how to secure the Dashboard?
To be honest, I switched form Traefik to NGINX Ingress Controller which has not such a complexity and is sufficient for most use cases. See my documentation here: https://github.com/imixs/imixs-cloud/blob/master/doc/INGRESS.md
Thanks, for the tip.
After days of being totally confused and frustrated by traefik, I just setup Nginx Ingress Controller and configed my cluster in about an hour.